Combination IgmnlvlsInn{_] VCR Operating Instructions Model No. VV-1330S / ...... As an ENERGY STAR _ partner, Matsushita Electric Corporation of America has determined that this product or product model meets the ENERGY STAR _ guidelines for energy efficiency• _- _J _ Please read these instructions carefully before attempting to connect, operate or adjust this product. Please save this manual. Spanish Quick Use Guide is included. (Gufa para rapida consulta en espaSol est& incluida.
Important Safeguards andPrecautions [ OPERATING INSTRUCTIONS. HEED ALL I READ AND RETAIN ALL SAFETY WARNINGS IN THE MANUAL AND AND ON UNIT { G OUNDINGPL G A TI N: The plug requires a three-hole grounding outlet. If necessary, have an electrician install the proper outlet. Do not tamper with the plug. 3 POWER CORD To avoid unit malfunction, and to protect against electrical shock, fire or personal injury: - Keep power cord away from heating appliances and walking traffic.
Safety Precautions/Mesures de securite Warning: To prevent fire or shock hazard, do not expose this equipment to rain or moisture. Caution: To prevent electric shock, match wide blade of plug to wide slot, fully insert. Avertissement: Afin de prevenir tout risque d'incendie ou de chocs electriques, ne pas Attention: exposer cet appareil a la pluie ou a une humidite excessive.
ImportantSafeguardsandPrecautions.•. 2 To Before Using .................................. Start! • Accessories .................... 6 • Record/Playback Time ... 6 • SELF-DEMO Mode ......... 6 6 * Loading the Batteries ..... 6 • Prevent Accidental Tape Erasure .................. 6 TV Operation ................................ 10 (Main Operation, Using the 100 Key, Rapid Tune, Audio Mute, Phones ) Use Now! Picture Adjustment ..................... 11 Timer Recording ..................
Connections ............................................................... 7 • Outdoor Antenna Connections ...... 7 • DSS/Cable box Connections ......... 7 One Time Setup ................................................... 8 - 9 (Language, Channel, Clock) Playback a Tape ....................................................... 12 (Main Operation, Forward or Reverse Search, Still Picture, Slow Motion, Frame by Frame Advance, Features for a Quality Picture) Record On a Tape .........................
Congratulations on your purchase of one of the most sophisticated and reliable products on lhe market today Used properly, it will bring you and your famJJy years of enjoyment. Please fill in the information below. The serial number Js on the tag located on the back of your unit. Date of Purchase Dealer Purchased From Dealer Address Dealer Phone No. Model No. VV-1330S Serial No. With Power ON, hold down PLAY/REPEAT on the unit for 5 seconds to deactivate the SELF-DEMO Mode.
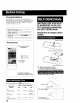
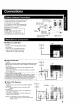
Unhook theantenna fromyourprevious TV orVCRandconnect ittothebackofthe unitasshowninthediagram• If yourantenna system hasseparate UHF andVHFlead-ins, youneeda UBF/VHF BandMixer(notsupplied•) WARNING: When using "Nut type" RF coaxial cables, tighten with fingers only. Overtightening may damage terminals. • Without a Cable Box : You can; • record or view unscrambled channels. You cannot; • record or view scrambled channels• • view a channel other than the one selected for any type of recording.
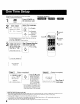
When the unit is turned on the first time, setup mode is entered automaticai}y 1 I Process of Setup the remote or unit. Press POWER on _ SELECT LANGUAGE Select the language. PUSH CH • :English OPRIMfR CH • :EspaSol ,_- - for English v APP. VOL + _0 :Fran_aJs for Spanish FVOL {EspaSot) ,(_ -for French + (Frangais) ,2CHANNEL UP POWER1 • If wrong language is set, complete "Reset all unit Memory Functions" steps page 35. • If you use a cable box, it must be left on.
_ SetTIME ZONE ACTION 2 ADJUST. Display MAIN MENU. Press ACTION. _u_E] SEL£_'T:& SET • H l, "q • :ACTION ,o j ACTION SET @k End setup. Press ACTION twice. •TIME ZONE ADJUST returns to "0" if clock is set manually. screen. SET I S INCOMPLETE j ACT ION TO SET \1/ SET CLOCK CLOCK a c Q • This unit's calendar is accurately maintained up to Dec. 31, 2089, 1! :59 PM. • Channel auto set selects normal TV or Cable channels depending on your unit hookup.
Press POWER on the remote or unit. O8 ASC [_lPcheck list before you begin. [] All connections are made. (See page 7.) Your unit is plugged in. Select a channel. Ec_ ; Using CH &V NUMBERED or or keys. c5&6 6cb6 _cb Adjust PLAY/ REPEAT volume. [ VOL Press VOL + -. ,O =_+ I 24 III!fllllll ......................
Display MAIN MENU. Press ACTION. ACTION i, CD MAIN Display SET UP TV screen. MENU 1) Press ,LV_ Ib" CH S_CT:A SET 3 CLC(_ EXIT • • • KEY :ACTION KEY SET 1 J _':' _ I _'c:_!(D to select "TV." 2) Press ACTION to display. ACTION 0 Display UP TM LOCK CAPTION 3A:CH UP V:CH DOWN 41_ :VOL UP "_ :VOL DOWN VIDEO ADJUST screen. :TUNER SELECT:A • KEY SET :" KEY END :ACTION KEY I r,__ _:_ _ 1) select. Press Ay to "_,C:3-* !_:3 , 2) Press I_ to , display.
[_lPCheck list before you begin. [_ All connections are made (See page 7.) _] Your unit is plugged in. 1 Insert a cassette. •Ttle unit power comes on automatically. O X To prevent tape jam Inspect your cassette tapes and remove any loose or peeling labels. 2l jPr°s'P'A • Playback begins it cassette has no record tab.
[_lPCheck list before you begin. [] All connections are made. (See page 7) [_ Your unit is plugged in. [] Cassette with record tab in place (F Insert a cassette. • The unit power comes on automatically. Select Channel. Press CH AV, or NUMBERED keys. 2I;s 3 CD 6_ L • To select "LINE," see bottom of this page. Select SPEED Recording speed (see page 6.) Press SPEED. ACTION SP = Standard Play LP = Long Play SLP = Super Long Play \\ SET/ SELECT A:CH UP v:CH DOWN I_:VOL UP 4 :VOL DOWN • Selecte
You can set up to 8 programs to be recorded while you are away. [_l_Check _PROG i 2 sET i Display screen" SET PROGRAM Press PROG Select TIMER PROGRAM. PROGRAM [_] [_] [_ [_ [_] list before you begin. NI connections are made (See page 73 Your unit is pJugged in. The clock is set to correct time The tape is long enough. The record lab is in place 1) Press ,&V rvct FC_ ] ,(D =O I tO select. .o =¢P 2) Press•to I display.
5i 1Enotheprogram ---?_'_-iii ---?!i_--i.: -: SELECT ENTER END PROG Press PROG (or ACTION.) Cancel a Timer Recording: (Recording is in progress) Hold down STOP for a few seconds to cancel the Timer Recording. 1-8:A • KEY :1,- KEY : PROS/ACTION KEY To Enter More Programs Press AV and • to select and set a blank program number, and then repeat steps 3 and 4. • Any future daily or weekly recordings will be pedormed as programmed. ] Exit this mode. / Press PROG (or ACTION) twice.
_lPCheck This unit can be set to automatically power on in one of 2 modes (TV, Playback) You can also combine the On-Timer with a one minute alarm that gradually increases in volume. PROG (_ _ 2 SET list before you begin. [_ The clock is set to correct time. I screen. Display SET PROGRAM Press PROG. Select PROGRAM ON-TIMER. I r'o_ _9! re. ,o _ING to select. 1)PressAY /P,ess, display. to SELECT:& • KEY SET :l_ KEY B*qD :PRQG KEY Set the ON-TIMER I TIME. 1) Press AV to .
This unit can be set 1orauto power off. ! Set SLEEP R TIMER. Press SLEEP repeatedly. • Pressing DISPLAY with sleep timer set displays remaining time. ' To Cancel, press SLEEP repeatedly until "SLEEP TIMER 00" appears. SLEEP TIMER 30 SLEEP TIMER 60 SLEEP TIMER 90 SLEEP TIMER O0 I 2 CHAY The feature allows you to set a timer alarm for up to 60 minutes. Useful for when you are cooking and need to leave the kitchen. -- i 2 T,_rR F_ -- I i'ii i!i !iiiiiiiiiiiiiii 1TIMER screen.
Display 0 I Display screen. Z_ _MAIN_ _L_I SEJ.ECT:A Y _1_ KEY SET :ACTION KEY MENU. only allows the selected useful information to everyone. Press ACTION. ACTION 1 MAIN Closed Caption is ... This multi use system not hearing impaired to enjoy programs, but also makes from TV stations available GE _ SET UP TV 1 ) Press AV< I_ to select "TV." _:_ !(_::) 2) Press ACTION to display. ACTION CD 3A:CH Y:CH SET UP Display _/ LOCK 31 I 4 411_ :VOL UP _1 :VOL DOWN screen. - 1) Press .
Closed Caption narration, if available, is displayed when MUTE button is pressed for silence. Display MAIN MENU. Press ACTION. Display ;creen. F_OL 2 SET UP TV 1) Press AY_I • to select "TV." 2) Press ACTION to display, FC_ ,o _9 ,c3 -'(_ _MAIN_ _ EXIT SELECT :& V _ > KEY SET :ACTION KEY ACTION 6 O 3 Display SET UP TV LOCK _ECT V IDEe ADJUST : TUNER • SELECT • _' KEY SET :b KEY END :ACTION KEY : CAP KEY r0" 1) P resskVto select. ,Ot _ '(:_ 2) Press•to display. ,c_ _c_ i.
Your unit is equipped with several time saving features as well as convenient automatic functions which make tape operation easier than ever. By pressing the CM SKIP button rn Play mode you can sk)p over 1 to 3 minutes of recorded tape in just a few seconds ' Set Skip Time. Press CM SKIP repeatedly to select skip time. CM SKIP F tess _ tess tess 1 mitt Skip _2 mJn Skip -3 min Skip It is easy to detect the end of a recorded program so that you may continue or begin a new recording.
ACTION Set to see a recording over and over ACTION Display MAIN MENU. Press ACTION. : 2 MAIN CH Display screen. MENU CLOCK SET UP VCR SELECT:& • • I_ KEY SET ;ACTION KEY V:CHDOWN e•:VOLUP ,:VOLDOWN 1) Press AY
Choose a timer recorded program from a Program Index List. 1 2 Display SEARCHSELECT MODE screen. Press SEARCH in Playback or Stop mode. SEARCH SELECT SEARCH MODE ZERO INDEX SEARCH SEARCH Display PROGRAM INDEX screen. r _ r0. .; 1) select Press AT to SELECT:A • KEY SET :_ KEY END :SEARCH KEY ;'c_ = * _6 _" i INDEX "PROGRAM SEARCH." I 2) Press•to display. PROGRAM INDEX 1"_[_] END : SEARCH TOP/EJECT Select the desired recorded program.
1 Display MAIN Press ACTION. ACTION CD 2 MAIN Display screen. MENU ; SELECT:A • 4 • KEY SET :ACTION KEY + ,_ _ & _(ZZ) ACTION SET SELEGT:A SET :• UP MENU. Channel Caption is ,.. Station names, e.g. ABC, TNT, etc. so that they wilt appear when a channel is selected. Choose 24 preset names (Preset Caption), or make up to 10 names of your own (Manual Caption.) SET UP CH [_lPcheck 1) Press AV• • to select "CH." list before you begin.
Do "Preset 2 CHANNEL PRESET Caption" steps 1-3 (page 24.) Select MANUAL CAPTION. CAPTION CAPTION _::_ =r°(:_ SELECT;A • KEY SET :_ KEY END :ACTION KEY 3 MANUAL CH NUMBER ,_ =o 1) Press_,_" to select. 2) Press•to display. CAPTION number. CAPTION -I F veL 1) Press Ay r ¢H Select ,_:D _9Channel to select CH t _6 NUMBER. i,o 2) Press • to move cursor to the right. SELECT:& • KEY SET :_ KEY END :ACTION ....
[_lPcheck This unit writes program data (see example below) for about the first 10 seconds of every recording. The information is then displayed the first 10 seconds of playback. To change the data, see "Changing Time Stamp Data" section on next page 1I The clock is set to correct time. [] The record tab is in place. Press ACTION. ,_8 _ MAIN you begin. lo,so,.,o.,.-u (_ Display screen. I list before SET UP VCR 1) Press ,l.y4 It,.
You may change the time stamp data (Date, Time, Channel, Category, and Notes) as desired 1 Display j 2 Time Stamp Data. 1) Insert cassette with record tab. 2) Press PLAY. 1 Display TIME STAMP EDIT. Press PROG PROG CC) while the data is playback I liiii ii !ii iiiiiiiiiiiiiiii mode. AY/REPEAT DATE : 12127/1999 MON TIME : 12:SOPM I:OOPM CH : 08 A_ CATEGORY : MOVIE f TIME STAMP EDIT 1 Change Data. N2TES:._M?_!_L_DV,E ....
When "ON" is selected, picture is displayed even when a broadcast signal is weak or nonexistent. Display MAIN MENU. Press ACTION. Display MAIN 2SELECT/SET _• A:CH UP _V :CH DOWN • :VOL UP • :VOL DOWN SET UP CH screon 1) Press ,&V4 MENU to select "CH." 2) Press ACTION to display. 1 ACTION CD Select WEAK DISPLAY. CABLE I ANTENNA A SET : UP CHANNEL SIGNAL ACTION UTO SET _.r_°: r_) ,o _ _ L 1) select. Press A, to 2) Press II_ to set "ON" or "OFF.
Connections you'll need to make. Recording (Editing) unit Playing (Source) VCR AUDIO VIDEO OUT 1 IN FROM @ ANT. @ OUT TVTO _recorded Insert pre-tape. t1" i Insert _ blank tape with recordtab. • Dubbing tapes ! t I Select "LINE" protected with Copy Guard will have poor quality results• m 2 See "Selecting mode. Input Mode" section on page 13. I Put in Standby 3I [p_Ay___ _ pA[_USF C Put in standbymode. Press PLAY then ; _ , PAUSE at starting point. ' i I O PAUSE SLOW I mode.
V-Chip Control Feature is... The unit has built-in V-Chip Control which allows you to block unwanted TV usage based on US MOVIES and US TV PROGRAMS ratings. Process of V-Chip Control Feature A 4-digit code must be entered to view a blocked program or change rating settings. Press DisplayACTION. MAIN _N 1 Display screen. _ • KEY :ACTION KEY !_ 1 2ACTION SET UP TV ._. SELECT:A MENU, 1) Press AV< • to select "TV." "_::_ 2) Press ACTION SELECT/SET UP / ACTION to display.
Process of V-Chip Control IEnter Codeine> If LOCK menu is not displayed, do "Enter Secret Code" steps on page 30. Feature Blocking I 'lEND AOToNLOCK tse'ec'UsMO L,.'=,,,L,_,JI, CHANGE SE_I STATU S. NGS USTVPROGRAMS:OFF ' 1) Press _,V CHANGE SE_INGSNExT PAGE ;_:_ .r'.C _ to select. SELECT:_* SET • KEY _ + :_-KEY : 16 i _6 : 2) Press• to set "ON" or "OFF." If you select US MOVIES STATUS: • "ON" _ V-Chip Control is activated. • "OFF" -) V-Chip Control is deactivated.
Process Enter of V-Chip Control Code_ Feature Blocking I If LOCK menu is not displayed, do "Enter Secret Code" steps on page 30. us MOVIES :OFF PROGRAMS CHANGE SETTINGS STATUS. 1 ) Press &V F(_ _ US TVto select, / LOCKNEXTPAGE[ Select SET _ •KEY i =;6+ ._"_6 ii 2) Press • to SELECT:A :1 KEY _ A END :ACTION KEY set "ON" or "OFF." If you select US TV PRQGRAMS STATUS: • "ON" --) V-Chip Control is activated. • "OFF" ---)V-Chip Control is deactivated.
Process of V-Chip [Enter Codeine> TV-Y FOR ALL CHILDREN: Content specifically geared to young viewers ages 2 6 rV-Y7 FOR AGE 7 AND OLDER: May contain mild physical or comedic violence which may frighten children under 7. TV-G GENERAL AUDIENCE: Contains little or no violence, strong language, or sexual dialogue or situations. pROGRAM RATING EXCEEDED ING:PG-13 ABC PARENTAL GUIDANCE: May contain infrequent coarse language, limited violence, some suggestive sexual dialogue and situations.
1 Display MAIN MENU. Press ACTION. ACTION CD 2 1 Display MAIN MENU. Press ACTION. ACTION CD language selection icon. _v _ 1 Press Ay_I• to select. _. _ _GE/ 1) Press A_!"_ • to select "CLOCK." J 2) Press ACTION. 2) Press ACTION repeatedly to set. Spanish:lDIOMA English:LANGUAGE French:LANGUE .C) _=C3 __+ ,C:3 r CH 1 3 SET ZONE CD MENu.
Use when moving unit to a new location, or if a mistake was made in the One Time Setup section • Make sure a tape is not inserted in the unit. Playing older or damaged tapes may eventually cause video heads to become clogged• Head Clog Sensor During playback this screen appears if clogging is detected. To remove screen, press PLAY on the remote or unit. • Use "dry" type head cleaning cassette only. v IDEOHEADSMAY (Part NO NV-TCL30PT NEEDCLEANING is recommended.
overlay. j o display or remove Press DISPLAY. the Function Status Channel Caption Current Time Rec Time Remaining (OTR mode only see page 13.) REC -0:25 -0:12:34 sP. Whenever a blank section of a tape comes up in Play mode, or when the selected channel has no broadcast signal with the "Weak Signal Display ON/OFF' (see page 28) set to "OFF," the TV screen will turn solid blue. Counter Tape Speed 12:00PM ABC 1 Time Stamp Data (See page 26, 27.) When a function button is pressed (PLAY, FF, etc.
Desenganche la antena del televisor o de Lavideograbadora que tuviera anteriormente y con6ctela a la parte trasera del registrador Combinacion de VCRfTV, come se muestra en el diagrama. Si el sistema de su antena tiene Mezclador de banda UHFVHF (no esta incluido> '_. O _. ,_:2. IJ_ ® _ _ - - - - . "'-. Thamn i'of° r(moad°rt dien310u iOd 7_ _ los cables pueden d_Plano Cable bifubular de 300 ohmios _ I _ I ...........
Ajuste de la zona horaria. 1 2 Presione POWER para encender el videograbador combinado. A xhiba elACTION. MENU PRINCIPAL. Presione MENU SELECT LANGUAGE Exhiba la pantalla "FIJAR RELOJ." PRINCIPAL Seleccione el lenguaje. 1) Presione &Y• • para seleccionar "RELOJ." CH : para ing_e,s PUSH CH • :E_gHSh OPRIMtR CH • :Espahol APP VOL + CH : para espaSol 2) Presione ACTION para exhibirla. VOL+: para frances :Fran_ai$ Seleccione "AJUSTE ZONA HORA.
•Inserte El videograbador un casete.combinado automaticamente • • • • • • • • Exhiba Presione FIJAR PROGPROGRAMACION. se enciende •Presione La reproduccion PLAY.
Check the following points once a( am if you are having trouble with your unit. No power.. • Completely insert Power Plug into an AC ouPet • Set POWER button to ON No picture or sound,.. Make sure your antenna system (TV or CABLE), Completely insert Power Plug into an AC outlet Set POWER button to ON. Poor picture with normal sound.. Adjust BRIGHTNESS, TV menu. (P 11) Poor sound with normal picture,.. • Adjust VOLUME control, Poor TV reception...
Panasonic Consumer Electronics Company, Division of Matsushita Electric Corporation of America, One Panasonic Way Secaucus, New Jersey 07094 Panasonic Sales Company, Division of Matsushita Electric of Puerto Rico, Inc. AVE. 65 de Infanteria, Km. 9.
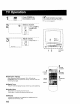
ACTION Page 34. VOLUME UP/DOWN SET/BACKSPACE \ Page 10. Page 9. N\\\ POWER Page 8. \\ \\ L UP/DOWN Page 10. SELECT UP/DOWN Page 9. \\ PROGRAM Page 14. _ _\ TRACKING MUTE Page 10, SLEEP Page 17. UP/DOWN Page 12. \\ NUMBERED Keys Page 10. DISPLAY Page 36, ADD/DELETE Page 34. RAPID TUNE Page 10. /- REC Page 13. - SPEED Page13. CM SKIP Page 20. -- -__ _- --- SEARCH Page 20. PAUSE/SLOW Page 12, -._ _ FAST FORWARD/SEARCH "_ -- _ ._ Page 12. COUNTER Page 21.
REWIND/SEARCH ACTION Page 12 Page 9 STOP/EJECT ACTION Page 12 Page 9 CHANNEL UP/DOWN TRACKING UP/DOWN SELECT UP/DOWN Page 10 Page 12 Page 9 VOLUME UP/DOWN SET/BACKSPACE Page Cassette Compartment Page 12 Page 12. FAST FORWARD/ SEARCH Page 12 REC Page 13. 9 POWER Page 8. TIMER Page 17. Audio/Video In Jack Page 29. Speaker Page 10. Lights during recording. ]n Rec Pause or OTR Pause mode, the REC Indicator indicator flashes.
Panasonic Consumer Electronics Company, Division of Matsushita Electric Corporation of America One Panasonic Way Secaucus, New Jersey 07094 Panasonic Sales Company ("PSC"), Division of Matsushita Electric of Puerto Rico, Inc. Ave 65 delnfanteria Km 95 San Gabrieb Industrial Park. Carolina, Puerto RLco 00985 Printed in U.S.A.