
Installation guide


Configuration and Operation
55
Upload Image by FTP – As seen in the figure below, select this box to assign an FTP site and
configure the parameters shown. When an alarm is triggered, event images are uploaded to
the designated FTP site. Specify which one of two FTP addresses you wish to use from the
drop-down menu. Select the number of frames for the pre-trigger and post-trigger buffers
from the drop-down menu of 1-20 frames.
Figure 54: Application – Upload Image by FTP
Check the Continue image upload box if you wish to use this option. If you wish to specify
the length of time for the upload, click on this radial button and enter the number of
seconds. If you wish to upload during the active trigger, click on this radial button.
Finally, select the number of frames per second from the drop-down menu next to Image
frequency.
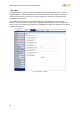
Upload Image by E-Mail – Select this box in order to assign an e-mail address and configure
various parameters as shown in the figure below. When the alarm is triggered, event images
are sent to one of two designated e-mail addresses. Select the number of frames for the pre-
trigger and post-trigger buffers from the drop-down menu of 1-20 frames. See Figure 55:
Application – Upload Image by E-Mail.
Figure 55: Application – Upload Image by E-Mail
Check the box for Continue image upload if you wish to use this option. If you wish to specify
the length of time for the upload, click on this radial button and enter the number of
seconds. If you wish to upload during the active trigger, click on this radial button.
Finally, select the number of frames per second from the drop-down menu next to Image
frequency.
Note:
Make sure that SMTP or FTP configuration has been completed. See Mail and FTP
for further details.