
Installation guide


Quasar CM-4251 Series User and Installation Guide
14
Tip:
Even if you are not using alarm inputs and audio input/output at the time of
installation, you may want to consider pre-wiring these connections for future use.
Note:
The power cable is not required if using PoE.
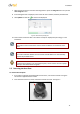
Figure 11: Threading Wiring through the Base Plate
3. Thread the wires through the base plate and screw it to the predrilled wall, ceiling,
CM Series Mini-Dome Recessed Mount, CM Series Mini-Dome Corner Mount, or 4S electrical
box. Check that the installation is not flimsy, will not wobble, and is flush with the mounting
surface.
Tip:
Use shims for shoring up mounts on uneven surfaces.
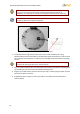
4. Snap the camera module back on the base plate with the wiring threaded through the gap at
the module base and then screw in the module-fastening screw.
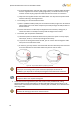
5. Plug the Cat 5 cable into the camera’s Ethernet port and, if needed, plug the power terminal
block into the power terminals.
6. If applicable, wire the Alarm In, Alarm Out, Audio In, and Audio Out terminal blocks to
external devices.