
Installation guide


Installation
11
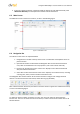
7. Right-click on the mouse and select the assigned IP or press the Assign IP button to open the
DNA Assign IP screen.
8. In the dialog box that is displayed, enter values for the IP Address, Gateway and Netmask.
9. Click Update and wait for OK status to be displayed.
Figure 6: Network Setup Dialog Box
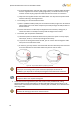
10. Disconnect the Ethernet cable. The camera is ready for deployment (mounting) in a site
installation.
Note:
The camera can be connected to a PC for bench installation via an Ethernet cross-
cable.
Note:
The camera default IP Address and the subnet mask IP Address are automatically
supplied by the DHCP server.
Tip:
A camera setup adapter, such as Veracity Pinpoint, can be used to connect a laptop
directly to the camera when using PoE.
5.5 Removing the Base Plate
To remove the base plate:
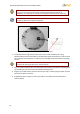
1. If you have not already removed the Mini-Dome cover, unscrew and remove it using the
star-bit tool supplied with the camera.
2. Press the sides of the inner cover inward and remove the cover. See Figure 7.
Figure 7: Inner Cover Removal