
User Manual
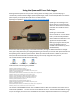

Running the QuanumGPS in Logging Mode
The switches and the blue display make the QuanumGPS much handier than a µ-blox receiver purchased
from eBay. After providing power and waiting the appropriate time for the unit to find the exact
frequency of the satellites, a menu will be shown on the display. This should be very familiar to you if
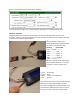
you have flown the QuanumGPS before. Make your way to menu item “PC Connect” and get ready to
fly. Just before take off press “Enter”. It will then say “Sending…”
Upon landing, just unplug the OpenLog and then if you are ready to record another path, connect the
OpenLog to the QuanumGPS again and take off.
There’s only two things you have to know; the rest you can figure out:
1. OpenLog starts a new file everytime you turn its power back on
2. QuanumGPS is sending data only when it says “Sending…”
QuanumGPS as Telemetry
My own expertise with airborne data is telemetry in the form of XBee. It is a simple connection to
QuanumGPS. But XBee’s are expensive and you need another one for the ground. And you still have the
problem of storing the data so there’s little advantage in this version over the OpenLog. But it is here
described if you need to see where your plane is in real time.
Ground Station
XBee is very hard to configure for sending and receiving analog data but breathlessly easy to use for
sending down digital data; streaming data, like that out of QuanumGPS. There’s absolutely nothing to
wire up or program for that ground station; just a laptop, and its USB cable.
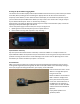
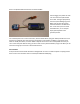
Even the antenna is built in to the
XBee. It is the light blue square
thing on the far left.
Below the XBee is the interface to
USB. It shifts the voltage of the
binary data as well as the power
from 5 V on the PC side to 3 V on
the XBee side. This interface is
another $25 or so. Both the XBee
and the interface are available at
Sparkfun:
https://www.sparkfun.com
/products/11812