
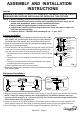
Installation Instructions
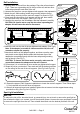

Plastic Screw
Rail Adapter
Grounding Strip
Rail
Brass Strip
Brass Strip
Brass Clip
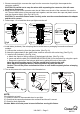
Plastic Screw
Cap
Cap
Rail Adapter
Cap
Rail
Fig.3
Fig.5
Fig.4
Fig.6
Fig.7Fig.8-a
Brass Strip on the
other side of Rail
Grounding Strip
Brass Strip
Rail
Cap
Cap
Ground Strip
The main part
of Rail Support
Point to Ceiling
Point to Ceiling
Fig.8-b
1. Carefully take out the rail from the package. Place the rail as shown in
Fig.3. There has a grounding strip in the top of the rail, and two other
brass strips placed at each side of the rail.
2. Unscrew the caps from one pre-tightened rail supports, then separate it.
3. Attach the rail, while making certain the grounding strip are facing
toward ceiling, securely into the main rail support, as shown in Fig.5.
4. Close back the other halve of rail support over the rail, then restore
the caps back to the rail support. (See Fig.4 & Fig.5)
5. Unscrew the caps from the rail adapter, and then separate it carefully.
CAUTION: Be careful not to snap the wire when separating the
adapter, this will cause the wire to disconnect.
349-5425 --- Page 2
080715
UANTUS
Q
Rail Installation:
Spot Light Installation:
Ceiling
Plastic Screw
Cap
Rail Adapter
Cap
Rail
Grounding Strip
6. Attach the rail onto the slot of the pre-tightened rail adapter. (See Fig.6)
Note: If the adapter is not able to close around the rail, turn rail
around so adapter fits properly.
7. Attach both halves of the adapter together, and then screw the caps
and plastic screws tightly. Make certain that the brass clips of the
adapter be connected properly with the brass strips and grounding
strip of the rail. (See Fig.7)
CAUTION: To ensure the fixture works correctly, make sure the
connection between the adapter and the rail is correct.
8. Follow steps 2~4 to install the rail onto another pre-tightened rail support.
9.
Shape the rail as your desired. Then mark and drill the desired positions
on the ceiling for the rest of the rail supports. (See Fig.8-a & Fig.8-b)
10. Repeat the steps of Rail Supports Installations to locate the rest rail supports. Then Follow steps
2~4 to install the rail onto the other rail supports.
11. After all rail supports have been installed, tighten the set screws into the support bases using
provided hex key. (See Fig.2-a & Fig.2-b)
CAUTION:
To reduce the risk of fire, electrical shock, or personal injury, do not touch or remove the spot light on
the rail when the light is on. Instead, turn off the electrical power. Unscrew the caps and plastic screws
to remove the spot light from the rail. Then reinstall them back onto the desired positions of the rail.