
Installation Instructions

ASSEMBLY AND INSTALLATION
INSTRUCTIONS
NOTE: 1. Before installing, consult local electrical codes for wiring requirements.
2. Please read these instructions carefully before installing this fixture. If you are not
familiar with installations, please consult a qualified electrician.
3. Do not install this lighting system in a damp or wet location.
4. Lighted lamp is hot! Do not touch lamp at any time. Use a soft cloth or cupule. Oil
from skin may damage lamp.
5. Customer Service: 1-800-887-6326 (weekdays 8 a.m. – 5 p.m. CST)
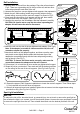
Canopy Installation
Outlet Box
Wire Nut
House Grounding Wire
Cross Bar
Hex Nut
Grounding Pad
Mounting Screw
Washer
Metal Pad
Screw
Canopy
Rail Adapter
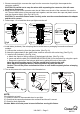
Rail support Installation:
Fig.1
Fig.2-a
Fig.2-b
1. With the wires from the rail adapter threading through the metal
pad, washer and grounding pad, attach the pipe of rail adapter to
the center hole of the canopy, then secure them with a hex nut.
2. Attach the cross bar to the outlet box using two mounting screws.
See Fig.1 for correctly location.
3. Thread the wires from the rail adapter through the center hole of the
cross bar. Pull out the outlet wires and the house grounding wire
from the outlet box. Make wire connections using the wire nuts:
---The black wire from the adapter to the black wire from the power
source.
---The white wire from the adapter to the white wire from the power
source.
---The green grounding wire from the grounding pad to the green
grounding wire from the power source.
Carefully put the wires back into the outlet box.
4. Attach the canopy to the cross bar, and secure it with two screws
from side set holes.
1. Mark two desired positions and drill them on the ceiling for two rail supports on the side of the canopy.
NOTE: Center the canopy between two rail supports and The distance between each rail
support and the canopy is 14 ~ 18 inches (See Fig 2-a). So the remainder length of the flexible
track could be bent to a wonderful arc.
2. Attach two anchors to the drilled positions. Unscrew the support bases from the rail supports, then
attach support bases onto the ceiling by threading drywall screws into the pre-tightened anchors.
3. Secure the pipe of rail supports into the support bases tightenly. (See Fig.2-b)
349-5425
349-5425 --- Page 1
080715
UANTUS
Q
Dry Wall Screw
Pipe of rail support
Support Base
Rail Support
Rail Support
Anchor
Ceiling
Set Screw
Hex Key
WARNING: BE SURE TO SHUT OFF POWER AT THE MAIN FUSE OR CIRCUIT
BREAKER BOX BEFORE INSTALLING OR SERVICING THIS FIXTURE.
14~18 inches 14~18 inches