
Installation and Operating Guide

38 Operation and Maintenance
❐
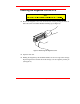
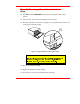
Insert the cassette into the drive opening with the label side to your left and the
write-protect switch positioned down. Apply steady pressure on the back of the
cassette until the autoloading mechanism takes the cassette and loads it into the
drive. The cassette is now in a semi-loaded state. If the humidity level is
acceptable, the drive threads the tape, initiates a load sequence and goes on-line.
The drive will take approximately 20 seconds to load the cassette.
Note
❐
Close the door and initiate desired program.
❐
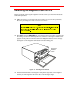
If the drive does not eject the cassette when the program is finished, open the VLS
door (the gripper arm should still be fully extended) and press the drive eject
button (refer back to Figure 12 if necessary). It will take about 30 seconds for the
drive to eject the cassette.
If the normal eject procedure fails to eject a cassette, a Power Eject can be initiated.
Press and hold the drive’s Eject button. The upper LED (on the drive) will begin
flashing amber, as it does during a normal Eject cycle. Holding down the Eject button
for 10 seconds will initiate a Power Eject cycle. The cassette will be ejected
immediately. Using the Power Eject function may cause a tape to be generated that
does not conform to the format standard. After the cassette is ejected, the drive will
reset.
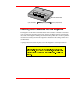
Warning
Power Eject should only be used as a last resort in case of an apparent
drive failure, or if there is no other way to eject a cassette.