Quantum Vision Contents Quantum Vision Requirements ............... 2 Server Requirements ........................... 3 Server Port Requirements.................... 3 Browser Requirements ........................ 4 Quantum Vision 4.3.2 Quick Start Guide Supported Storage Devices ................. 4 Installing Quantum Vision....................... 5 Windows Installation .......................... 6 Linux Installation ................................. 9 Virtual Appliance Installation............
Quantum Vision 4.3.2 Quick Start Guide • Access the native management interface of any monitored Quantum device. • View and compare DXi Advanced Reporting graphs for one or more DXi disk backup systems. • Generate a Capacity Upgrade Estimate for DXi devices, this is an estimate regarding when your RAID may need to be expanded. • Monitor the usage and health of media in Scalar libraries (including Extended Data Life Management (EDLM) status), change media location, and delete media. About Quantum Vision 4.
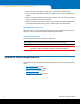
Quantum Vision Server Requirements Table 1 Vision Server System Requirements The Quantum Vision software runs on the Vision server. Before installing the Quantum Vision software, make sure the Vision server meets the requirements in Table 1.
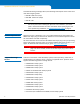
Quantum Vision 4.3.2 Quick Start Guide To enable monitoring of storage devices, the following firewall ports on the Vision server must allow outgoing traffic: • Port 80 - Web server (http) • Port 443 - Web server (https) • Port 22 - SSH Note: Ports 80 and 443 are the default web server ports. If you specified different web server ports when installing the Quantum Vision software, open those ports in the firewall instead.
Quantum Vision • Scalar i6000 library • Scalar i2000 library • Scalar i500 library • Scalar i80 library • Scalar i40 library • Scalar LTFS • vmPRO 4000 (software/hardware backup solution) • vmPRO virtual backup system Installing Quantum Vision If Quantum Vision 3 is installed on the Vision server, you should uninstall it before you install any version of Quantum Vision 4. Caution: Installing Vision 4 does not upgrade an existing Vision 3 installation.
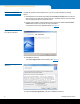
Quantum Vision 4.3.2 Quick Start Guide Windows Installation To install the Quantum Vision software on a server running a Windows operating system: 1 Download the Vision installer file: vision-4.3.2-windows-installer.exe. If you do not have Internet access and have copied Vision to a removable media, insert the media into the appropriate drive of the Vision server. 2 Browse to the location of the Quantum Vision installer file: vision-4.3.2-windowsinstaller.exe. Double-click the file to begin installation.
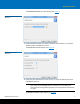
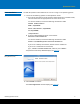
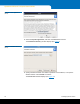
Quantum Vision The Installation Directory window displays (see Figure 3). Figure 3 Installation Directory (Windows) 5 Specify a different location to install the Quantum Vision software, or accept the default location. Click Next to continue. The Vision Ports window displays (see Figure 4). Figure 4 Vision Ports (Windows) 6 Specify the ports that Quantum Vision will use, or accept the default port values. Click Next to continue.
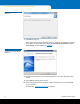
Quantum Vision 4.3.2 Quick Start Guide Figure 5 Ready to Install (Windows) 7 Click Next to continue. Wait while the setup wizard installs the software, initializes the database, and starts Vision. When the setup wizard is finished, the Completing the Quantum Vision Setup Wizard window displays (see Figure 6). Figure 6 Completing the Quantum Vision Setup Wizard (Windows) 8 (Optional) Select the check box to launch Quantum Vision after closing the setup wizard. 9 Click Finish to close the setup wizard.
Quantum Vision Linux Installation To install the Quantum Vision software on a server running a Linux operating system: 1 Use one of the following options to install Quantum Vision: a If you do not have Internet access and have copied Vision to a removable media, insert the media into the appropriate drive of the Vision server. In a terminal window, execute the following commands as root: umount /media/ mkdir /tmp/VISION mount /dev/ /tmp/VISION/ cd /tmp/VISION/ ./setup-linux.
Quantum Vision 4.3.2 Quick Start Guide Figure 8 License Agreement (Linux) 3 Select I accept the agreement, and then click Forward to continue. The Installation Directory window displays (see Figure 9). Figure 9 Installation Directory (Linux) 4 Specify a different location to install the Quantum Vision software, or accept the default location. Click Forward to continue. The Vision Ports window displays (see Figure 10).
Quantum Vision Figure 10 Vision Ports (Linux) 5 Specify the ports the Quantum Vision will use, or accept the default port values. Click Next to continue. Note: On Windows or Linux installed Vision servers, you can change your network ports using Vision’s Security feature; however, be sure to check your existing firewall configuration and make sure the appropriate firewall ports are open. The Ready to Install window displays (see Figure 11). Figure 11 Ready to Install (Linux) 6 Click Forward to continue.
Quantum Vision 4.3.2 Quick Start Guide Figure 12 Completing the Quantum Vision Setup Wizard (Linux) 7 (Optional) Select the check box to launch Quantum Vision after closing the setup wizard. 8 Click Finish to close the setup wizard. 9 If you are installing Vision using a removable media: a In a terminal window, execute the following commands as root: cd / umount /tmp/VISION/ b Remove the media from the drive. 10 Continue with Quantum Vision Setup on page 30.
Quantum Vision 3 On the vSphere Client window (see Figure 13), select Deploy OVF Template from the File menu. The Source window displays. Figure 13 Deploying an OVF Template 4 On the Source window do the following (see Figure 14): a Select Browse, browse and locate the QuantumVision.ovf file. b Choose the file QuantumVision.ovf. c Click Next. The OVF Template Details window displays.
Quantum Vision 4.3.2 Quick Start Guide 5 On the OVF Template Details window (see Figure 15), make note of any information you feel you may need. Click Next. The End User License Agreement window displays.
Quantum Vision 6 On the End User License Agreement window (see Figure 16), click Accept; and then click Next to continue. The Name and Location window displays.
Quantum Vision 4.3.2 Quick Start Guide 7 On the Name and Location window (see Figure 17), enter a name for the new appliance; if necessary, select an Inventory Location. Click Next. Figure 17 Specifying the Appliance Name and Location 8 If your configuration has multiple hosts or clusters, select your host or cluster. Click Next. This window will not display if (as does this deployment) you have only one host or a single cluster.
Quantum Vision 9 If your configuration supports resource pools (see Figure 18), select your resource pool. Click Next. This window will not display if you are not using the resource pool capability.
Quantum Vision 4.3.2 Quick Start Guide 10 If you have multiple storage destinations (see Figure 19), select your storage destination. Click Next. This window will not display if you have only one storage device.
Quantum Vision 11 On the Disk Format window (see Figure 20) make sure that Thin Provision is selected. Click Next. Figure 20 Selecting Thin Provision 12 If you have multiple vSwitches configured in your environment, select the appropriate network. Click Next. This window will not display if you have a single vSwitch configuration. The Ready to Complete window displays.
Quantum Vision 4.3.2 Quick Start Guide 13 On the Ready to Complete window (see Figure 21), check the settings, if they are correct, click Finish. Figure 21 Completing the Deployment Task 14 The deployment process will take a few minutes.When the Vision appliance has been deployed, the Deployment Completed Successfully dialog box displays (see Figure 22). Click Close.
Quantum Vision 15 On the vSphere Client window, select your appliance’s name (the name you entered in Step 7 on page 16) in the left panel (see Figure 23). Figure 23 Selecting Your Appliance 16 On the vSphere Client window, click the Launch Virtual Machine Console button (see Figure 24). Your appliance’s virtual machine console window displays.
Quantum Vision 4.3.2 Quick Start Guide 17 On your appliance’s virtual machine console window, click the Power On button (see Figure 25). The power on process will take a few minutes. Figure 25 Powering On the Appliance 18 When the power on process has completed, your appliance’s console command line window displays (see Figure 26). Occasionally you may need to access a Vision functions by using the console command line.
Quantum Vision 19 When the IP address has been picked up by the system, you can find the IP address by clicking the vSphere Client Summary tab and then locating the IP Address in the right panel (seeFigure 27). Figure 27 Locating Your Appliance’s IP Address For enhanced stability, it is recommended that you replace your DHCP assigned IP address with a static IP address (Accessing the Console Command Line (virtual appliance only) on page 33).
Quantum Vision 4.3.2 Quick Start Guide Updating the Virtual Appliance As a precautionary measure, Quantum recommends that you use your vSphere client or other ESXi management client to take a snapshot of your Vision virtual appliance before beginning any update. On the Vision window, the Software Update dialog box allows you to update your Vision virtual appliance*. It also allows you to choose whether you want your appliance to automatically check for updates and notify you when updates are available.
Quantum Vision http:///directory/path/vision-install-4.3.22575.x86_64.rpm. For this example, you would use the http command in Step 4. If you will not be using an HTTP server, place the RPMs anywhere on the server; be sure to remember the location; for example, /tmp/vision/updates/vision-install4.3.2-2575.x86_64.rpm For this example, you would use the scp command in Step 4. 3 Log in to the appliance as the sysadmin user. • If you are on a Linux/Unix/Mac system, use SSH or a comparable application.
Quantum Vision 4.3.2 Quick Start Guide Updating Quantum Vision 4.2.1 virtual appliance to 4.3.2 To update an existing installation of Quantum Vision 4.2.1 virtual appliance to 4.3.2: 1 Download the Vision-install RPM (vision-install-4.3.2-2575.x86_64.rpm) from the Quantum Web Site at http://www.quantum.com/vision. Once you have accessed the Web site, click the Upgrade link (see Figure 28). Note: The Vision version number will change when the software is updated. You should use the most recent version.
Quantum Vision 7 Exit the admin application by typing exit at the prompt. At this point your Vision appliance has been updated to version 4.3.2. Updating Quantum Vision 4.3 or 4.3.1 virtual appliance to 4.3.2 To update an existing installation of Quantum Vision 4.3 or 4.3.1 virtual appliance to 4.3.2: 1 Log on Vision and access the Vision window. 2 On the Vision Configuration menu, click Software Update (see Figure 29).
Quantum Vision 4.3.2 Quick Start Guide Figure 30 CSoftware Update Figure 31 Software Update Configuration Figure 32 Software Update Notification Updating the Standard Installer Version of Vision 28 To update an existing installation (standard installer version) of Quantum Vision 4 to the latest version: 1 Download the Vision updater from the Quantum Web site at http://www.quantum.com/vision. Once you have accessed the Web site, click the Upgrade link (see Figure 33).
Quantum Vision Figure 33 Vision Upgrade Link Make sure you download the correct updater for the operating system running on the Vision server (Windows or Linux). Note: If the Vision server is unable to access the Internet, download the updater on another computer, and then copy it to the Vision server using a USB flash drive or other removable storage. 2 On the Vision server, stop the Vision service: • In Windows, use the Services control panel to stop the Quantum Vision service.
Quantum Vision 4.3.2 Quick Start Guide The Ready to Install window displays. 8 Click Next or Forward to continue. Wait while the setup wizard updates the software. When the setup wizard is finished, the Completing the Quantum Vision Setup Wizard window displays. 9 Click Finish to close the setup wizard. The Quantum Vision software is updated to the latest version. Note: After the setup wizard is complete, Quantum Vision must update and convert the database for optimum performance.
Quantum Vision Figure 34 Login Window 3 Enter the default username and password: • Username - admin • Password - password 4 Click Login. After a successful login, the Vision window displays (see Figure 35). Continue Vision configuration with Discovering Devices. If you are unable to log on, verify that your username and password are correct, then try again.
Quantum Vision 4.3.2 Quick Start Guide Figure 36 After First Login A device is a system, such as a Scalar tape library or DXi disk backup system, that is monitored by Quantum Vision. Before you can use Quantum Vision to monitor a device, you must first discover the device. To discover devices: 1 On the message box that displays after you first log on to Quantum Vision, click Yes. The Device Management dialog box displays.
Quantum Vision Note: The username must have administrator rights on the device. • Device Password - Enter the password for the device username. • Gather Enabled - Select the check box to enable gathering of status and configuration data from the device. Clear the check box to disable gathering of status and configuration data. Note: The Select Device Groups list is empty because you have not yet added any user groups. You can associate devices with user groups in a later procedure in this guide.
Quantum Vision 4.3.2 Quick Start Guide Log on with your appliance’s username and password and you will go to the console command line (see Figure 39). If this is your first time to access the console command line, log on with the default username and password: sysadmin/QuantumVision. Figure 39 Console Login The following will help you access and use the various commands: • To see the list of commands, type help and press . • To log off the console command line, type exit and press .
Quantum Vision admin backup - This command prompts the user for the server name, the username and password, and the location in which the database will be archived (on the server). admin restore - This command prompts the user for the server name, the username and password, and the location in which the database is archived. The command then copies the archive from the server to the appliance, extracts it, and then restarts the Vision server.
Quantum Vision 4.3.2 Quick Start Guide Taking Next Steps To learn more about using Quantum Vision, see the Quantum Vision User’s Guide on the Quantum Vision Installers and Documentation CD, or see the online help. (To display the online help, click the Help button on the upper right of the Vision window.
Quantum Vision Viewing Device Status The Status console displays all monitored Quantum devices. Use the Status console to view the overall health of all DXi and Scalar devices or to get detailed status information for a single device. You can also view and acknowledge alert notifications for devices. (See Chapter 5 “Vision Status” in the Quantum Vision User’s Guide.) Running Reports Reports present capacity, performance, and configuration information for devices and media.
Quantum Vision 4.3.