
User`s guide

Setting the SCSI ID 17
SuperLoader 3
Setting the SCSI ID
Each SCSI device attached to a server or workstation must have a unique SCSI ID from 0
through 7. The default SCSI ID is 5 for the SuperLoader 3.
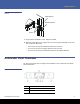
To change the SCSI ID for the SuperLoader 3:
1 If the main menu is not already visible, press Enter.
2 On the main menu, scroll to Configuration and press Enter.
3 On the Configuration submenu, scroll to SCSI ID and press Enter.
4 Scroll to the number you want to set as the autoloader's SCSI ID, then press Enter.
Cycle Power new SCSI ID appears on the LCD.
5 Press and hold the power button on the front panel until System Shutdown wait 60
sec
appears on the LCD.
Power Off appears on the LCD, then the autoloader shuts off.
6 Press the power button again to power on the autoloader.
The new SCSI ID is now in effect.
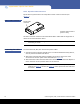
Preparing the Host and Verifying the Connection
If necessary, install a SCSI, Fibre Channel, or SAS host adapter, software, and compatible
drivers. Refer to the manuals for the host computer and SCSI, Fibre Channel, or SAS host
adapter for detailed instructions. In addition, follow these general guidelines:
• When the host server is powered on, install software, and/or drivers that are
compatible with the autoloader (see
Windows Operating System Support). Software
compatibility information is available at www.quantum.com. Most backup software
packages require an additional module to communicate with the autoloader
robotics.
• If the host server is connected to a network, check with the system administrator
before turning off power.
• Use proper procedures to prevent electrostatic discharge (ESD). Use wrist-grounding
straps and anti-static mats when handling internal components.
• Make sure that the host server has an open expansion slot.
• Make sure that your backup application supports the SCSI, Fibre Channel, or SAS
host adapter.
• For the SCSI autoloader interface:
• Depending on the server configuration, you may need to change the SCSI ID of
the autoloader (see
Setting the SCSI ID).