
User's Manual


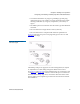


Table Of Contents
- Contents
- Figures
- Tables
- Preface
- Tape Drive Product Information
- SDLT 600 Tape Drive Specifications
- Installing Your Tape Drive
- Warranty Note
- Safety, Handling, and ESD Protection
- Pre-Installation Guidelines
- Configuring and Installing an Internal Tape Drive with SCSI Interface
- Configuring and Installing an Internal Tape Drive with Fibre Channel Interface
- Configuring and Installing a Tabletop Tape Drive with SCSI Interface
- Configuring and Installing a Tabletop Tape Drive with SCSI Interface
- Confirming the Installation
- Using Your Tape Drive
- Regulatory Compliance
- Super DLTtape I and Super DLTtape II Data Cartridges
- DLTtape VS1 Data Cartridge
- Glossary

Chapter 3 Installing Your Tape Drive
Confirming the Installation
SDLT 600 Product Manual 68
Confirming the Installation 3
To confirm the installation, power on the SDLT 600 tape drive system and
the host computer. The screens displayed at power-on contain BIOS,
operating system, and SCSI controller information. If the first screen
displays host adapter and SCSI ID information, then the installation is
successful. See Troubleshooting
on page 80 if the installation is not
successful.