
User's Manual

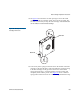
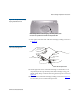

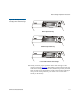


Table Of Contents
- Contents
- Figures
- Tables
- Preface
- Tape Drive Product Information
- SDLT 600 Tape Drive Specifications
- Installing Your Tape Drive
- Warranty Note
- Safety, Handling, and ESD Protection
- Pre-Installation Guidelines
- Configuring and Installing an Internal Tape Drive with SCSI Interface
- Configuring and Installing an Internal Tape Drive with Fibre Channel Interface
- Configuring and Installing a Tabletop Tape Drive with SCSI Interface
- Configuring and Installing a Tabletop Tape Drive with SCSI Interface
- Confirming the Installation
- Using Your Tape Drive
- Regulatory Compliance
- Super DLTtape I and Super DLTtape II Data Cartridges
- DLTtape VS1 Data Cartridge
- Glossary

Loading a Data Cartridge
SDLT 600 Product Manual 113
you move the write-protect switch to the left, a small closed padlock
is visible. This is your visual reminder that you cannot write data to
the media.
• Slide the write-protect switch to the right to
disable write protection
(you can write over existing data on the media, and you can append
additional data to the media unless the data cartridge is write-
protected via firmware). When write-protection is disabled, a small
open padlock is visible.
Loading a Data Cartridge 2
Complete this subsection to load a data cartridge into the front of the tape
drive; see figure 35
as needed.
To load a data cartridge, follow these steps:
1 Insert the data cartridge into the front of the tape drive, as shown in
figure 35
.
2 Push the data cartridge fully into the tape drive.
The Drive Status LED flashes to show that the media is loading.
When the media reaches the Beginning of Tape (BOT) marker, the
LED lights steadily. The data cartridge is now ready for use.