
User's Manual


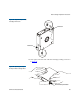
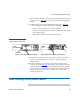


Table Of Contents
- Contents
- Figures
- Tables
- Preface
- Tape Drive Product Information
- SDLT 600 Tape Drive Specifications
- Installing Your Tape Drive
- Warranty Note
- Safety, Handling, and ESD Protection
- Pre-Installation Guidelines
- Configuring and Installing an Internal Tape Drive with SCSI Interface
- Configuring and Installing an Internal Tape Drive with Fibre Channel Interface
- Configuring and Installing a Tabletop Tape Drive with SCSI Interface
- Configuring and Installing a Tabletop Tape Drive with SCSI Interface
- Confirming the Installation
- Using Your Tape Drive
- Regulatory Compliance
- Super DLTtape I and Super DLTtape II Data Cartridges
- DLTtape VS1 Data Cartridge
- Glossary
Unloading a Data Cartridge
SDLT 600 Product Manual 103
Unloading a Data Cartridge 1
Follow these steps to unload a data cartridge; see figure 27 as needed.
1 Press the
Eject button (or issue an appropriate system software
command); the tape drive completes any active writing of data to the
media, then rewinds. The Drive Status LED flashes as the media
rewinds.
When the media is finished rewinding, the tape drive ejects the data
cartridge and the Drive Status LED lights steadily.
2 Remove the data cartridge from the tape drive and return the data
cartridge to its plastic case to protect it from damage.
Caution: Remove the data cartridge from the tape drive BEFORE
turning off host power. Failure to remove a data cartridge may
result in data cartridge or tape drive damage.
Do NOT rush removal of the data cartridge. Wait until the
tape drive ejects the data cartridge and the Drive Status LED
lights steady before removing the data cartridge.