Planning Guide Quantum Scalar i6000 Library 6-66882-12 Rev A
Scalar i6000 Planning Guide, 6-66882-12 Rev A, June 2015, Product of USA. Quantum Corporation provides this publication “as is” without warranty of any kind, either express or implied, including but not limited to the implied warranties of merchantability or fitness for a particular purpose. Quantum Corporation may revise this publication from time to time without notice. COPYRIGHT STATEMENT © 2015 Quantum Corporation. All rights reserved. Your right to copy this manual is limited by copyright law.
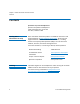
Contents Chapter 1 About This Guide and Your Product 1 Product Safety Statements . . . . . . . . . . . . . . . . . . . . . . . . . . . . . . . . . . 1 Mercury Statement . . . . . . . . . . . . . . . . . . . . . . . . . . . . . . . . . . 2 Disposal of Electrical and Electronic Equipment . . . . . . . . . . . . 2 Product Regulatory Model Number . . . . . . . . . . . . . . . . . . . . . . . . . . . . 2 Explanation of Symbols and Notes . . . . . . . . . . . . . . . . . . . . . . . . . . . .
Contents I/O Management Unit . . . . . . . . . . . . . . . . . . . . . . . . . . . . . . . . . . . . . 31 Control Management Blade . . . . . . . . . . . . . . . . . . . . . . . . . . 31 Fibre Channel I/O Blades . . . . . . . . . . . . . . . . . . . . . . . . . . . . . 32 Ethernet Expansion Blades . . . . . . . . . . . . . . . . . . . . . . . . . . . 32 Robot . . . . . . . . . . . . . . . . . . . . . . . . . . . . . . . . . . . . . . . . . . . . . . . . . 34 Import/Export Station . . . . . . . . . . . . . .
Contents Library Connection Types and Speeds . . . . . . . . . . . . . . . . . . . . . . . . . 65 Physical Specifications – Pallet . . . . . . . . . . . . . . . . . . . . . . . . . . . . . . . 66 Pallet Specifications . . . . . . . . . . . . . . . . . . . . . . . . . . . . . . . . 66 Physical Specifications – Library. . . . . . . . . . . . . . . . . . . . . . . . . . . . . . 66 Configuration Rules . . . . . . . . . . . . . . . . . . . . . . . . . . . . . . . . 67 Basic Building Blocks. . . . . . . . . . .
Contents vi Scalar i6000 Planning Guide
Chapter 1 About This Guide and Your Product This guide contains information necessary for site planning prior to the installation of the Scalar i6000. This guide is intended for anyone interested in learning about or anyone that needs to know how to plan for the installation of a Scalar i6000 library. Caution: Be sure to read all operating instructions in this manual and in the System, Safety, and Regulatory Information Guide before operating this product.
Chapter 1: About This Guide and Your Product Product Regulatory Model Number This unit is engineered and manufactured to meet all safety and regulatory requirements. Be aware that improper use may result in bodily injury, damage to the equipment, or interference with other equipment. WARNING: Before powering on or using this equipment, read THE System, Safety, and Regulatory Information Guide. Keep the Guide for future reference.
Chapter 1: About This Guide and Your Product Explanation of Symbols and Notes Explanation of Symbols and Notes The following symbols appear throughout this document to highlight important information. WARNING: INDICATES A POTENTIALLY HAZARDOUS SITUATION WHICH, IF NOT AVOIDED, COULD RESULT IN DEATH OR BODILY INJURY. Caution: Indicates a situation that may cause possible damage to equipment, loss of data, or interference with other equipment.
Chapter 1: About This Guide and Your Product Contacts Contacts Quantum Corporate Headquarters Quantum Corporation Headquarters 1650 Technology Drive, Suite 700 San Jose, CA 95110-1382 Getting More Information or Help More information about this product is available on the Service and Support Web site at www.quantum.com/support. The Service and Support Web site contains a collection of information, including answers to frequently asked questions (FAQs).
Chapter 2 Description The Scalar i6000 library automates the retrieval, storage, and control of cartridges. The cartridges are mounted and retrieved from tape drives using a robotic assembly that is driven by application software from the host without operator intervention. The library is designed for ease of installation, configuration, and field upgrades. In December, 2011, the library robotics were redesigned. The robot redesign accommodates either a single robot or dual robotics.
Chapter 2: Description The Series 3 modules can be mixed and matched with older modules. However, the CM3 and DREM3 increased drive support requires gen2 robotics, gen2 electronics and minimum i12.2.1 code. If these gen2 and code requirements are not met, the CM3 and DREM3 can still be used but will operate in 12 drive mode. Note: Series 2 and earlier modules cannot be converted to Series 3 modules.
Chapter 2: Description Figure 1 Robot Tab To determine what generation electronics your library is running, select Monitor > System from the menu, click the Components tab and look in the Name column. If you have MCB2 and RCU2, you have gen2 electronics. Any other MCB or RCU level means gen1 electronics. Figure 2 Components Tab In March of 2013, a High Density Expansion Module (HDEM) was made available to provide increased storage capabilities.
Chapter 2: Description density expansion modules, the maximum capacities are 12,006 LTO cartridges (for a single-robot library) or 11,760 LTO cartridges (for dualrobot libraries).
Chapter 2: Description Control Module Control Module All libraries contain a control module. A single-frame library consists of a control module only. The control module manages library operations via the library management module and includes an operator panel touch screen for local operator use.
Chapter 2: Description Control Module Figure 3 Front and Back View of the Control Module rear view front view Magazines and cartridge slots I/O management unit 24-slot I/E station Drive clusters Library management module Power supplies Robot (Gen 1) 10 Scalar i6000 Planning Guide
Chapter 2: Description Control Module Figure 4 Front and Back View of a Series 3 Control Module (CM3) rear view Magazines and cartridge slots Power supplies Library management module 24-slot I/E station I/O management unit Robot Drive clusters front view Note: A control module can only contain a 24-slot I/E station.
Chapter 2: Description Control Module Figure 5 Magazine and Drive Location in the Single-Robotics Control Module cartridge magazines 24-slot I/E station drives or storage drive side 12 door side Scalar i6000 Planning Guide
Chapter 2: Description Control Module Figure 6 Magazine and Drive Location in the Single-Robotics Series 3 Control Module cartridge magazines 24-slot I/E station drives or storage drive side door side Note: Series 3 modules require i12.2.1 firmware as well as gen2 electronics and robotics.
Chapter 2: Description Control Module Figure 7 Magazine and Drive Location in the Dual-Robotics Control Module calibration targets Rack 1 (back) 14 Rack 2 (door) Scalar i6000 Planning Guide
Chapter 2: Description Control Module Figure 8 Magazine and Drive Location in the Dual-Robotics Series 3 Control Module calibration targets Rack 1 (back wall) Rack 2 (door) Note: Series 3 modules require i12.2.1 firmware as well as gen2 electronics and robotics.
Chapter 2: Description Control Module Control modules in dual-robotics libraries can take advantage of two columns of storage (up to 14 additional magazines) that are unavailable in single-robotics configurations. Figure 9 shows where the additional magazines are located.
Chapter 2: Description Control Module Figure 10 Additional Storage Available in Dual-Robotics Series 3 Control Module Control module Rack 1 (rear wall) Control module Rack 2 (door) Extra magazine slots are only available if the drive slots are not in use. Note: Series 3 modules require i12.2.1 firmware as well as gen2 electronics and robotics.
Chapter 2: Description Expansion Modules Expansion Modules Expansion modules enable the library to expand by adding space for tape drives, an I/E station, and storage. Each expansion module from 96 to 780 LTO cartridge slots depending on the number of tape drives installed and whether an I/E station is installed. See Figure on page 21 for location information.
Chapter 2: Description Expansion Modules Note: When referencing expansion modules in all Scalar i2000/i6000 documentation it includes all three module types: drive-ready, storage and high-density. When referencing standard expansion modules, it includes just the drive-ready and storage expansion modules.
Chapter 2: Description Expansion Modules • Power System on page 39 (required only if drives are installed; if an expansion module contains only cartridges, all power is derived from the control module).
Chapter 2: Description Expansion Modules Figure 12 Magazine and Drive Locations in SEM with a 24-slot I/E Station magazines 24-slot I/E station (optional in DREM and SEM) DREM drive cluster (optional) drive side Scalar i6000 Planning Guide door side 21
Chapter 2: Description Expansion Modules Figure 13 Magazine and Drive Locations in Series 3 SEM with a 24-slot I/E Station magazines 24-slot I/E station (optional in DREM and SEM) DREM drive cluster (optional) drive side door side Note: Series 3 modules require i12.2.1 firmware as well as gen2 electronics and robotics.
Chapter 2: Description Expansion Modules Figure 14 Magazine and Drive Locations in Standard Expansion Modules with a 72slot I/E Station magazines 72-slot I/E station (optional in DREM and EM) DREM drive cluster (optional) drive side Scalar i6000 Planning Guide door side 23
Chapter 2: Description Expansion Modules Figure 15 Magazine and Drive Locations in Series 3 Standard Expansion Modules with a 72slot I/E Station magazines 72-slot I/E station (optional in DREM and SEM) DREM drive cluster (optional) drive side door side Note: Series 3 modules require i12.2.1 firmware as well as gen2 electronics and robotics.
Chapter 2: Description Dual-Robot Configurations and Parking Modules Dual-Robot Configurations and Parking Modules A dual-robotics library requires Gen 2 robotics hardware. A dual-robot library requires, at a minimum, a control module, a left parking module, and a right parking module. See Figure 16. For a dual-robot library that includes an HDEM, it requires, at a minimum, a left parking module (shipped with dual-robots), a control module, an HDEM and a right parking module.
Chapter 2: Description Dual-Robot Configurations and Parking Modules library to dual robotics, see Dual Robotics Upgrade Requirements on page 97. Figure 16 Dual Robotics Library - No HDEM Left parking module (Position 0) Side panels, doors, and door posts have been removed for clarity.
Chapter 2: Description Dual-Robot Configurations and Parking Modules Figure 17 Left Parking Module Slot Configuration (Dual-Robot Only) = Columns unavailable for storage Rack 1 (rear wall) Scalar i6000 Planning Guide Rack 2 (door) 27
Chapter 2: Description Dual-Robot Configurations and Parking Modules Figure 18 Right Parking Module Slot Configuration (Dual-Robotics Only) = columns unavailable for storage Optional 24-slot I/E station for DREM or SEM Optional DREM drive clusters Rack 1 (rear wall) 28 Rack 2 (door) Scalar i6000 Planning Guide
Chapter 2: Description Library Management Module Library Management Module The library management module is located in the control module. It controls system hardware and enables external devices to perform configuration and obtain system status. The library management module contains the following boards: • Management control blade (MCB) - Manages the library, passing commands to and from the robotics control unit as well as the storage area network (SAN) components.
Chapter 2: Description Library Management Module Figure 19 Library Management Module Boards Management control blade (MCB) 30 Scalar i6000 Planning Guide
Chapter 2: Description I/O Management Unit I/O Management Unit The I/O management unit is an optional component that provides connectivity and data path management to a SAN fabric and the hosts. The I/O management unit houses up to four FC I/O blades, which provide FC connections for the Fibre Channel drives in the module. The I/O management unit also houses up to two Ethernet Expansion blades, which handle internal Ethernet communication between the MCB and HP LTO-5 and LTO-6 drives.
Chapter 2: Description I/O Management Unit Fibre Channel I/O Blades There is a single Fibre Channel (FC) I/O blade type: 7404 that autonegotiates up to 4 Gbps. Each FC I/O blade has an embedded controller that provides connectivity and features that enhance the performance and reliability of tape operations. Each blade provides two host communication ports and four connection ports to drives.
Chapter 2: Description I/O Management Unit Figure 20 I/O Management Unit Bay 1 - Not used Bay 3 - FCBor EEB Bay 5 - FCB or EEB Bay 7 - EEB Bay 2 - CMB Bay 4 - FCB or EEB Bay 6 - FCB or EEB Bay 8 - EEB CMB = Control Management Blade FCB = Fibre Channel I/O Blade EEB = Ethernet Expansion Blade Scalar i6000 Planning Guide 33
Chapter 2: Description Robot Robot The robot moves cartridges between storage cells, tape drives, and the I/E station. A picker is used to get or put cartridges in a storage cell or a tape drive slot. The picker moves along an X and Y axis and can pivot 180o. A barcode scanner on the picker assembly identifies cartridges located in storage cells. The library can be configured for either one or two robots. See DualRobot Configurations and Parking Modules on page 25 for more information.
Chapter 2: Description Tape Drives and Media Tape Drives and Media Note: Library firmware versions 630Q (i10) and later do not support DLT tape drives, media, or magazines. If you upgrade to these library firmware versions, make arrangements to remove and/ or replace all DLT tape drives, media, and magazines in your library. If you want to continue to use DLT tape drives and media, your library firmware must be at version 617G.GS01001 (i8.4) or earlier.
Chapter 2: Description WORM Support Note: When you add drives, you lose storage slots. Note: The Scalar i6000/i500 library configured with tape drives over Native Fibre Channel connectivity, allows the utilization of all tape drives simultaneously without loss of performance when utilizing direct connectivity of the Tape Drives with Customer SAN Fabric and Backup Servers environment. The compatibility matrix between LTO tape drives, Scalar Tape Libraries and SAN Switches can be found at http://www.quantum.
Chapter 2: Description Magazines Magazines The magazine is a storage assembly that installs on the drive side or door side of the control module, expansion module, or parking module. It contains the cartridge slots and provides flexibility when adding storage cartridges to a module. The LTO magazines hold six cartridges. Magazines are removable and may have moved during shipment; make sure they are seated.
Chapter 2: Description Cartridges Each magazine has a barcode label that the scanner reads for identification and inventory. An optional, snap-on dust cover is available for the magazines to be used for external storage. The magazines with the dust cover have interlocked stacking that enables easier storage of the media when they are removed from the library. Cartridges Cartridges are stored in magazines within the library and identified by an operator-attached, machine-readable barcode label.
Chapter 2: Description Power System Power System The library supports single and redundant power configurations. The single configuration has either a single AC or DC line input with a single DC power supply. The redundant configuration has either a dual AC or DC line input with dual DC power supplies. You can hot swap a power supply if you have a redundant power supply. You can hot add a second power supply. Note: Power supplies cannot be mixed with other power supplies.
Chapter 2: Description Host Attachment Host Attachment Hosts can be attached to the library in the following ways: • Library Control Path on page 40 • Data Path on page 41 • Path Failover on page 42 • Network on page 43 Library Control Path The library control path is used to send SCSI commands to the library.
Chapter 2: Description Host Attachment SCSI connection uses the Fibre Channel connection on the drive so a dedicated port for library control is not needed. Path failover licenses can be added to a library that has IBM or HP nFC LTO-5 or higher drives. If control path failover is used, a minimum of two path failover licenses are required. The control path fails over to the second port on a drive and then to another drive that is configured for control path failover.
Chapter 2: Description Host Attachment • LTO-4 uses 4 Gb • LTO-3 uses 2 Gb and 4 Gb • LTO-2 uses 1 Gb and 2 Gb • LTO-1 uses 1 Gb • Path Failover (Previously Native Storage Networking (nSNW) (Ethernet Expansion Blade Attached) — Applies to nSNW HP LTO5 FC or LTO-6 drives connected to an Ethernet Expansion blade only. The native 8 Gb FC port on the drive is used.
Chapter 2: Description Operator Panel minimizing the ports used on their FC switches, the second port on the drives do not need to be used. In this case, the failover would go directly from the primary drive to the failover drive. Network The library management interface uses an 10/100 Ethernet port on the MCB for network connectivity. For i11.x, the MCB 2.0 is available with a 1 Gb Ethernet port and for i12.x, the MCB 2.0 has two 1 Gb Ethernet ports.
Chapter 2: Description Operator Panel Figure 22 Operator Panel Status indicator Power indicator Robotics Enabled indicator Power button Robotics Enabled button touch screen The touch screen is the library navigation point and provides access to the Library Management Console (LMC), which is shown in Figure 23 on page 45.
Chapter 2: Description Operator Panel Figure 23 Library Management Console Title bar Menu bar Tool bar Current library Current activity Data transfer statistics Mount statistics Current time and date Media slot usage Configuration summary System status buttons For additional information on the touch screen and the LMC, refer to the Scalar i6000 User’s Guide.
Chapter 2: Description Aisle Lights Aisle Lights Aisle lights are used to illuminate the inside of a module and can be used in conjunction with a webcam to monitor activity within the library. Aisle lights can be configured to turn on at various time intervals and for specific durations. If a webcam is installed, the aisle lights will turn on automatically when the webcam is accessed and turn off when stopped. Note: Aisle lights are available for i2000/i6000 libraries.
Chapter 2: Description Tower Barcode Scanner Note: It is recommended that version i10.2 be used so that the aisle lights turn on automatically when the webcam is activated. Previous versions will require that the aisle lights be turned on independently from the webcam. Note: Webcams are available for i2000/i6000 libraries. However, not all i2000’s have the necessary hardware features. The Control Module serial number in your i2000/i6000 library configuration must be at least 203102253 or begin with 263.
Chapter 2: Description Managing Your Library Remotely enable or disable specific access protocols to limit what type of remote management is possible. In addition to this, most customers should have one or more firewalls in place to govern remote access. As with any Internet accessible service, the LMC requires a communication path so that data can be transmitted between clients and the Scalar i6000. How this communication path is managed depends on the user’s configuration.
Chapter 2: Description Managing Your Library Remotely Scenario 1: Internet-based clients managing multiple internal Scalar i6000s For most organizations, a single administrator will not be managing all storage resources. In this instance, as shown in Figure 24, multiple administrators and even Quantum service personnel may be asked to remotely access Scalar i6000s.
Chapter 2: Description Managing Your Library Remotely In the scenario shown in Figure 24, Quantum highly recommends using virtual private network (VPN) software to control access to the Scalar i6000. VPNs offer authentication and encryption services to protect data transmissions and determine who can access a corporate network. By using VPN, the LMC client appears to be inside the firewall and have unrestricted access when communicating with the library.
Chapter 2: Description Managing Your Library Remotely Scenario 2: Internal clients accessing a single library across an internal firewall Another common configuration is one in which multiple internal clients manage a single Scalar i6000. For example, Figure 25 shows network operation/data center staff providing monitoring services of specific resources.
Chapter 2: Description Managing Your Library Remotely In the scenario shown in Figure 25, customers can utilize port forwarding functionality to enable specific access to a Scalar i6000. Port forwarding works by taking all host communications directed to a specific port and forwarding them to a single IP device. In this case, port forwarding would be configured so that all communications to the Java RMI server port (1099) would be directed to the IP address of the Scalar i6000.
Chapter 2: Description Managing Your Library Remotely Scenario 3: Internal clients accessing multiple libraries across an internal firewall Many customers use a layered system of firewalls to safeguard resources. In the scenario shown in Figure 26, a customer may have multiple Scalar i6000s which need to be administered by internal staff (for example, data center/network operations staff), with a firewall between the administrators and the libraries.
Chapter 2: Description Slot Capacity To enable LMC access between firewall zones, two solutions are possible depending on the customer configuration.
Chapter 2: Description Encryption and Key Management Solutions Note: Maximum numbers assume only one drive and one 24-slot I/E station in the control module. To gain the use of additional storage slots, you must purchase a Capacity on Demand license for the desired number of slots. Expansion modules may also be needed to add more physical capacity. Unlicensed Slots Active Vault and Extended Data Lifecycle Management (EDLM) features do not require the use of licensed slots.
Chapter 2: Description Encryption and Key Management Solutions Table 2 Encryption Key Management/Drive Compatibility Encryption System Supported Tape Drives Quantum Encryption Key Manager (Q-EKM) IBM LTO-4 Fibre Channel Note: Must purchase Q-EKM library licenses per tape drive used1. IBM LTO-6 Fibre Channel IBM LTO-5 Fibre Channel Scalar Key Manager (SKM) HP LTO-4 Fibre Channel Note: Must purchase SKM library licenses per tape drive used1.
Chapter 3 System Specifications This section provides performance, environmental, electrical, and physical specifications for modules in the library.
Chapter 3: System Specifications Performance Specifications Performance Specifications Inventory time varies based on the number of modules and module type. The inventory times for each module are provided below: • CM: 72 seconds • DREM: 72 seconds • SEM: 72 seconds • HDEM (no scanner): 136 seconds • HDEM (with scanner): 34 seconds • LPM/RPM: 34 seconds • Dual Robot feature generally reduces the inventory time by 50%. Exchange performance is highly dependent on library configuration.
Chapter 3: System Specifications Environmental Specifications Environmental Specifications Table 3 lists the key environmental information for the library. Table 3 Environmental Specifications BTU/Heat Dissipation Temperature Humidity Altitude Minimuma Maximumb LTO:50°F - 95°F (10°C - 35°C)c 15 - 75% 10,000 ft .375 kwh 1280 BTU/hour 8.862 kwh 30238 BTU/hour a. Configuration includes a control module with one drive. b.
Chapter 3: System Specifications Electrical Specifications Electrical Specifications Each system can be configured with either a single AC or DC power source as well as a redundant power option. If redundant power is chosen, the control module and the first seven expansion modules that contain tape drives require two independent power sources.
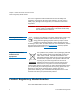
Chapter 3: System Specifications Electrical Specifications Table 4 Electrical Specifications for Control and Expansion Modules (Not including HDEMs) Location Voltage (Single Phase, 50 - 60 Hz) Required Protective Service Delivered Power Connector Part Number AMPs North America 110 30 NEMA L5 - 30 9-01488-03 30 North America 208 30 NEMA L6 - 30a 9-02919-01 30 North America 208 20 NEMA L6-20 9-02918-01 20 North America 208 15 NEMA L6 - 15 9-01488-04 15 International 240 16 I
Chapter 3: System Specifications Electrical Specifications Supported Power Connectors The supported power connectors are shown in Figure 27 and Figure 28.
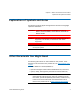
Chapter 3: System Specifications Electrical Specifications Module Power Consumption The power consumption for a control module is listed in Table 5 and for storage only or drive expansion modules, see Table 6. Note: Gen 1 robotics libraries, Gen 2 single-robotics libraries, and Gen 2 dual-robotics libraries have nearly identical readings and fall under these specifications. Table 5 Control Module Power Consumption Subsystem AMP @ 110 V AMP @ 220 V DC AMP @ 48 V kW BTU/hr Base Module 1.82 0.
Chapter 3: System Specifications Electrical Specifications Notes: • Drive values are writing uncompressed data (worst case) • Max 18 drives in a Control Module • Dual robot feature only available with Gen 2 Robot • Dual robot values are for single MCB control, not redundant MCB • Robot numbers are operating • Base Module value does not include a robot or a drive Table 6 SEM and DREM Power Consumption Subsystem AMP @ 110 V AMP @ 220 V DC AMP @ 48 V kW BTU/hr Base Module 0 0 0 0 0 Base Module -
Chapter 3: System Specifications Library Connection Types and Speeds Table 7 HDEM Power Consumption Subsystem AMP @ 110 V AMP @ 220 V DC AMP @ 48 V kW BTU/hr HDEM 0.635 0.32 N/A 0.07 238.7 Library Connection Types and Speeds Table 8 lists the library connection types and speeds.
Chapter 3: System Specifications Physical Specifications – Pallet Physical Specifications – Pallet Pallet Specifications The library control modules, expansion modules, and parking modules are each shipped on the same type of specially designed pallet. For dualrobot new installs or upgrades, the robots will be shipped inside the module. The pallet’s dimensions are listed in Table 9. Table 9 Pallet Dimensions – Module Only Height Width Length 87 in. 221.0 cm 42.5 in. 108.0 cm 48 in. 121.
Chapter 3: System Specifications Physical Specifications – Library • Basic Building Blocks on page 69 • Examples of Common Configurations on page 72 Configuration Rules The Scalar i6000 is a highly configurable library. Standard configuration rules are used for the placement of drives and modules. If specific configuration requirements are needed, e.g.
Chapter 3: System Specifications Physical Specifications – Library Placement of Modules • Control Module (CM) location is always the first module on the left, except when Dual Robots are installed. When Dual Robots are installed, the CM is the second module from the left. • Expansion Modules: • Drive Ready Expansion Module (DREM) are always installed to the right of the CM.
Chapter 3: System Specifications Physical Specifications – Library • Optional 72-slot can be installed in DREMs, HDEMs or SEMs, but not in the RPM. • The LPM cannot support I/E Stations. • A maximum of 16 I/E stations (including the CM I/E Station) can be installed in a library, but with the restrictions listed above. • I/E Stations are installed left to right, with the 72-slot I/E Stations installed closest to the CM followed by 24-slot I/E Stations.
Chapter 3: System Specifications Physical Specifications – Library Table 10 Basic Building Blocks Components Weight Point Load Height Width Depth 71.5 lb/in.2 77.4 in 24.3 in 38.3 in 5.0 kg/cm2 196.6 cm 61.7 cm 97.3 cm Details specific to single-robot configuration CM – fully loaded: robot, drives, redundant power, 24-slot I/E, media 899 lb 409 kg Details Specific to Dual-Robot Configuration CM – Fully loaded: no robot, drives, redundant power, 24-slot I/E, media 897 lb 408 kg 71.
Chapter 3: System Specifications Physical Specifications – Library Components Weight Point Load Height Width Depth DREM – Fully loaded: drives, redundant power, 24-slot I/E, media 882 lb 401 kg 70.2 lb/in2 77.4 in 23.6 in 38.3 in 4.9 kg/cm2 196.6 cm 59.9 cm 97.3 cm DREM – Fully loaded: drives, redundant power, 72-slot I/E, media 894 lb 406 kg 71.1 lb/in2 77.4 in 23.6 in 196.6 cm 59.9 cm 38.3 in 97.3 cm HDEM - Empty 627 lb 49.6 lb/in2 77.4 in 24.3 in 38.3 in 284 kg 3.
Chapter 3: System Specifications Physical Specifications – Library Examples of Common Configurations The smallest library configuration consists of the control module only. The minimal configuration contains one I/E station and one drive. Note: This configuration applies to single-robot systems only. The maximum Gen 1 library configuration is 12 frames and the maximum Gen 2 library configuration is 17 frames. The maximum Gen 1 and Gen 2 single-robotics configurations are shown in Figure 29 and Figure 30.
Chapter 3: System Specifications Physical Specifications – Library Figure 29 Gen 1 single-robot configuration Scalar i6000 Planning Guide 73
Chapter 3: System Specifications Physical Specifications – Library Figure 30 Gen 2 single-robot configuration 74 Scalar i6000 Planning Guide
Chapter 3: System Specifications Physical Specifications – Library Figure 31 Dual-robot configuration Scalar i6000 Planning Guide 75
Chapter 3: System Specifications Physical Specifications – Library Figure 32 Dual-robot, HDEM configuration 76 Scalar i6000 Planning Guide
Chapter 3: System Specifications Module Foot Pad Positions Module Foot Pad Positions The library foot pad positions looking down from the top are shown in Figure 33. The foot pad positions are the same for the control module, expansion modules, HDEMs and parking modules. Figure 33 Library Module Foot Pad Positions back 24.28” (616.68mm) 2X 3.07” (78.07mm) 38.34” (973.87mm) 2X 33.34” (846.8mm) foot pad 4X 2” (50.8mm) front 2X 18.53” (470.6mm) 2X 2.88 (73.
Chapter 3: System Specifications Module Floor Cutout Module Floor Cutout The foot pad positions are shown from underneath the library in Figure 34. The module floor cutouts are the same for the control module, expansion modules, and parking modules. However, the HDEM has a different module floor cutout, as seen in Figure 36 and Figure 37. Note: Floor cutouts can be used for cable access as well as the access hole at the top of the module. Figure 34 Module Floor Cutout (Bottom View) front 2.49 (63.
Chapter 3: System Specifications Module Floor Cutout Figure 35 Module Floor Cutout (Front View) cutout Figure 36 HDEM Floor Cutout (Bottom View) front cutout Scalar i6000 Planning Guide 79
Chapter 3: System Specifications LTO Drive Requirements and Compatibility Figure 37 HDEM Floor Cutout (Front View) cutout LTO Drive Requirements and Compatibility The control module and any drive ready expansion module (including the right parking module in dual-robot configurations) can each contain up to 12 FC linear tape-open format tape drives (LTO-1, LTO-2, LTO-3, LTO-4, LTO-5, and LTO-6).
Chapter 3: System Specifications LTO Drive Requirements and Compatibility Table 11 LTO Drive Compatibility LTO-1 LTO-2 LTO-3 LTO-3 WORM LTO-4 LTO-4 WORM LTO-5 LTO-5 WORM LTO-6 LTO-6 WORM LTO-1 Drive Reads/ Writes N/C N/C N/C N/C N/C N/C N/C N/C N/C LTO-2 Drive Reads/ Reads/ Writes N/C N/C N/C N/C N/C N/C N/C N/C Writesa LTO-3 Drive Readsb Reads/ Reads/ Writes Write Once, Read N/C N/C N/C N/C N/C N/C Write Once/ Read Many Reads/ Writes Write Once, Read N/C N/
Chapter 3: System Specifications Barcode Requirements Barcode Requirements Cartridges must have an external barcode label that is machine-readable to identify the volume serial number. A barcode must use only uppercase letters A to Z and/or numeric values 0 to 9. The library supports Code 39 (3 of 9) type barcode labels. For LTO media barcodes, the library dynamically supports 1 to 14 characters for volume serial number plus a two-character media type identifier.
Chapter 3: System Specifications Barcode Requirements • No black marks should be present in the intermediate spaces or rest zones • No white areas should be present on the bars Scalar i6000 Planning Guide 83
Chapter 3: System Specifications Barcode Requirements 84 Scalar i6000 Planning Guide
Chapter 4 Site Preparations This chapter provides a structure for the collection of all necessary information concerning the delivery site. Record all requested information in the forms provided or create additional sheets as needed.
Chapter 4: Site Preparations General Information General Information Place any additional information in Additional Comments on page 99.
Chapter 4: Site Preparations General Information Telephone Quantum sales rep.
Chapter 4: Site Preparations Physical Environment Physical Environment Place any additional information in Additional Comments on page 99.
Chapter 4: Site Preparations Physical Environment Fire protection Seismic bracing - If seismic bracing is being used, verify that the seismic bracing solution is supported prior to installation.
Chapter 4: Site Preparations Access Conditions Access Conditions Access to the library room (elevator, stairs, door widths, etc.) Dimensions and location of the smallest door or opening Loading dock specifications (dock height, type of ramps, weather protection, etc.
Chapter 4: Site Preparations Access Conditions Semitrailer accessibility (Y or N) Preferred/required local carrier company Where is the trailer location for staging? Availability of material handling equipment Scalar i6000 Planning Guide 91
Chapter 4: Site Preparations Access Conditions Location for uncrating Preferred time of day for unloading and moving materials Off hours/weekends accessibility for installation team 92 Scalar i6000 Planning Guide
Chapter 4: Site Preparations Access Conditions Procedure for obtaining building passes Procedure for scheduling the elevator, loading dock Waste disposal considerations Scalar i6000 Planning Guide 93
Chapter 4: Site Preparations Required Configuration Information Bargaining unit considerations Other considerations Required Configuration Information The following is some of the information that will be needed during installation of the library. Place any additional information in Additional Comments on page 99.
Chapter 4: Site Preparations Required Configuration Information License string: IP address (internal) IP addresses of the two network time protocol (NTP) servers: 1. 2.
Chapter 4: Site Preparations SAN Readiness If your mail server requires a user name and password you can enable this on the library and enter these for e-mail authentication.
Chapter 4: Site Preparations Dual Robotics Upgrade Requirements NPIV Requirements To configure a tape drive for either control path or data path failover, you need the following: • The library must have a Native Storage Networking license installed. • The tape drive to be configured for data path failover must be licensed for native storage networking. • The tape drive must be an HP LTO-5 or LTO-6 Fibre Channel tape drive.
Chapter 4: Site Preparations Gen 2 Single Robotics Upgrade Requirements Requirement Scalar i6000 — Scalar i2000 libraries must be upgraded to Scalar i6000 before upgrading to dual robotics. Gen 2 — Dual robotics libraries use the Gen 2 robot. If you are upgrading from a Gen 1 system, the hardware and robots need to be upgraded to Gen 2. You cannot add a second robot to a Gen 1 system. No DLT tape drives, media, or magazines — Dual robotics libraries do not support DLT tape drives or media.
Chapter 4: Site Preparations High-density Expansion Module Requirements Requirement Scalar i6000 — Scalar i2000 libraries must be upgraded to Scalar i6000 before upgrading to Gen 2 robotics. No DLT tape drives, media, or magazines — Gen 2 robotics libraries do not support DLT tape drives or media. Remove these from the library before the upgrade. High-density Expansion Module Requirements Add.
Chapter 4: Site Preparations Additional Comments 100 Scalar i6000 Planning Guide