
User's Guide


Chapter 8 Extended Data Lifecycle Management
Incomplete EDLM Scans
Scalar i500 User’s Guide 215
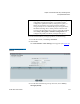
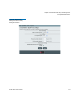
4 Type a name for the partition in the Enter Name text box.
5 Type in the number of storage slots to assign to the partition in the
Enter Number of Slots text box.
6 Select the drive(s) you want to add to the partition from the table.
Only EDLM scanning drives appear in the list.
7 Click Next.
The Create Partition - EDLM Policy Settings screen appears (see
Figure 34
on page 217).
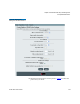
8 If desired, set EDLM scanning policies on this EDLM library
managed partition (go to Step 5: Setting Up Automatic EDLM
Scanning Policies on Partitions on page 216).
9 If you do not wish to configure automatic EDLM scanning policies on
the partition, click Apply to finish.
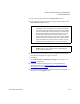
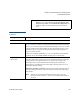
Note: The number in parentheses indicates the number of slots
available for use in the partition. For standard partitions,
the number equals the number of licensed slots available,
and the default equals the total number of available slots.
Since EDLM partitions can contain both unlicensed and
licensed slots (using all unlicensed slots before using
licensed slots), the number in parentheses equals the total
number of licensed and unlicensed slots, and the default
equals the number of unlicensed slots available. You can
configure EDLM partitions to use zero slots if desired.
Note: The Select Emulation Type and Select Media Barcode
Format fields are not selectable when creating EDLM
library managed partitions.