
User's Manual


Chapter 8: Installing, Removing, and Replacing Components
Removing and Replacing the Chassis
212 Quantum Scalar i40 and Scalar i80 User’s Guide
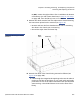
Figure 51 Reinstalled
Components
Ethernet
cable in LEFT
SCB port
Tape drive cables
Power supply
cord
13 Turn ON the library by pressing the power button on the front
panel.
14 Wait for the library to initialize. This can take
up to 5 to 17 minutes,
depending on library size.
15 You will notice the library has a new diagnostic ticket (DT042)
sta
ting the library’s vital product data (VPD) has changed.
16 Reconfigure host applications to support the new library VPD (serial
nu
mber, WWNN, and drive addresses).
17 If you had license keys installed on the old library, install the new
li
cense keys. From the operator panel, select Setup > License
Installation; or from the Web client, select Setup > License. For
further directions, see
Applying a License Key on page 70.
18 Run the Installation and Verification Test (IVT) to ensure the robot,
tape drives,
and magazines are all functioning properly. From the