
User's Guide


Scalar 24 Installation and Operation Guide 27
• While installing a rack mounted unit, do not block or otherwise restrict airflow to the front or rear
vents.
• To maintain rack stability, consider the mechanical loading of the rack to ensure a low center of
gravity.
• Before installing a unit into a rack, consider the overall loading of the branch circuit supplying power
to the rack.
• Since this unit is intended to be attached to an earth ground, ensure that a reliable path to earth
ground is maintained within the rack.
Tools required: #3 Philips screwdriver and #1 Philips screwdriver
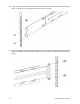
1 The Scalar 24 requires a 4U (7-inch) space in a standard 19-inch rack. Ensure that this amount of space
is available in the rack. Measure and mark the holes to simplify the subsequent steps.
2 Remove the rackmount assembly from packaging.
3 Power down your Scalar 24 and disconnect the AC line cord from the AC source outlet.
4 Disconnect the SCSI cable from the rear panel of your Scalar 24.
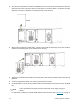
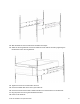
5 Using a #1 Philips screwdriver, take off the cosmetic cover of the Scalar 24 by removing the six screws
(3 per side) on the sides of the cover. Slightly bend the sides and lift the bottom edge of the cover away
from the unit. Lift the cover up to remove it.