
User's Manual


Chapter 4 Configuring StorNext
Windows Configuration Utilities
StorNext 3.1.3 Installation Guide 73
Client Configuration 4
The Client Configuration utility lets you view and modify properties for
the StorNext client software. Use the utility to add name servers, map file
systems to drives, and configure a distributed LAN server or a
distributed LAN client.
To run the Client Configuration utility, on the Windows Start menu, click
All Programs > StorNext File System > Client Configuration.
The Client Configuration utility includes six tabs:
• Drive Mappings on page 73
• FS Name Servers on page 75
• Authentication on page 76
• Mount Options on page 78
• Syslog Level on page 79
• Cache Parameters on page 80
• Distributed LAN on page 81
Click a tab to view or modify StorNext client properties. After making
changes on one or more tabs, click
OK to save the changes. A message
appears prompting you to restart the system. Click
Yes. Most changes do
not take affect until the system is restarted.
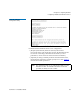
Drive Mappings 4
To access a StorNext file system, it must be mapped to a local drive letter
on the client system.
Use the Drive Mappings tab (figure 37) to map file systems to local drives.
Table 14 describes the fields on the Drive Mappings tab.
Note: You must specify a file system name server on the FS Name
Servers
tab before mapping drives.