
User's Manual


Chapter 4 Configuring StorNext
Configuration Wizard
StorNext 3.1.3 Installation Guide 64
The following sections describe each step of the Configuration Wizard.
Each step consists of a separate wizard that guides you through a task. To
complete a task, follow the onscreen instructions. To see more detailed
instructions for completing a task, refer to the indicated section in the
StorNext User’s Guide.
Step 1: Enter License 4
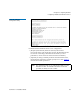
The Enter License Wizard guides you through the steps of entering a
license string. A license string must be entered before you can configure
or use StorNext.
You can generate a temporary license that is valid for 30 days. To obtain a
permanent license, contact the Quantum Technical Assistance center at
licenses@quantum.com and provide the following information:
• The product serial number from the StorNext box or CD.
• The number of client machines connecting to the MDC.
• The StorNext Server ID number. (This number can be found on the
Enter License String window of the Enter License Wizard.)
To display the Enter License Wizard at any time, on the Config menu,
click
Enter License. For more information about entering a license, see
Chapter 4, “Common StorNext Tasks,” in the StorNext User’s Guide.
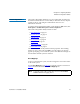
Step 2: Add File System 4
The Add New File System Wizard guides you through the steps of
creating and configuring a new file system. The wizard also lets you
establish a mount point for the file system, specify disk block size, and
customize stripe groups.
A file system is a shared data pool that can be accessed by client systems
and applications. Each file system contains one or more stripe groups. (A
stripe group is a logical volume that consists of one or more disks.)
Note: Using the Configuration Wizard to configure StorNext is
optional. All configuration tasks can be accessed at any time
using the StorNext main menu, as described in the following
sections.