
User's Manual


Chapter 3 Installing the StorNext Client
Installing the StorNext Client on Windows
StorNext 3.1.3 Installation Guide 52
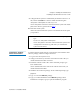
Figure 21 StorNext Installation
Window: Remove StorNext
3 Click Remove StorNext.
A dialog box appears informing you that the current client
configuration has been saved.
4 Note the name and location of the saved configuration file, and then
click
OK.
5 If prompted, click Yes to continue, and then click OK to finish the
removal.
6 When the removal is complete, click Yes to reboot the system.
Running the Setup
Wizard 3
To launch the setup wizard, use the correct StorNext installation CD for
your operating system, or use the client software installer you
downloaded from the MDC.
1 If necessary, unzip the client software archive file you downloaded
from the MDC.
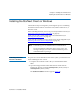
2 Open the unzipped folder and double-click the client software
installer file. This file is named
SnfsSetup32.exe (32-bit systems) or
SnfsSetup64.exe (64-bit systems).
The StorNext Installation window appears (figure 22).
Note: After installing the new version of StorNext, you can restore
the saved client configuration (see
Restoring a Previous Client
Configuration on page 56).