
User's Manual


Chapter 2 Installing StorNext File System
Installing StorNext File System on Linux or Unix
StorNext 3.1.3 Installation Guide 26
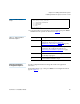
Figure 6 Configuration Menu
When you first enter the Configuration Menu, it displays recommended
locations for StorNext application directories based on the available file
systems detected by the installation script. To accept the recommended
directory locations and return to the Main Menu, press
<Enter>.
Alternately, customize the installation by specifying the file systems
where application and support files are stored.
1 On the Configuration Menu, type the number that corresponds to the
directory location you want to customize (
1–6), and then press
<Enter>.
A list of available local file systems is shown.
2 To change the file system where the directory is located, type the
name of the file system and press
<Enter>.
3 To confirm the change, type yes and press <Enter>.
To customize additional directory locations, repeat steps 1–3.
4 When you are done customizing the installation, press <Enter> to
return to the Main Menu.
Performing an
Installation Operation 2
To install StorNext using the options specified on the Configuration
Menu, perform an installation operation.
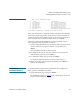
1 On the Main Menu, type 2 and press <Enter>.
The installation script runs (figure 7). The script displays the current
progress of the installation.