Qflash 4d Digital Flash ® Models T4d, X4d Operating Instructions For use with Quantum Turbo®, Turbo 2x2, Turbo Compact, or Turbo Z Batteries Quantum Instruments Designed and manufactured in the USA
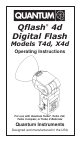
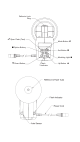
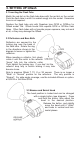
Reflector Lock Ring M Open Flash (Test) Mode Button I ■ Option Button Set Button G Modeling Light ● L Down Button Flash Indicator Up Button J
1
TABLE OF CONTENTS Section 1.0 2.0 3.0 4.0 5.0 6.0 7.0 8.0 9.0 10.0 11.0 Description INTRODUCTION WARNINGS SETTING UP Qflash NEW FEATURES FOR PREVIOUS Qflash OWNERS QUICK START Qflash OPERATION WITH QUANTUM DEDICATED QTTL ADAPTERS MULTIPLE Qflash OPERATION - WIRED MODE MULTIPLE Qflash OPERATION - WIRELESS MODE EXPOSURE COMPENSATION OF Qflash TYPICAL LIGHTING SITUATIONS CUSTOMER SERVICE 1. INTRODUCTION Qflash models T4d and X4d provide professional quality lighting for both digital and film cameras.
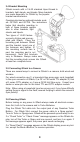
3. SETTING UP Qflash 3.1 Inserting the Flash Tube Match the red dot on the flash tube base with the red dot on the socket. Push the flash tube in until it is seated snugly into the socket. Excessive force is not required. Replace the flash tube only with Quantum type QF30 or QF30uv for Qflash model T4d. Qflash model X4d requires QF32 or QF32uv flash tubes. Other flash tubes will not provide proper exposure, may not work at all, or they may damage the Qflash. 3.
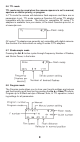
3.4 Bracket Mounting Qflash mounts with a 1/4-20 standard tripod thread to brackets, light stands, and tripods. Many brackets are made especially for Qflash by the popular bracket manufacturers. Quantum also has two optional brackets, models QF70US and QF70E. The instructions below that describe mounting to both of these brackets applies also to other brackets, light stands, and tripods. Two types of 1/4-20 fasteners and a friction pad are supplied with Qflash.
If at any other time Qflash should behave strangely or not respond to commands, it may be restored to factory settings. Refer to Section 5.10.7 to force a reset. Note that in the event of a reset all operator data entered (film speed, f/#, etc.) will be lost and must be entered again. * Lumedyne or Norman systems may power Qflash X4d. See the separate sheet enclosed for compatible model numbers. 3.7 Reflector Specifications The ”normal” QF60 reflector is supplied with Qflash 4d.
5. QUICK START IMPORTANT! With digital cameras perform a custom white balance prior to a shooting session. Otherwise, the camera will assume you are using some unknown flash. 5.1 Controls Qflash controls operate in predictable ways. Spend a moment to get the feel of the controls. The Mode I, Set G, and Option ■ buttons select the type of features or settings you want to change. Mode I sets the flash operating mode, such as Automatic, Manual, TTL, etc.
5.3 Changing modes To change from one mode to another: Press Mode I button. The flash mode display will blink. Use Up J or Down L buttons to change mode. 5.4 Changing settings in Manual mode The camera exposure may be set to manual, or aperture or shutter priority; however, Qflash will emit the fixed amount of light shown on its display. Press Set G one or more times until the parameter you wish to change blinks.
5.6 TTL mode TTL mode may be used when the camera exposure is set to manual, aperture or shutter priority, or program. In TTL mode the camera will determine flash exposure and there are no parameters to set. TTL mode requires a Quantum QF series TTL adapter compatible with the camera. The listing for compatible QF series TTL adapters is available from your dealer, in the latest Quantum price list, or at www.qtm.com. QF series TTL adapters are generally not compatible with digital cameras.
Your Qflash is factory preset with several Programs (which you can always change). To view them, press Mode I, then Up J or Down L until you see the Program mode displayed, like the one above. After the “P” stops blinking, press the Up J or Down L buttons jump to the next higher, or lower program number. (Programs numbers which have not been “set” will be skipped). How to set up or change a Program While in the Program mode, press the Set G button.
5.9.1 Flash Sensor Limit for Auto and Auto Fill Modes Flash sensor limit is an option that limits the distance that the sensor “sees” when the Qflash is in Auto mode. If the subject has no background (an open field outside) or the background is far away (a large catering hall), the sensor tries to balance the light from the subject with the lack of light coming from the background. The result is an over exposed subject.
5.9.2 Linked Ratio Linked Ratio sets lighting ratios between any Qflash and a Qflash 4d. The available ratios are from -3 to +3 stops, in 1/3 stop increments that display as: -3, -2 7, -2 3, -2, ...etc... +2, +2 3 +2 7, +3. See Sections 7 and 8 for more details. 5.9.3 Resetting the Flash Counter This option can be used as a way of confirming that the flash has fired for every picture taken. To zero the counter, push the Set G until number of flashes will blink. Use Up/Down J L buttons to clear the counter.
When using a Telephoto Reflector QF63B the Auto mode cannot be used because the flash sensor is blocked. Use Manual, TTL, QTTL, Strobo or Linked modes. Use “B” series reflectors (QF61B, QF62B g/s, QF63B) with Qflash 4d. The standard QF60 reflector mounts to Qflash 4d as well. 5.9.7 Changing between Feet and Meters Set your preference for the display of metric (M) or US distance (Ft) units. Guide numbers also change accordingly. 5.10 Features of Qflash 5.10.
The Flash Indicators light for several seconds after a flash. See 5.10.2 above for the signals they display. The Speaker (if turned on, Section 5.9.4) will sound after a flash. The audible signal is one “beep” for OK and “ready”, and three “beeps” for Under or Over. In addition to OK / Under / Over exposure indicators, a ‘Limit’ indicator is added if the Auto Sensor Limit has been selected (Section 5.9.1). If the flash output has reached the sensor limit set (5, 10, 15 or 20ft.
5.10.8 Quick Turn off If you are using the Qflash as an on-camera flash and want to disable the flash for a few shots you can use the ‘quick turn off’ feature. To activate the quick turn off feature press Mode I twice. The word ‘OFF’ will appear in the display. To return to normal operation press any button (except Test M). Note: This feature will only prevent the flash from firing; it will not turn off the Qflash or the Turbo. To completely turn off the Qflash the Turbo must be turned off. 5.10.
The camera exposure may be set to manual, or aperture or shutter priority, however, Qflash will emit the fixed amount of light shown on its display. Note that only the camera controls the F# and ISO shown on the display- you cannot change it on Qflash. The distance shown on the Qflash display will correspond to the correct distance for good exposure for the F# selected. The camera also selects its shutter speed consistent with flash exposure. 6.
Error messages will appear if you choose a fill ratio which will is out of range of the flash. The error indications are: “OUT OF RANGE - DECREASE FILL OR F#” For example, the camera is set to F16 and QTTL fill flash is set to +2 stops. Either decrease F# on the camera or decrease the fill flash ratio on the QTTL adapter. “OUT OF RANGE - INCREASE FILL OR F#” For example, the camera is set to F2.8 and QTTL fill flash is set to -3 stops.
6.5 Additional QTTL features 6.5.1 Rear curtain sync If supported by your camera, the QTTL adapter can fire Qflash in sync with the rear curtain. Rear curtain sync is selected by a switch located on the back of the adapter. Set it to “R” for rear curtain, or “F” for front curtain. 6.5.2 Auto focus assist If your camera requires an infrared focus assist the QTTL adapter will project a beam when the camera focuses. You can turn the auto focus function on or off by a switch on the adapter. 6.5.
Fill/flash — QTTL D series adapters provide for fixing fill/flash ratios between the camera’s exposure and the flash’s exposure. Both fill/flash and Linked ratios can be set independently. Here’s an example of using both ratios: A QTTL adapter is connected to a camera set to f/8. A Control Qflash in Auto Fill mode is connected to the QTTL adapter. The R Fill dial is set to -2 stops. The light produced by the Control Qflash will be F/4, 2 stops less than the camera.
Press the Mode I button on the Qflash that you want to be the Control Qflash (usually the one at the camera). The display for this Qflash will change to ‘Wired Control’, and display the data for Remote 1 (R1) and Remote 2 (R2). The displays of the two Remote Qflashes will automatically change to R1 and R2. To change which Qflash is Remote 1 and 2 see Section 7.5. To designate another Qflash to be the Control, press Set G on the Control flash. “Control” will blink.
Press Set G again to set the parameters for the mode selected. For example, power (1/64 to 1/1) for Man, F# for Auto, etc. There are no settings for TTL or OFF modes. If a QTTL adapter is connected to any of the Qflash 4d’s, then QTTL mode will be available for all of the Qflashes. The Control Qflash will display the fill/flash ratio set on the QTTL adapter. To change the ratio, turn the R Fill dial on the QTTL adapter. The fill ratio will be effective for all Qflashes connected.
7.2.1 Two Qflashes in Manual or Strobo mode Each Qflash works independently. This allows you to increase power, create multiple light sources and to set ratios manually. 7.2.2 Two Qflashes in TTL or QTTL mode For this setup use either QF series TTL adapters, FW series TTL adapters, or D series QTTL adapters. This setup can increase power and / or create multiple light sources with TTL control. 7.2.
7.2.4 One Qflash in Auto mode, one in Linked mode Controls light output With the Qflash Model T/T2/T2d in Auto mode, the TTL mode of the Qflash 4d is replaced by Linked mode. The ‘Linked’ unit’s light output will be controlled by the sensor of the unit in Auto mode. Use this set up when you want more light than that available from one Qflash, or when you want light from two directions, controlled by the Qflash near the camera, for example. 7.2.
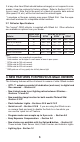
23 Wired Matrix - for only Qflash 4d Man, AP, SP ?? Man, AP, SP, Prog Man, AP, SP M M M M A A A A T T T - TTL - T T T - - - - L QTTL Linked L Wired Remote 1 or 2 Manual auto M A M A O O O O OFF O O Camera Exposure Control A A M M M - A M M T T** T - S S S S S - - - L T T T - - - - L O O O O O Remote Qflash modes and how the light is controlled All models model 2 models 2d & 4d Manual auto TTL Strobo Slave QTTL Linked OFF M A S O M A S L L O **
8. MULTIPLE Qflash OPERATION WIRELESS MODE Quantum Qflashes can be coordinated and controlled wirelessly using Quantum FREEXWIRE ™ Digital Transceivers. Qflash types can be mixed (Section 8.2), or only Qflash 4d’s can be used. FREEXWIRE’s connected to Qflashes need to be set for the “TTL” option. The procedure, explained in detail in the FREEXWIRE instructions, is summarized below: • Turn off FREEXWIRE. Disconnect external power if connected. • Switch Local/Relay switch to Relay.
8.1.1 Set the Control Qflash Set Wireless Control mode on the Qflash connected to the camera. To enter the Wireless mode press Mode I, then Up/Down J L. When the Wireless mode is first entered Qflash 4d defaults to “Wireless Remote1.” Press Set G. The flash mode will blink. Press Up/Down J L to change to “Wireless Control”. When the Wireless Control mode is first entered the data for Remote 1 (R1) and Remote 2 (R2) will show as a series of dashes.
If the Control Qflash is in Auto mode, then Linked mode may appear for R1 or R2 modes. Next to Linked will appear the ratio. Use the Up/Down J L buttons to change this ratio. (If both R1 and R2 are in ‘Linked’ or TTL mode, the ratio will appear next to R1 only, although this ratio is for both flashes). Press Set G again and the word SEND will appear next to the data for R1 or R2. The Control Qflash in now sending the data to the Remote Qflash. 8.1.
half way (to wake up the camera or metering function). The Qflash display will then update to the current camera settings. With some cameras, updating takes place automatically. The Control Qflash can be set to QTTL mode, and fill/flash ratios can be set on the QTTL adapter. Note: Some cameras have their own flash compensation ( +/-). Use either the camera’s flash compensation, or Qflash’s, but not both. Auto mode is replaced by Auto Fill mode.
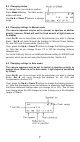
8.3 Matrix of Qflash / FREEXWIRE features The chart on next page shows all possible operating modes for all models of Qflash when used in the wireless mode with FREEXWIRE. Note that Wireless modes are not required. You may use the normal Manual, Auto, TTL, QTTL, etc. modes without the ability to change settings on the Remote Qflashes from the Control Qflash. 8.
29 Man, AP, SP Man, AP, SP, Prog Man, AP, SP - A A M M - A A M M A A A M M M - T T T L L T L TTL L T - All models - S S S S S S S S S - O O O O O O O O O OFF O O O O 2d-4d - M M M M M M - - Manual - - A A A A A A - - - - - - - T - - - - - - - L L - - - O O O O O O - - Qflash 4d only Wireless Remote 1 or 2 Auto TTL Linked OFF - Wireless Remote Qflash Strobo S S S S **Auto Fill and QTTL only available with D series adapters.
9. EXPOSURE COMPENSATION OF Qflash Quantum calibrates Qflashes to American National Standards Institute (ANSI) standards with laboratory equipment traceable to the National Institute of Standards and Technology (NIST). From time to time, photographers may wish to fine-tune Qflash exposures to match their exposure meters, to compensate for variations in cameras or films, to match particular styles, for effects, or for individual taste.
flash meter reading will be increased by whatever bounce occurs from nearby surfaces. These factors will affect calibration and should be considered. 3. Turn Qflash on and change the manual power setting to 1/8. 4. Set the film speed on the flash and the flash meter to the same value. 5. Change the F number on the flash until the distance shown in the display is 10 feet. 6. Fire Qflash. Push the Set G button four times. “+0” will appear in the upper right corner of the display and begin to blink. 7.
6. Use Up J button to increase light output (if flash meter reads less than F 8.0), or use Down L button to decrease light output (if flash meter reads more than F 8.0). The light output can be increased or decreased by as much as 2 stops in 1/3 steps. 9.3 Compensation, Fill/Flash, and Linked ratio summarized The diagram shows all three types of adjustments on a Qflash 4d display. The table summarizes the characteristics of each.
10. TYPICAL LIGHTING SITUATIONS This section covers some typical lighting situations that photographers find themselves in, and how the Qflash models T4d and/or X4d can help. 10.1 Portrait Setting up a 3:1 portrait ratio has always been time consuming. It is usually accomplished with three flashes: Main, Fill, Background set to manual. Each flash needs to be adjusted and metered separately. If the Main is in an umbrella or soft box this becomes even more time consuming.
Now the system is set up for perfect portrait lighting, with no metering needed. The on camera Qflash (Control) which is producing a flat light will shut off one stop below the lens setting (Fill). Remote 1 Qflash will produce a light from the left (loop lighting) that is equal to the lens setting (Main). This will achieve the portrait 3:1 ratio. The ratio can be adjusted by changing the F number of the Control Qflash and the linked ratio.
Suggestion: Use Program mode to preset a number of Auto, Auto Fill F stops with/without Sensor Limit for easy use during your photo shoot. 10.3 Manual shooting made easy Nothing can beat the combination of a flash meter and a flash set manually. Automatic and TTL are a compromise based on the need for speed. Setting the flash for a manual power setting and taking an incident meter reading takes time and resources the average photographer may not have.
10.4 Wireless lighting ratios made easy When using multiple lights to light a subject it’s very easy to set up a lighting ratio between the Main and Fill lights. The ratio can be set from -3 stops to +3 stops. Equipment needed: • One Qflash 4d located at camera position • One Qflash / 2/ 2d/ 4d located off to the side of the subject • Two FREEXWIRE’s • Two FW31 cables • Two Quantum Turbo, 2x2, Z, or Compact Batteries Set up: Connect the equipment as shown. Set the Main flash to TTL mode.
10.5 Lighting ratios using a control cable This set up is similar to the wireless one above. The only difference is that a Qflash 4d is not used in the Main position. If you are using two Qflash 4d’s, then see section 7.1 for more detail. Equipment needed: • One Qflash 4d located at camera position • One Qflash / 2/ 2d located off to the side of the subject • One QF50 control cable • Two Quantum Turbo, 2x2, Z, or Compact Batteries Set up : Same set up as previous page.
11. CUSTOMER SERVICE Having any trouble in using your Quantum product? We are here to help. Mail, call, fax, or email our Service Department: Service Department Quantum Instruments Inc. 1075 Stewart Avenue Garden City NY 11530 Tel: 516 222 6000 Fax: 516 222 0569 email: QuantRep@qtm.com Troubleshooting tips are available at www.qtm.com, Support, Customer Support, FAQ. If you suspect a malfunction or require adjustment, return the unit to us with an accurate description of the problem.
Qflash T2/X2, T4d/X4d ACCESSORIES QF61B SNOOT QF62Bs/g BARE BULB ENHANCER QF63B TELE-REFLECTOR QF67A WIDE ANGLE DIFFUSER 39
Qflash T2/X2, T4d/X4d ACCESSORIES QF63T / QF36X REMOTE FLASH HEAD QFT2/X2 QFT4d/X4d QF68 SOFTBOX 40
OTHER QUANTUM PRODUCTS TURBO 2X2 TURBO COMPACT QPAQ-X RADIO SLAVE FREEXWIRE ™ 41
Quantum Instruments Inc 1075 Stewart Ave. Garden City NY 11530 Tel: 516 222 6000 Fax: 516 222 0569 Email: QuantRep@qtm.com www.qtm.