
User's Manual


Configuring and Operating the DLT4000 Basic Tape Drive
3-14 DLT4000/DLT4500/DLT4700 Cartridge Tape Subsystem
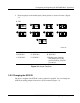
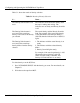
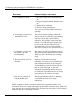
Drive State Indicator Displays and Actions
a. No cartridge is present 1. The yellow Tape in Use indicator turns
off.
2. The green Operate Handle indicator turns
on.
3. The handle is unlatched.
4. The drive beeps momentarily.
You can now raise the handle and insert a
cartridge.
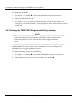
b. A cartridge is present and
the handle is down
The drive loads the cartridge. When the
yellow Tape In Use indicator stops blinking
and stays on, the tape's actual density
indicators. For example, if the actual tape
density is 2.6 GB, then the indicator turns
on next to the 2.6 label. When Density
Override blinks, you can select a density.
The drive is ready for use. (See Section 3.4.)
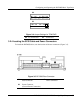
c. A cartridge is present, but
the handle is up (not
recommended)
The yellow Tape In Use indicator turns off.
The green Operate Handle indicator flashes.
When you lower the handle, the cartridge
loads.
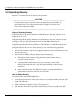
d. The drive detects an error
condition
Right or left side indicators blink
repeatedly. You may try to unload the tape
and reinitialize the drive by pressing the
Unload button or turn drive power off and
then on again. The right- or left-side
indicators stop blinking and the drive tries
to reinitialize. The indicators turn on steady
again and turn off if the test succeeds.
e. The drive is powered on
with the handle open
The Operate Handle indicator is blinking;
close handle and wait for a steady
indications.
POST completes in about 15 seconds and the drive responds normally to all
commands. However, it might take longer for the media to become ready. After a bus
reset, the tape drive responds within a bus selection time-out period. Use this table to
determine the drive's operating condition: