
User's Manual

Configuring and Operating the DLT2500 Mini-Library
DLT2000/DLT2500/DLT2700 Cartridge Tape Subsytem 4-7
4.3 Configure and Install the DLT2500 Mini-Library
This section describes how to configure and install the mini-library including:
•= Configuration guidelines
•= Connecting the SCSI signal cable to the mini-library
The mini-library is factory set to SCSI ID 5, unless otherwise specified.
4.3.1 Configuration Guidelines
Your system uses the SCSI ID to identify, or address, the mini-library. Follow these
guidelines when you configure the mini-library for your system:
If you are installing the mini-library as …
……
…
Then …
……
…
The only SCSI device on the bus or one of
multiple SCSI devices on the bus
Be sure to use a SCSI ID that is unique
from any other device or system ID on
the SCSI bus.
If you need to change the SCSI ID, see
the section on setting the SCSI ID, later
in this chapter.
The last or only device on the SCSI bus The user must terminate the bus by
installing a terminator.
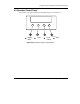
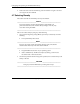
4.3.2 Connecting the SCSI Signal Cable to the Mini-Library
Examine the components on the mini-library rear panel (Figure 4-3) to complete the
physical installation.
To connect the SCSI signal cable:
1. Ensure the mini-library power is turned off.
2. Connect one end of the SCSI cable to an available SCSI signal connector on the
mini-library rear panel.
3. Snap the wire cable clamps into place or tighten the screws (whichever is supplied)
to secure the cable.
4. Connect the other end of the SCSI signal cable to the SCSI connector on your
system, or for daisy-chained configurations, to another SCSI device.
See your system documentation for system SCSI connections.