
User's Manual


Configuring and Operating the DLT2000 Basic Tape Drive
DLT2000/DLT2500/DLT2700 Cartridge Tape Subsystem 3-13
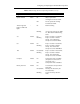
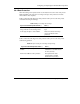
Table 3-2 POST Sequence of Events
Stage What Happens
1. The lights on the right front panel turn on sequentially from top to bottom. All
lights stay on for a few seconds.
2. The lights on the left front panel turn on at the same time for about three
seconds and then turn off.
3. The green Operate Handle, the orange Write Protected, and the yellow Use
Cleaning Tape lights turn off. The yellow Tape in Use light blinks while the
tape drive initializes.
4. After initialization, the drive is in one of the following four states:
Drive State Indicator Displays and Actions
a. No cartridge is present
1. The yellow Tape in Use light turns off.
2. The green Operate Handle light turns on.
3. The handle is unlatched.
4. The drive beeps momentarily.
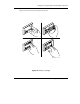
You can now raise the handle and insert a
cartridge.
b. A cartridge is present
and the handle is down
The drive loads the cartridge. When the yellow
Tape In Use light stops blinking and stays on,
the tape's actual density lights. For example, if
the actual tape density is 2.6 GB, then the light
turns on next to the 2.6 label. When Density
Override blinks, you can select a density. The
drive is ready for use. (See Section 3.4.)
c. A cartridge is present,
but the handle is up (not
recommended)
The yellow Tape In Use light turns off. The
green Operate Handle light flashes. When you
lower the handle, the cartridge loads.
d. A cartridge is not
present and the handle
could be up (not
recommended)
The yellow Tape In Use light turns off. The
green Operate Handle light flashes. When you
lower the handle, the cartridge loads.