Quick Setup Guide Model: QN-I-470
Copyright Information Copyright & trademark specifications are subject to change without prior notice. Copyright © 2018 Quantum Networks (SG) Pte. Ltd. All Rights Reserved. Quantum Networks® & the logo are trademarks of Quantum Networks (SG) Pte. Ltd. Other brands or products mentioned may be trademarks or registered trademarks of their respective owners.
Contents Glossary ....................................................................................................................................4 Before You Begin ....................................................................................................................5 Package Contents ...................................................................................................................5 Prerequisites .............................................................................
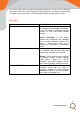
This Quick Setup Guide provides step-by-step instructions on how to set up Quantum Networks Access Point. After completing the steps described in this Guide, you will be able to install the Access Point (AP) on site and provide wireless network access to users. Glossary Feature Management Mode Operation Mode Quantum RUDDER Description Standalone: In this mode, each device is configured and managed individually. It can be useful in scenarios with few devices or sites with limited internet access.
Before You Begin Your Quantum Networks’ Access Point can work in “Standalone Mode” or can be managed by “Cloud Controller”. To manage Access Point by “Cloud Controller”, please follow step 5 first and then step 1. For “Standalone Mode”, continue with step 1. Package Contents • Access Point • Quick Setup Guide Prerequisites Internet access Desktop / Laptop / Handheld device 802.3af / 802.
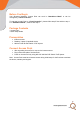
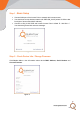
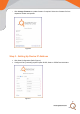
Step 1 - Basic Setup Connect WAN port of the Access Point to network with internet access. You should see a new wireless network with SSID QN_XX:XX (where XX:XX are last four digits of Access Point MAC Address). Connect to QN_XX:XX SSID and browse Access Point’s default IP “169.254.1.1”. You should be greeted with welcome message. Figure 1 Step 2 - Check Device Info / Change Firmware Click Device Info to view information about device MAC Address, Serial Number and Current Firmware.
o Click Change Firmware to update firmware if required. Select the firmware file from respective location and update. Figure 3 Step 3 - Setting Up Device IP Address Click Start Configuration (Refer Figure1). Configure IPv4 by selecting required option DHCP, Static or PPPoE and click Next.
Management Mode Quantum Networks’ Access Point can be configured in two modes: Standalone Independent management of each Access Point Cloud Controlled Centralized management of Access Points using Quantum RUDDER Step 4 - Access Point Quick Setup in Standalone Mode Select “Management Mode” as “Standalone”, if each Access Point is to be configured and managed individually. Define username and password for the device and click “Next”. User can select Access Point Operation Mode as Bridge or Router.
iii. Review the Configuration Summary. Click Reconfigure if any changes are required or click Finish to complete the configuration.
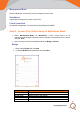
Router i. ii. Select option Router and click Next. Configure WLAN (SSID) and Local subnet parameters and click Next. Figure 7 Parameter WLAN Country Timezone WLAN Name SSID Password Local Subnet IP Address Subnet Mask Value Select country Select timezone Define name for the network Define visible wireless network name Configure passphrase for SSID LAN IP address.
iii. Review the Configuration Summary. Click Reconfigure if any changes are required or click Finish to complete the configuration. Figure 8 Click Reconfigure if any changes required or click Finish to complete the Configuration.
Step 5 - Access Point Quick Setup in Cloud Controlled Mode Select “Management Mode” as “Cloud Controlled”, enter Quantum RUDDER login credentials and click “NEXT”. (If you do not have an account on Quantum RUDDER, please refer Step 6) Select Cloud Controller site, where Access Point’s needs to be added and click “Next”. User can select Access Point’s Operation Mode as Bridge or Router. Bridge I. Select Operation Mode as Bridge and click Next. a.
Router I. II. Select Operation Mode as a Router and click Next. Configure WLAN (SSID) and Local subnet parameters and click Next. Figure 10 Parameter WLAN Name SSID Passphrase Local Subnet IP Address Subnet Mask Value Define wireless network name Define visible wireless network name Configure passphrase for SSID LAN IP address. This IP address can be used for accessing this Access Point LAN Subnet mask Note: If you do not want to create WLAN (SSID)/LAN now, click Skip option.
Figure 11 Review the Configuration Summary. Click Reconfigure if any changes are required or click Finish to complete the configuration.
Step 6 – Create New Account on Quantum RUDDER Browse https://cc.qntmnet.com. Click “Create New Account” to sign up for a new account. Figure 12 Follow the steps as guided on screen for Registration. Verify Quantum RUDDER account from registered email id. Your Account on Quantum RUDDER (Quantum Networks’ Cloud Controller) is now ready to use.
Reset Access Point to Factory Defaults o o o Power on the Access Point Push the reset button on back panel and hold it for 10 seconds. Access Point would restart with factory defaults Access Point Default Login Detail User Name: As Defined while creating account Password: Auto Generated Password will be sent to registered email on Quantum RUDDER. If you encounter problems while installing or using this product, please browse www.qntmnet.com for: Direct contact to the support center.
FCC Statement FCC Class B This equipment has been tested and found to comply with the limits for a Class B digital device, pursuant to Part 15 of the FCC Rules. These limits are designed to provide reasonable protection against harmful interference in a residential installation. This equipment generates, uses and can radiate radio frequency energy and, if not installed and used in accordance with the instructions, may cause harmful interference to radio communications.
CE Statement This equipment complies with EU radiation exposure limits set forth for an uncontrolled environment. This equipment should be installed and operated with minimum distance 24 cm between the radiator and your body. The device is restricted to indoor use only when operating in the 5150 to 5350 MHz frequency range. All operational modes: 2.4GHz: 802.11b, 802.11g, 802.11n(HT20), 802.11n(HT40), 802.11ac(VHT20), 802.11ac(VHT40), 802.11ax(HE20), 802.11ax(HE40) 5 GHz: 802.11a, 802.11n (HT20), 802.