QFT5D INSTRUCTIONS 10/5/06 10:27 AM Page 1 Qflash “5d-R” series Digital Flash ® Models QFT5d-R, QFX5d-R Operating Instructions QFT5d-R-- powered by Quantum Turbo® batteries QFX5d-R-- powered by Quantum Qpaq System Quantum Instruments Designed and manufactured in the USA
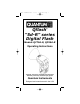
QFT5D INSTRUCTIONS 10/5/06 10:27 AM Page 2 Reflector Lock Ring M Open Flash (Test) Mode Button I ■ Option Button Set Button G Modeling Light ● L Down Button Flash Indicator Up Button J
QFT5D INSTRUCTIONS 10/5/06 10:27 AM Page 3
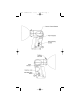
QFT5D INSTRUCTIONS 10/5/06 10:27 AM Page 4 Flash Display Symbols Speaker Flash indicator LEDs On solid - Flash ready Blinking - Flash recycling Front curtain sync Rear curtain syns Reflector in normal Bare bulb reflector Reflector with diffusing disks, wide angle dome, or soft box Telephoto reflector Auto sensor limit turned off
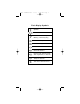
QFT5D INSTRUCTIONS 10/5/06 10:27 AM Page 5 TABLE OF CONTENTS Section 1.0 2.0 3.0 4.0 5.0 6.0 7.0 8.0 9.0 10.0 11.0 12.0 13.0 14.0 15.0 16.
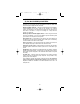
QFT5D INSTRUCTIONS 10/5/06 10:27 AM Page 6 2. WARNINGS AND CAUTIONS • Disconnect external power before changing the flash tube, or connecting or disconnecting to/from cameras, power packs, or any other equipment. • OPERATE ONLY WITH A FLASH TUBE IN THE SOCKET!! • DO NOT TOUCH THE FLASH TUBE SOCKET WITH METAL OBJECTS!! • THIS IS A PROFESSIONAL INSTRUMENT.
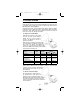
QFT5D INSTRUCTIONS 10/5/06 10:27 AM Page 7 4. FEATURES AVAILABLE WITH QTTL (D, Dw, Dw-R SERIES) ADAPTERS Quantum’s QTTL® adapters provide a dedicated link between Qflash 5d-R series and popular digital and film cameras. Wireless multiple ratio TTL - with Dw-R series Adapters & FreeXWires, remote Qflashes can be set to ratios of the camera’s TTL metering system. For example, an on-camera flash could be set 1.
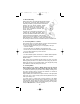
QFT5D INSTRUCTIONS 10/5/06 10:27 AM Page 8 5. GETTING STARTED 5.1 Inserting the Flash Tube Match the red dot on the base of the flash tube with the red dot in the socket of Qflash. Push the flash tube in until it is seated snugly into the socket. Excessive force is not required. Replace the flash tube only with Quantum type QF30 or QF30uv for Qflash model T5d / T5d-R. Qflash model X5d / X5d-R requires QF32 or QF32uv flash tubes.
QFT5D INSTRUCTIONS 10/5/06 10:27 AM Page 9 5.4 Bracket Mounting Qflash mounts with a 1/4-20 standard tripod thread to brackets, light stands, and tripods. Many brackets are made especially for Qflash by popular bracket manufacturers. Quantum has two optional brackets, models QF70US and QF70E. The instructions below describe mounting to both of these brackets and to other manufacturers brackets, light stands, and tripods.
QFT5D INSTRUCTIONS 10/5/06 10:27 AM Page 10 6. BASIC NAVIGATION This Section explains how to maneuver your way around the Qflash 5d-R Very Important Tips For consistent exposures with your digital camera and Qflash. • Always do a custom white balance before shooting • When shooting TTL use Aperture or Shutter priority or Manual camera modes • Set your metering area to center weight, partial metering instead of matrix or multi-spot metering.
QFT5D INSTRUCTIONS 10/5/06 10:27 AM Page 11 7. COMMON FEATURES 7.1 Flash Ready The Flash Ready indicator will blink while Qflash is recycling. It will stop blinking once the flash is ready to fire again, and the speaker will beep. If flash readiness is supported by the camera, then an LED or flash symbol will appear in the viewfinder when the flash is ready. Many cameras will automatically switch the shutter to the camera pre-defined flash sync speed. 7.
QFT5D INSTRUCTIONS 10/5/06 10:27 AM Page 12 7.5 Auto Focus Assist The D/Dw/Dw-R series QTTL Adapters will project a beam whenever the camera is having difficulty focusing due to low light conditions. A local Qflash must be connected for this feature. Turn the auto focus assist switch of the QTTL Adapter to on ( ). Always turn the auto focus assist switch off (●) under any of the following conditions: When no Qflash is connected; When using Qflash models, T, T2, X or X2.
QFT5D INSTRUCTIONS 10/5/06 10:27 AM Page 13 (optional Bare Bulb Enhancers QF62Bs and QF62Bg) and TELE (for optional QF63B Tele photo reflector). The reflectors must be repositioned manually. Notes: When using QF62B s/g the manual parameters are accurate only for an open area. In medium and small rooms the very widely dispersed light will bounce off nearby walls and increase exposure.
QFT5D INSTRUCTIONS 10/5/06 10:27 AM Page 14 8.2.2 Manual mode Qflash Compensation This procedure will calibrate Qflash to an incident light flash meter you use and trust. Note that only incident light measurements are reliable for manual exposure settings. 1. Place the Qflash 10 feet from the incident light flash meter facing Qflash. 2. The area surrounding the meter and flash should be similar to the shooting environment you usually work in.
QFT5D INSTRUCTIONS 10/5/06 10:27 AM Page 15 5. Fire Qflash. Push the the Option ■ button, until the compensation dis play appears. 6. Use the Set G and Up J button to increase light output (if flash meter reads less than F 8.0), or the Down L button to decrease light output (if flash meter reads more than F 8.0). The light output can be increased or decreased by as much as 2 stops in 1/3 steps. 8.3 Option Menu 3 FW7Q Zone Control This option menu is only available when a FW7Q is attached to the Qflash.
QFT5D INSTRUCTIONS 10/5/06 10:27 AM Page 16 9. MANUAL MODE OPERATION The camera exposure may be set to any mode, and Qflash will emit the fixed amount of light shown on its display. 9.1 Manual Mode with sync only connection Power, F/number, ISO are all user adjustable. The Set G button will cycle through them in that order. Power settings are adjustable in 1/3 steps from full power to 1/64th power like this: 1/1, 1/1-, 1/2+, 1/2 ,1/2- …… 1/32, 1/32-, 1/64+, 1/64.
QFT5D INSTRUCTIONS 10/5/06 10:27 AM Page 17 9.2 Manual mode with QTTL adapter connection With a QTTL adapter the camera controls the f/# and ISO shown on the display - you cannot change it on Qflash. The camera also selects its shutter speed consistent with flash exposure. The camera exposure may be set to manual, aperture or shutter priority. The power level is set on the Qflash.
QFT5D INSTRUCTIONS 10/5/06 10:27 AM Page 18 Reminder: If the distance to the subject changes (you move in for a head shot, or move out for a full length) you must change the flash distance readout by changing the power setting. 10. AUTOMATIC MODE OPERATION The preferred setup for Auto Mode is to connect Qflash to a camera with a QTTL (D, Dw, or Dw-R series) Adapter. Then, the ISO and f/# settings of the camera are set and displayed on the Qflash panel.
QFT5D INSTRUCTIONS 10/5/06 10:27 AM Page 19 10.2 Auto mode exposure indications There are three types of exposure indications. The display will blink either OK, Over, or Undr. The display will also indicate how much over or under the last exposure was, from +3 stops to -3 stops. If an arrow appears then the exposure error is more than 3 stops (for example -3 ). If activated in Options (Section 8.2) the Speaker will sound after a flash.
QFT5D INSTRUCTIONS 10/5/06 10:27 AM Page 20 Error messages will appear if you choose a fill ratio which is out of range of the flash. The error indications are: “OUT OF RANGE - DECREASE FILL OR F#” For example, the camera is set to F16 and QTTL fill flash is set to +2 stops. Either decrease the f/# on the camera or decrease the fill flash ratio on the QTTL adapter. “OUT OF RANGE - INCREASE FILL OR F#” For example, the camera is set to F2.8 and QTTL fill flash is set to –3 stops.
QFT5D INSTRUCTIONS 10/5/06 10:27 AM Page 21 10.5 Setting the Sensor Limit: Press Option ■ button to bring up this menu. Push Set G once. The sensor limit will blink. Use Up J/Down L buttons to change the sensor limit. The available limits are: ∞ - No limit placed on sensor distance 20ft / 6m, 15ft / 4m, 10ft / 3m, 5ft / 2m, ∞ When the Flash Sensor Limit is set to the flash will produce the desired f/# for a subject within the flash’s minimum and maximum flash distance.
QFT5D INSTRUCTIONS 10/5/06 10:27 AM Page 22 10.7 Using the Sensor Limit The flash Sensor Limit function essentially cuts down on the distance that Qflash attempts to illuminate. See the examples shown below. Open field The subject is located 15 feet from the camera. The background is an open field in a park. By setting the Sensor Limit to 15 feet, the flash will read only the light from subjects within 15 feet, ignoring anything further.
QFT5D INSTRUCTIONS 10/5/06 10:27 AM Page 23 11. TTL and QTTL MODE OPERATION TTL Mode TTL mode may be used when the camera exposure is set to manual, aperture or shutter priority, or program mode, and Qflash is connected to the camera with a compatible QF series Adapter. The camera will determine flash exposure. The listing for compatible QF series TTL adapters is available from your dealer, or at www.qtm.com. QF series TTL adapters are generally not compatible with digital cameras.
QFT5D INSTRUCTIONS 10/5/06 10:27 AM Page 24 12. STROBOSCOPIC MODE OPERATION Press the Set G to cycle through Frequency, Number of Flashes, and Strobo Power, in that order. Connect a sync cord or any Quantum QF, D, Dw, or Dw-R series Adapter to the camera. After the flash has finished firing a confirmation message will be displayed. The flash will display the actual number of flashes fired. Strobo is a manual exposure mode. Over and Under exposures are not indicated. 13.
QFT5D INSTRUCTIONS 10/5/06 10:27 AM Page 25 Your Qflash is factory preset with several Programs (which you are free to change). To view them, press Mode I, then Up J/Down L until you see the Program mode displayed, like above. After the “P” stops blinking, press the Up J/Down L buttons to switch to the next higher, or lower program number. (Programs which have not been preset are considered “clear” and will be skipped). How to set up or change a Program While in the Program mode, press the Set G button.
QFT5D INSTRUCTIONS 10/5/06 10:27 AM Page 26 14.1 QTTLw - Wireless TTL mode QTTLw mode gives exposure control of all Qflashes to your camera’s preflash evaluative TTL metering system. Both Local (on-camera) and Remote Qflashes will produce the same exposure. The Fill ratio can be adjusted on the QTTL adapter (or on the camera, if available). However, use only one Fill compensation at a time. Set the camera modes: Choose manual, aperture priority, or shutter priority on your camera.
QFT5D INSTRUCTIONS 10/5/06 10:27 AM Page 27 Set the camera modes: Choose manual, aperture priority, or shutter priority on your camera. Program mode may be selected, although the camera will make decisions that reduce your control. 14.2.1 Always set up the Remote Qflash(s) first Connect a FreeXWire receiver to the remote Qflash(s). FreeXWire model FW7Q connects directly to Qflash; models FW8R or FW10w require an FW31 cable for connection.
QFT5D INSTRUCTIONS 10/5/06 10:27 AM Page 28 14.3 Wireless Auto Fill Wireless Auto Fill mode has several useful features. It can add light ratio capability to non-TTL cameras. With digital cameras Auto Fill mode can decrease the delay between shutter release and image capture, compared to the camera system’s TTL control. And, Auto Fill with Qflash sensor control lets the photographer fine tune flash exposure for her/his particular needs without being locked into camera TTL exposure.
QFT5D INSTRUCTIONS 10/5/06 10:27 AM Page 29 14.4 Wireless Control Mode Wireless Control mode can achieve the most control over wireless Remote Qflashes. From the camera position you can change the modes, settings, as well as the fill ratios, of Wireless Groups R1 and R2. Wireless Control mode has the disadvantage, however, of being slower to react than QTTLwR mode. This is because much more information has to be transmitted to the Remote Qlfashes.
QFT5D INSTRUCTIONS 10/5/06 10:27 AM Page 30 14.4.2 Set up the Remote Qflash Groups Any number of Remote Qflashes may be used. Set each the Mode of each Remote to either Wireless Group R1 or R2, or Linked to Local, using the Mode I and Up J/Down L controls on each Remote Qflash. The displays on the Remote Qflashes will update when the word SEND appears on the Local Qflash. 14.4.
QFT5D INSTRUCTIONS 10/5/06 10:27 AM Page 31 14.5 Available Modes and Features of Qflash Wireless Operation In addition to the setups described in Section 14.1, 14.2 and 14.3, other combination of modes are possible for Local and Remote Qlfashes. In the table below, pay particular attention to the models of FreeXWires and QTTL adapters required to achieve the results in the chart. We recommend some testing when using one of the combinations of operating modes before shooting an assignment.
QFT5D INSTRUCTIONS 10/5/06 10:27 AM Page 32 14.6 SYNC only setup By employing this type of setup each Qflash operates independently of the others. This is the simplest and most straightforward way of using multiple, wireless Qflashes. For independent Qflash operation the Qflashes must be in Manual, Auto (Auto Fill), or Strobo. If any one of the Qflashes is in TTL, QTTL, or Wireless, the Qflashes will no longer behave independently.
QFT5D INSTRUCTIONS 10/5/06 10:27 AM Page 33 15. WIRED CONTROL MODE Qflash’s Wired Control Mode is a versatile tool for precise lighting control. One Qflash is designated as the “Control”, and from its panel the photographer can change the modes or settings on one or two “Remote” Qflashes. The physical setup for Control Mode is shown below.
QFT5D INSTRUCTIONS 10/5/06 10:27 AM Page 34 The displays of the two Remote Qflashes will automatically change to R1 and R2. 15.2 Select the Mode and settings for all flashes Always select the settings you desire for the Control Qflash first. Those settings determine the choices you have for the Remotes. • Press Set G until “C” is blinking. (If “R1” or “R2” is blinking instead, press the Up J/Down L buttons until “C” blinks). • Press Set G again. The mode of the Control flash will blink.
QFT5D INSTRUCTIONS 10/5/06 10:27 AM Page 35 16. TYPICAL LIGHTING SITUATIONS This section covers some typical lighting situations that photographers find themselves in. Here is how Qflash can help. 16.1 Portrait Setting up a 3:1 portrait ratio (or any other ratio) has always been time consuming. It is usually accomplished with three flashes: Main, Fill, Background set to manual. Each flash needs to be adjusted and metered separately.
QFT5D INSTRUCTIONS 10/5/06 10:27 AM Page 36 16.2 Wireless lighting ratios made easy When using multiple lights to light a subject it’s very easy to set up a lighting ratio between the Main and Fill lights. The ratio can be set from –3 stops to +3 stops. Equipment needed: • One Qflash 5d-R • One Qflash (any version) located to the right of the subject • Two FreeXWires • Two QF30 cables • Two Quantum Turbo batteries Set up: • Connect the equipment as shown. • Set the Main flash to TTL mode.
QFT5D INSTRUCTIONS 10/5/06 10:27 AM Page 37 11. CUSTOMER SERVICE Having any trouble in using your Quantum product? We are here to help. Mail, call, fax, or email our Service Department: Service Department Quantum Instruments 10 Commerce Drive Hauppauge, NY 11788 Tel: (631) 656-7400 Fax: (631) 656-7410 Website: www.qtm.com Troubleshooting tips are available at www.qtm.com, Support, Customer Support, FAQ.
QFT5D INSTRUCTIONS 10/5/06 10:27 AM Page 38 Qflash ACCESSORIES QF63T / QF36X REMOTE FLASH HEAD QFT2/X2 QFT4d/X4d QFT2d/X2d QFT5d/X5d QF68 SOFTBOX QF69 FOLDING SOFT BOX & HOT SPOT REDUCER 34
QFT5D INSTRUCTIONS 10/5/06 10:27 AM Page 39 OTHER QUANTUM PRODUCTS TURBO 2X2 TURBO COMPACT TURBO SC FW7Q QNEXUS RADIO SLAVE FREEXWIRE ™ 35
QFT5D INSTRUCTIONS 10/5/06 10:27 AM Page 40 Quantum Instruments, Inc 10 Commerce Drive, Hauppauge NY 11788-3968 USA Tel: 1-631-656-7400 Fax: 1-631-656-7410 www.qtm.