
Technical data


DAT 72 (DDS Gen5) 36/72 GBYTE
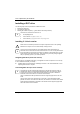
1
► Release the locking mechanism by pressing the locking button (1).
► Swing the drive handle completely in the direction of the arrow.
► Install the DAT drive as described in "Hot-plug/hot-swap components" in the operating manual
of the PRIMERGY server.
► Swing the drive handle down again.
Features of hot-swap drive
The advantages of hot-swap drives for PRIMERGY systems that they do not require a separate
controller for the drive, and that the drives can be easily replaced in the case of a failure.
i
The drive can be installed during operation. When removing the drive, you must deactivate
the software and drivers beforehand.
Other features:
• Compatibility to the latest version of NT-Backup and CA ARCserve 2000/BrightStore 9
• Support under Windows 2000, Windows Server 2003; LINUX SLES 8.X
• Can be combined with hard disk drives and hot-swap drives on the same SCSI bus
• LVD interface with SCA II plug for easy installation
Backup software for hot-swap drives
Hot-swap drives are compatible to the backup software NT-Backup and CA ARCserve
2000/BrightStore 9.
Installation recommendations
• The performance of hard disk drives can be impaired by operating more than three DAT drives
on the same bus.
• With rack mounting, install the first DAT drive in the right-hand outer slide-in module.
• With tower mounting, install the first DAT drive in the top slide-in module.
Installing in a new PRIMERGY server
Apply the following procedure to install the hot-swap drive in a new server with
10 - English A26361-H939-Z100-1-7419