Slate 10" Tablet User Guide [UG template version 15b_rev080815] [sprint_nkj_aqt100_ug_en_150916_d2]
Table of Contents Introduction ................................................................................................................................................... 1 About the User Guide ........................................................................................................................... 1 Get Started .................................................................................................................................................... 2 Parts and Functions .
Create a Google Account............................................................................................................ 31 Sign In to Your Google Account ................................................................................................. 33 Google Play Store ............................................................................................................................... 34 Find and Install an App ........................................................................
Back Up Contacts ............................................................................................................................... 60 Messaging and Internet............................................................................................................................... 61 Gmail ................................................................................................................................................... 61 Create and Send a Gmail Message ......................
Take a Picture ............................................................................................................................. 85 Take a Picture with the Timer ..................................................................................................... 86 Record a Picture Using Lens Blur ............................................................................................... 87 Record Videos .......................................................................................
View YouTube Videos............................................................................................................... 108 Post a Video to YouTube .......................................................................................................... 109 Google Play Music App ..................................................................................................................... 110 Play Music with Google Play.......................................................................
Sound and Notification Settings ........................................................................................................ 144 Storage Settings................................................................................................................................ 145 Battery Settings ................................................................................................................................. 146 Applications Settings .................................................
Introduction The following topics describe the basics of using this guide and your new tablet. About the User Guide Thank you for purchasing your new Slate 10" Tablet. The following topics explain how best to use this guide to get the most out of your tablet. Before Using Your Tablet Read the Get Started guide and Important Information booklet that were packaged with your tablet thoroughly for proper usage. Accessible services may be limited by subscription contract conditions.
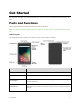
Get Started The following topics give you all the information you need to set up your tablet and Sprint service the first time. Parts and Functions These topics illustrate your tablet’s primary parts and key functions. Note: Your tablet's screens and apps layouts are subject to change. This user guide uses sample images only. Tablet Layout The following illustration outlines your tablet's primary external features and keys.
Part Description Back key Lets you return to the previous screen, or close a dialog box, options menu, the notification panel, or onscreen keyboard. Home key Returns you to the home screen. Touch and hold to access Google Now. Recent apps key Displays a list of recently used applications. 3.5mm Headset jack Allows you to plug in either a stereo headset or an optional headset for convenient, hands-free conversations. Volume buttons Allows you to adjust the ringtone or media volumes.
● The nano SIM card is replaceable (at cost) in case of loss/damage. ● Return the nano SIM card to the company when canceling subscription. ● Returned nano SIM cards are recycled for environmental purposes. ● Note that the nano SIM card specifications and performance may change without notice. ● It is recommended that you keep a separate copy of information that is stored on the nano SIM card. The company is not responsible for damages from stored information that is lost.
microSD Card Your tablet supports the use of an optional microSD card (not included) to expand its storage capacity. Some cards may not operate properly with your tablet. microSD Card Cautions Data: Information stored on the microSD card can become lost or changed accidently or as a result of damage. It is recommended that you keep a separate copy of important data. The company is not responsible for damages from data that is lost or changed.
Unmount the microSD Card Always unmount the microSD card before removing it from your tablet. 1. From the Home screen, tap Apps 2. Tap Storage > Settings . . 3. Tap Unmount SD card > OK. The menu option name changes from Unmount SD card to Mount SD card. The memory card is now unmounted. Remove the microSD Card Follow these instructions to remove a microSD card. Always power the tablet off before inserting or removing a microSD card. 1. From the Home screen, tap Apps 2. Tap Storage > Settings . .
4. Open the cover of the nano SIM/microSD card slots. 5. Slide the microSD card out of the slot to remove it. 6. Close the cover of the nano SIM/microSD card slots. Format the microSD Card When you insert an optional microSD card for the first time, it is recommended that you format it on your tablet. 1. From the Home screen, tap Apps 2. Tap Storage > Settings . . 3. Tap Erase SD card. 4. Tap ERASE SD CARD again, and then tap ERASE EVERYTHING to confirm.
All data on the memory card is erased, and the card is formatted for use on your tablet. Charge the Battery Follow these instructions to charge your tablet’s battery using either the included AC adapter or via a USB connection on your computer. Charge Using the AC Adapter 1. Plug the USB connector into the charger/accessory jack at the top of your tablet. 2. Plug the other end of the USB cable into the AC adapter. 3. Plug the AC adapter into an electrical outlet. 4.
2. Insert the large end of the micro USB cord into an external USB port on your computer. 3. After charging, safely remove the micro USB cord from both the tablet and the computer. Turn Your Tablet On and Off The instructions below explain how to turn your tablet on and off. Turn Your Tablet On ■ Press and hold the Power/lock button. Your tablet will power on. Depending on the settings, you may see the lock screen.
2. Tap Power off to turn the tablet off. Your tablet will power off. Your screen remains blank while your tablet is off (unless the battery is charging). Use the Touchscreen Your tablet’s touchscreen lets you control actions through a variety of touch gestures. Tap or Touch When you want to type using the onscreen keyboard, select items onscreen such as application and settings icons, or press onscreen buttons, simply tap or touch them with your finger.
Touch and Hold To open the available options for an item (for example, a contact or link in a Web page), touch and hold the item. Swipe or Slide To swipe or slide means to quickly drag your finger vertically or horizontally across the screen. Drag To drag, press and hold your finger with some pressure before you start to move your finger. While dragging, do not release your finger until you have reached the target position.
Flick Flicking the screen is similar to swiping, except that you need to swipe your finger in light, quick strokes. This finger gesture is always in a vertical direction, such as when flicking the contacts or message list. Rotate For most screens, you can automatically change the screen orientation from portrait to landscape by turning the tablet sideways. When entering text, you can turn the tablet sideways to bring up a bigger keyboard. See Touchscreen Keyboards for more details.
Note: The Auto-rotate check box needs to be selected for the screen orientation to automatically change. From the Home screen, tap Apps the contents of the screen. > Settings > Display > When device is rotated > Rotate Tip: You can also access the screen rotation setting from the notification panel. Pull down the status bar and tap Auto-rotate or Portrait to select or deselect the option.
Activate Your Tablet Follow the instructions below to activate your tablet if it has not already been activated. Depending on your account or how and where you purchased your tablet, it may be ready to use or you may need to activate it on your Sprint account. ● If you purchased your tablet at a Sprint Store, it is probably activated and ready to use. ● If you received your tablet in the mail and it is for a new Sprint account or a new line of service, it is designed to activate automatically.
2. Follow the onscreen instructions to complete each section. For each topic, you will have the option to skip it and continue to the next screen. Select language – Select a preferred language. Select Wi-Fi network – If prompted, follow the prompts to sign in to an available Wi-Fi network. For secured Wi-Fi networks, you will need to enter a password. See Wi-Fi for more details.
Get Started Add your account – Tap Enter your email and complete the steps to sign in to your current Google Account, or tap Or create a new account to set up a new Google Account. Tap SKIP to skip Google setup. The following options may apply depending on your selection: • Enter your email – Enter your Gmail address and password and tap ACCEPT to agree to the terms of service and privacy policy and sign in to your current Google Account.
Get Started Get your apps & data – If you are using a Google Account you had set up on a previous Android device, you can choose to use that device's backup information to restore backed-up apps, data, system settings, Wi-Fi passwords, etc., from the previous device to your new tablet. Tap Set up as a new device to skip this step.
Enter your name – If you skip the Google Account setup on the previous step, you can enter your name. Protect your tablet – Tap SET SCREEN LOCK NOW to configure the screen lock method and follow the onscreen instructions to complete the process. Tap SKIP to skip this step. Google services – Select your Google location and service options and then tap NEXT.
3. Your setup is now complete. Follow the onscreen instructions to learn about basic tap menu navigation, view tutorials, or just get started. Your tablet is now set up for use. If you skipped any part of the setup, you can access additional options through the Apps screen or through Settings. Note: You do not need to sign up for a Google Account to use your tablet. However, to download apps from Google Play, you must link your tablet to a Google Account.
Basic Operations The following topics outline basic features and operations of your tablet. Basics The following topics offer an overview of your tablet’s basic operations. Home Screen and Applications (Apps) List Most of your tablet’s operations originate from the home screen or the apps list. 1. From any screen, tap the Home key 2. Tap Apps to display the home screen. to display the apps list. For information about using the home screen, see Home Screen Basics.
Tap Clear All to clear the list. Tablet Settings Menu You can customize your tablet’s settings and options through the Settings menu. ■ From the home screen, tap Apps > Settings . – or – Pull down the status bar and tap Settings . For more information, see Settings. Portrait and Landscape Screen Orientation The default orientation for your tablet’s screen is portrait (vertical), but many apps will change to landscape orientation (widescreen) when you rotate the tablet sideways.
Note: Not all screens will adjust for landscape orientation. Turn Screen Rotation On or Off 1. Pull down the status bar twice to display the quick settings menu. 2. Tap Portrait switched to to turn the Screen rotation on. When the function is enabled, the displayed icon is . Note: You can also set the rotation option from the main settings menu. From the Home screen, tap Apps screen.
1. From the home screen, tap Apps . The apps list opens. 2. Tap and app icon to launch the corresponding application. The application opens. Apps List The apps list expands to include any apps you download and install on your tablet. The following table outlines the primary apps that have been preinstalled on your tablet.
App Function/Service Contacts Launches the Contacts application, which allows you to create a new contact and manage your contacts. Downloads Launches the Downloads application, which allows you to view or delete what you have downloaded. Drive Launches the Google Drive application, which allows you to back up your files to Google Drive. Email Launches the Email application, which allows you to send or receive emails.
App Function/Service Messenger Launches the Messenger application, which allows you to instantly reach your Facebook friends or people in Contacts. You can also have group chats, share photos and videos, and chat while using other applications. NASCAR Mobile Launches the NASCAR Mobile, which allows you to follow your favorite NASCAR driver with news, video, and Live race features. NextRadio Launches the NextRadio application, which allows you to see and hear your favorite local radio stations.
App Function/Service Voice Search YouTube Launches the Voice Search application, which allows you to search the Web by speaking. Launches the YouTube application, which allows you to view video or upload videos from your tablet. Tablet Number Follow the instructions below to display your tablet’s wireless tablet serial number. 1. From the home screen, tap Apps > Settings > About tablet . 2. Tap Status. You will see the number listed under Serial number.
2. On the Airplane mode option, tap the switch to On . Your tablet is now in airplane mode. You will see the airplane mode icon in the status bar. Tip: You can also access airplane mode through the status bar menu. Pull down the status bar and tap Airplane mode . When the function is enabled, the displayed icon is switched to . To turn off airplane mode: 1. From the home screen, tap Apps > Settings 2. On the Airplane mode option, tap the switch to Off > More . .
● Google voice typing allows you to speak your entries. See Google Voice Typing for details. ● Japanese IME allows you to type in Japanese on your keyboard. Note: Keyboard layouts and options may change depending on where you’re using them. For example, if you’re entering text to do a Web search, a search icon may be available instead of an enter key. Google Keyboard The Google Keyboard makes typing fast and easy with gesture and voice. Assign Google Keyboard for Text Entry 1.
1. Tap a text field where you want to enter the text. 2. Enter the desired text. To delete incorrect characters, tap To enter numbers or symbols, tap To enter a smiley, tap By default, Google Keyboard starts with a capital at the beginning of text. Tap . Tap and hold to delete the whole word. . . the case of the text. Tap 3. When you have finished, tap to change again to switch to all upper case letters. to close the keyboard.
3. Tap Current Keyboard > CHOOSE KEYBOARDS > Google voice typing. Use Google Voice Typing 1. Tap . 2. Speak to the tablet and watch your text being entered on the screen. 3. If the text is incorrect, tap . 4. When you have finished, the on-screen keyboard will appear. Configure Google Voice Typing To configure options for Google voice typing, tap the Home key Language & input > Apps > Settings > > Google voice typing and change the desired settings.
2. Drag either cursor to select more or less text. 3. On the pop-up menu, tap: SELECT ALL to highlight all text in the field. CUT to remove the selected text. COPY to save the selected text to the clipboard. 4. Enter the text. 5. Tap to delete the selected text. Paste Text 1. Tap and hold the text at the point you want to edit. The selection cursor displays at the point you tapped. 2. Tap PASTE to paste the copied text.
Note: Although you need a Gmail account to use certain features of your tablet, such as Google Play, you do not need to use Gmail as the default account for your tablet. Create a Google Account Online 1. From a computer, launch a Web browser and navigate to www.google.com. 2. On the main page, select Sign-in, then click Create an account. 3. Follow the onscreen prompts to create your free account. 4.
3. Follow the prompts to set up your account. Tap NEXT to proceed between steps, which may include: Enter your First name and Last name. Enter a desired Username. Enter and reenter a password. Set a phone number to recover your Google Account in case you forget your password. View Privacy and Terms. Select Google service options. Set up payment information. 4. When the email setup is complete, your tablet will communicate with the Google server to confirm your information.
4. Follow the onscreen instruction to complete the email setup. Your tablet then communicates with the Google server to confirm your information. Google Play Store Google Play store™ is the place to go to find new Android apps, books, movies, and music for your tablet. Choose from a wide variety of free and paid content ranging from productivity apps and games to bestselling books and blockbuster movies and music. When you find what you want, you can easily download and install it on your tablet.
4. Tap an app to read a description about the app and user reviews. 5. Tap lNSTALL (for free applications) or the price (for paid applications). Note: If you have not already done so, you will need to set up a payment method to purchase paid apps from Google Play. 6. The subsequent screen notifies you whether the app will require access to your personal information or access to certain functions or settings of your tablet.
2. Tap Menu > My apps. 3. Tap the app to uninstall for a refund. The details screen for the app opens. 4. Tap Refund, and then tap Yes to confirm. Your app is uninstalled and the charge is canceled. Update an App Depending on your settings, many apps will update automatically, or you can update apps directly from the Play Store app. Update an App Directly 1. From the home screen, tap Apps 2. Tap Menu > Play Store . > My apps. 3. Tap the app you want to update, and then tap UPDATE > ACCEPT.
The app update is downloaded and installed. Set Automatic App Updates 1. From the home screen, tap Apps 2. Tap Menu > Play Store . > My apps. 3. Tap the app you want to set for auto-update, and then tap > Auto-update. The app is set to update automatically whenever an update becomes available. Note: Automatic updates are unavailable for some apps. Open an Installed App There are two methods to open any app that you have downloaded and installed from Google Play.
1. From the home screen, tap Apps 2. Tap Menu > Play Store . > My apps. 3. Tap the desired application, then tap OPEN. -or1. From the home screen, tap Apps . 2. Tap the icon of the newly installed application. Uninstall an App You can uninstall any app that you have downloaded and installed from Google Play. 1. From the home screen, tap Apps 2. Tap Menu > Play Store . > My apps. 3. Tap the app you want to uninstall, and then tap UNINSTALL > OK.
The app is uninstalled and removed from your tablet. Get Help with Google Play The Google Play store app offers an online help option if you have questions or want to know more about the app. 1. From the home screen, tap Apps 2. Tap Menu > Play Store . > Help & Feedback. The Google Play store Help page opens and you can find comprehensive, categorized information about Google Play store.
Turn the Screen Off When Not in Use ■ To quickly turn the screen off, press the Power/lock button. Pressing the Power/lock button again or will turn on your tablet screen and show the lock screen. To save battery power, the tablet automatically turns off the screen after a certain period of time when you leave it idle. You will still be able to receive messages while the tablet’s screen is off. Note: For information on how to adjust the time before the screen turns off, see Display Settings.
update. A weak signal or low battery during an update may cause the update to fail. An update failure may disable the tablet. Other functions during update: Other tablet functions cannot be used during a software update. Update Your Tablet Software You can update your tablet's software using the System Update option. Before Updating Your Tablet Updating your tablet may result in a loss of saved data depending on the condition of your tablet (malfunctioning, damaged, water seepage, etc.).
2. Tap Update Firmware. Your tablet automatically downloads and installs any available updates. You may be required to power your tablet off and back on to complete the software upgrade. Confirm Your Current Tablet Software 1. From the home screen, tap Apps > Settings > About tablet . 2. Locate the Android version read-only field. Update Your Profile This option allows you to automatically update your online user profile information.
2. Follow the onscreen instructions. The tablet will download and install the profile update and you will see a confirmation when complete. Note: If your data services or account syncing ever seems to go out unexpectedly, use this feature to reconnect with the network. Update Your PRL This option allows you to download and update the PRL (preferred roaming list) automatically. 1. From the home screen, tap Apps > Settings > System Update > Update PRL. 2. Follow the onscreen instructions.
UICC Unlock This option allows you to unlock the client initiated UICC. 1. From the home screen, tap Apps > Settings > System Update > UICC Unlock. 2. Follow the onscreen instructions.
Your Tablet Interface The following topics describe how to use and customize your tablet’s home screen, understand the status bar, and use the notification panel. Home Screen Basics The home screen is the starting point for your tablet’s applications, functions, and menus. You can customize your home screen by adding application icons, shortcuts, folders, widgets, and more.
Item Description Back key Tap to return to the previous screen. Tip: Tap the Home key to return to the main home screen from any other screen. Extended Home Screens In addition to the main home screen, your tablet features extended home screens to provide more space for adding icons, widgets, and more. Press Home key to display the main home screen and then slide the screen right or left to move from the main screen to an extended screen.
● While on an extended screen, press Home key to return to the main home screen. To go directly to a particular screen: 1. From any screen, tap and hold an empty space. 2. Slide the screen right or left to switch between screens. Status Bar and Notification Panel Your tablet’s status and notifications are available at a glance at the top of the screen.
Status Bar The status bar at the top of the home screen provides tablet and service status information on the right side and notification alerts on the left. To view the notification panel or access the quick settings menu, pull down the status bar from the top of the screen. Main Status Icons Icon Status Signal strength - Shows your current signal strength (the more bars there are, the stronger the signal is). No service - Your tablet cannot find a mobile network. Sprint 4G LTE data service is available.
Icon Notification New Email - Indicates a new Email message. New Gmail - Indicates a new Gmail message. Upcoming event - Alerts you of an upcoming event. Data is syncing - Application sync is active and synchronizations is in progress for Gmail, Calendar, and Contacts. Problem with Sign-In or Sync - There has been an issue with your connection to Google server, you were not properly signed into your account.
Close the Notification Panel ■ Slide the notification panel up. (Slide your finger up from the bottom of the screen.) – or – Tap the Back key to close the notification panel. Notification Panel The notification panel gives you access to both the notifications and the quick settings menus. Customize the Home Screen Learn how to set the wallpaper and add, move, or remove shortcuts, widgets, and folders from the home screen.
You can also access the wallpaper from the Home screen. Tap and hold an empty space, and then tap WALLPAPERS. 2. Tap an option to select the wallpaper. ID wallpapers to open the available wallpapers that were included in your Sprint ID pack. Live Wallpapers to open a list of animated wallpapers installed on your tablet. Photos to use a picture save on your tablet as a wallpaper. You can crop the picture before setting it as a wallpaper.
The icon will disengage and you will see thumbnails of your home screen. 3. Drag the icon to an empty location on the home screen. The shortcut is added to the home screen. Add Widgets to the Home Screen You can add widgets to your tablet’s home screen. Widgets are self-contained apps that display on a home screen. Unlike a shortcut, the Widget works as an onscreen application.
The widget is added to the home screen. Add Folders to the Home Screen You can group home screen shortcuts into folders for convenient access. 1. From the home screen, tap and drag an app shortcut onto another app shortcut until a white circle appears. 2. To open the folder, tap the folder icon. 3. From the opened folder, tap Unnamed Folder to change the folder name. Tip: You can add multiple apps in your folder by repeating step 1.
Contacts The Contacts application lets you store and manage contacts from a variety of sources, including contacts you enter and save directly in your tablet as well as contacts synchronized with your Google Account, your PC, compatible email programs (including Exchange Server), and your Facebook friends. Contacts Cautions Information saved in Contacts may be lost or changed if the battery is removed for a long period or left uncharged.
: Tap the picture icon to assign a picture to the contact. Name Phone Email Address Special Dates Groups Add another field: Tap ADD ANOTHER FIELD to include additional information such as IM, Notes, Nickname, Website, etc. Note: To select a type (label) for a phone number, email address or postal address (such as Mobile, Home, Work, etc.), tap the type to the right of the field and select the appropriate type. 5. When you have finished adding information, tap Add new contact.
The contact’s detailed listing appears. Contacts Screen Layout The following illustration shows your Contacts app layout and describes the various features. Item Description Favorites tab Show favorite contacts. Contacts tab Show all contacts. Groups tab Show contact groups. Contact Tap to show contact’s details. Search Search contacts.
Item Description Index Browse contacts by letter. Add new Add a new contact. Edit a Contact Once you’ve added a contact, you can add or edit any of the information in the entry, assign an ID picture, customize with a unique ringtone, and more. 1. From the home screen, tap Apps > Contacts . 2. Tap a contact to view its details. 3. Tap . 4. Tap any field you want to change or add. See Add a Contact. 5. Add or edit the information, and then tap Edit Contact.
2. Tap a contact to view its details. 3. Tap > Delete. 4. Tap OK. The contact is deleted. Share a Contact You can quickly share contacts using Bluetooth, Email, Gmail, or Google Drive. 1. From the home screen, tap Apps > Contacts . 2. Tap a contact to display it, and then tap > Share. 3.
Bluetooth to send the information via Bluetooth. See Bluetooth for information on pairing and sending via Bluetooth. Drive to share the information with Google Drive. Email to send the information as an email attachment. See Compose and Send Email for details on sending email. Gmail to send the information as a Gmail attachment. See Create and Send a Gmail Message for details. 4. Complete the required steps as prompted for the selected method. The selected contact will be shared.
Back Up Contacts You can export all of the contacts on your tablet as vCard files. You can then copy this file to a computer or another tablet that is compatible with this format, such as an address book application. Back Up Contacts to Your Internal Storage 1. From the home screen, tap Apps > Contacts . 2. Tap > Import/export. 3. Tap Export to storage. 4. Select the contact(s) to export and tap . 5. Select Phone storage and tap OK. 6. Follow the onscreen instructions to complete the export.
Messaging and Internet With wireless service, you have the opportunity to share information through many different channels and accounts, including Gmail (Google), personal and corporate email, social networking accounts, and Hangouts. Gmail Use Google’s Gmail service and your Google Account to send, receive, and manage your Gmail messages. Before using Gmail, you must register a Google (Gmail) Account on your tablet. See Google Account for details. Gmail Cautions Gmail is handled as email from a PC.
3. Enter the message recipient(s), subject, and message, and then tap . The Gmail message is sent. Gmail Composition Options ● Adding Cc/Bcc: In the mail composition window, tap ● Attaching Files: In the mail composition window, tap file you want to attach. ● Save as a Draft (Send Later): While composing your message, > Save draft. The message is saved as a draft for later. ● Delete Mail Being Composed: In the mail composition window, tap > Discard > DISCARD.
2. Tap the new message from the notification panel. The new Gmail message opens. If you have two or more new Gmail messages, tapping the notification opens the Gmail inbox. Open Gmail Messages You can also read and reply to all your Gmail messages from the Gmail inbox. 1. From the home screen, tap Apps > Gmail . The Gmail inbox opens. 2. Tap the message thread you want to view. The message thread opens, with the newest message displayed.
Options when Reviewing Gmail Messages ● Replying to Gmail Messages: With the Gmail message open, tap message, and tap ● , compose your reply . To reply to all, tap Options > Reply all. Forwarding Gmail Messages: With the Gmail message open, tap additional message, and tap , enter a recipient and an . Use Gmail Labels Gmail saves all mail in one box, but you can add labels that allow you to sort your Gmail conversation threads.
1. From the home screen, tap Apps > Gmail . 2. Touch and hold a conversation thread to add a checkmark to it, and then tap . The thread is now archived. Mute Gmail Threads If registered on a mailing list, there will be threads with always-continuing conversations. For long threads that are not important, mute the threads and they will no longer appear in the inbox. When mail arrives that includes a user's address as a recipient or in Cc, mail will again appear in the inbox. 1.
Delete Gmail Threads If you no longer wish to keep a Gmail conversation thread, you can simply delete it from the inbox. 1. From the home screen, tap Apps > Gmail . 2. Touch and hold a conversation thread to add a checkmark to it, and then tap . The thread is deleted. Search Gmail Messages If you need to find a specific message or message thread, you can search Gmail from the inbox. 1. From the home screen, tap Apps 2. Tap > Gmail . .
3. Enter your search text and tap . The search results appear. Tap a message or thread from the list to display it. Report Spam Gmail You can report spam Gmail messages from your tablet’s Gmail inbox. 1. From the home screen, tap Apps > Gmail . The inbox opens. 2. Touch and hold a conversation thread to add a checkmark to it, and then tap > Report spam. The selected message is reported as spam Gmail.
Add Another Google (Gmail) Account If you have multiple Gmail accounts you wish to view on your tablet, you can add them from the Settings > Accounts menu. 1. From the home screen, tap Apps > Settings > Accounts > Add account. 2. Tap Google, and then tap Enter your email. 3. Enter your Gmail address and password, and then tap NEXT. 4. Follow the onscreen instructions to complete the email setup. Your tablet then communicates with the Google server to confirm your information.
3. Tap the account you want to view from the list. The selected account inbox is displayed. Gmail Settings You can access settings for the Gmail app and for your individual Gmail accounts from the Gmail Settings menu. 1. From the home screen, tap Apps > Gmail . The Primary inbox opens.
2. Tap > Settings. 3. Tap General settings to access settings for all accounts, or tap an account name to configure settings for a specific Gmail account. General settings: Gmail default action, Conversation view, Swipe actions, Sender image, Reply all, Auto-fit messages, Auto advance, Confirm before deleting, Confirm before archiving, and Confirm before sending.
1. From the home screen, tap Email or tap Apps > Email . A popup window for adding an account appears if no email account has been previously set up. 2. Follow the onscreen instructions to set up your email account. The email account is set up and you will begin receiving email. Add an Email Account You can add several types of personal email accounts, such as POP3 and IMAP accounts, on your tablet.
2. Tap > Settings > Add account. 3. Follow the onscreen instructions to complete the account setup. The email account is added and you will begin receiving email for the account. Note: You can also sign up for a new Email account from the Settings menu. Important: If the account type you want to set up is not in the tablet database, you will be asked to enter more details. You should get all pertinent information for the email account, such as incoming and outgoing server settings, before you proceed.
5. Enter the required information: Username: Enter your network domain and username, separated by “\”. Password: Enter your network access password (case-sensitive). Server: Enter your system’s Exchange server remote email address. Obtain this information from your company network administrator. Security Type: Select the security type. Port: Specify the port number. 6. Follow the onscreen prompts to configure options for the account.
3. Enter the message recipient(s). You can add multiple recipients to an email message. To add recipients from Contacts, tap tap . , select the contact(s) you wish to include, and then 4. Enter the email subject and message. 5. Tap To add an attachment to the message, tap want to attach. > Attach file. Locate and then tap the file you . The email message is sent. Open Email Messages You can open and read email messages directly from the email inbox.
2. Tap the message you want to view. The email message opens. 3. Tap to reply to the message. To reply to all, tap > Reply all. Tip: Tap the account name at the top of the screen to switch to a different email account. Tip: You can also access new email messages from the notification panel. Pull down the status bar to display the notification panel, and then tap an email notification. The email inbox will open and display the new email message.
2. Tap once. and select the desired account, or tap Combined view to see all your email inboxes at Refresh an Email Account Whatever your automatic synchronization settings are, you can also synchronize your sent and received email messages manually at any time. ■ While viewing the account you want to synchronize, swipe your finger downward to refresh. Sort Email Messages 1. On the email account inbox, tap > Sort by. 2. Select one of the sort options to sort email messages. 3. Tap OK.
Delete an Email Message 1. On the email account inbox, touch and hold the message you want to delete. 2. Tap . Delete Multiple Email Messages 1. On the email account inbox, tap and hold the messages you want to delete. 2. Tap . Configure Email Settings You can configure various settings for your email account such as account name, email checking frequency, default account, notifications, and server settings. 1. From the home screen, tap Email Messaging and Internet or tap Apps > Email .
2. Tap > Settings. 3. Tap General settings or an email account. Then change the desired settings. Data Services General Information (4G LTE) The following topics will help you learn the basics of using your data services, including managing your user name, launching a data connection, and navigating the Web with your tablet. Important: Certain data services requests may require additional time to process.
The tablet will scan for the best available Sprint network and will automatically connect to it. When your tablet is connected via 4G LTE, appears in the status bar. Note: The Sprint networks are self-discoverable, which means no additional steps are required for your tablet to connect to it. Data Connection Status and Indicators Your tablet displays the current status of your data connection through indicators at the top of the screen.
The search results appear or a Web page opens. Browser Use Options ● Searching within a Web Page: With a Web page displayed, tap > Find in page, and enter your search text. Tip: To change the tablet’s default launch page to your current page, tap > Settings > Home page > Open this page and enter the current page's Web address. Add a Bookmark Bookmark favorite sites using the browser menu options. 1. From the home screen, tap Chrome or tap Apps > Chrome . The browser opens. 2.
View Browser History Use the browser menu options to view your browsing history. 1. From the home screen, tap Chrome or tap Apps > Chrome . The browser opens. 2. Tap > History. 3. Tap an entry. The Web page opens. Open New Browser Tabs Use tabbed browsing to switch between websites quickly and easily. 1. From the home screen, tap Chrome or tap Apps > Chrome . The browser opens.
2. Tap > New tab. A new tab appears. To switch tabs, tap one of the available thumbnails in the tabs window. Learn to Navigate the Browser Navigating through menus and websites during a data session is easy once you’ve learned a few basics. Here are some tips for getting around: Scrolling As with the other menus on your tablet, you will have to scroll up and down to see everything on the website. To scroll a Web page: ● Slide your finger on the screen in the direction you wish to scroll.
Repeat this process to keep going back through your recently visited pages. Browser Settings The Browser menu offers additional options to expand your use of the Web on your tablet. Open the Browser Menu 1. From the home screen, tap Chrome 2. Tap or tap Apps > Chrome . to enter the Browser menu. 3. Select one of the available options and modify the setting. Chrome Support ■ To find on-tablet help with Chrome, from Chrome, tap Messaging and Internet > Help & feedback.
A Web page will open displaying Google help for Chrome. Tip: For more information, from your computer, visit: google.com/intl/en/chrome/browser/mobile/.
Camera and Video You can use the camera or video camera to take and share pictures and videos. Your tablet comes with a 5 megapixel camera with an autofocus feature that lets you capture sharp pictures and videos. Camera Overview The camera's overview screen lets you view your subject and access camera controls and options. Tip: Swipe from left to right to switch modes or access the Settings menu.
1. From the home screen, tap Apps > Camera . The camera viewfinder appears. 2. Aim the camera at your subject. The camera will automatically focus, but you can tap another part of the screen to move the focus there. Spread two fingers apart on the screen to zoom in. Pinch two fingers together on the screen to zoom out. To switch to the front camera, tap 3. Tap > . To switch back to the rear camera, tap . to take the picture.
The picture will be taken after either 3 seconds or 10 seconds. Record a Picture Using Lens Blur You can make the subject of your picture stand out by blurring the background. 1. From the home screen, tap Apps > Camera 2. Swipe from left to right, then tap to switch to Lens Blur mode. 3. Aim the camera at your subject and tap . . 4. When prompted, slowly move the device up, keeping the focus centered on the subject. Record Videos Record high-quality videos using your tablet’s video camera.
1. From the home screen, tap Apps 2. Swipe from left to right, then tap 3. Tap 4. Tap > Camera . to switch to Video mode. To switch to the front camera, tap > . To switch back to the rear camera, tap . to start recording. To take a photo, tap anywhere in the screen. The video will keep recording. to stop recording. View Pictures and Videos You can view the most recent pictures or videos. ● Swipe from right to left on any screen to view last taken picture or recorded video.
View Pictures and Videos You can access and view all your stored pictures and videos from your tablet’s Photos. 1. From the home screen, tap Apps > Photos . The Photos album opens. By default, the pictures and videos in an album are displayed in grid view. 2. Tap an image to view the picture or video. The picture opens or the video begins playing. Tap a picture or video to view it full screen.
Note: When viewing pictures, you can touch and hold on a picture or video to open a selection menu and choose what to do with the picture or video. Edit Pictures When viewing the photo or video, you can edit, delete, or view the file information. 1. From the home screen, tap Apps > Photos 2. Select the picture you want to edit and tap . . 3. Select one of the available options: Tap to automatically adjust color and exposure, manually change lighting, manually adjust color, or add effects.
4. Select the desired sharing application or method. 5. Follow the onscreen prompts to complete and send the file. Delete Pictures or Videos You can delete the unwanted photos or videos. 1. From the home screen, tap Apps > Photos . 2. Select the picture or video you want to delete. 3. Tap to delete the file. Camera Settings You can adjust your camera’s settings using the icons on the main camera screen and the full camera settings menu.
Change the Resolution, Quality and Viewfinder Aspect Ratio You can specify the image resolution or video quality before taking the photo or recording the video. 1. From the home screen, tap Apps 2. Swipe from left to right, then tap > Camera . to access the Settings menu. 3. Tap Resolution & quality. 4. Select the camera type and change the desired setting. Change Picture Location Settings You can choose whether the camera stores location information for the pictures you take. 1.
4. Slide the switch to on or off.
Apps and Features The following topics detail many of your tablet’s tools and features such as maps and navigation, calendar, clock, social networking apps, music, and more. NASCAR MOBILE Now you have the ability to get every bit of NASCAR coverage, news, and stats right on your phone. Install the NASCAR MOBILE App on Your Phone Before you use the NASCAR MOBILE app on your phone, you must download and install the app from Google Play. 1. From the home screen, tap Apps > Play Store . 2.
Navigation Apps Your tablet offers a number of location-based navigation programs to help you figure out where you are and get you where you’re going. Enable Location Services on Your Tablet Before using any location-based services, you must enable your tablet’s location feature. For information about setting your tablet’s location options, see Location Access Settings.
● Obtain Useful Area Information for Current Location: From the Maps app, tap information you’re looking for, and then tap a result to view it. ● View Traffic Information, Aerial Photos, Etc., in Maps: From the Maps app, tap tap Traffic, Satellite, Google Earth, etc. ● Check Route to Destination: From the Maps app, tap , enter your current location and your destination, and then tap a method of transport (car, public transit, bicycle, or on foot).
Hangouts Hangouts is Google's instant messaging service. Use to communicate with other Hangout users, and also use video calling. Log in to a Google Account beforehand (see Google Account). Using Hangouts 1. From the home screen, tap Apps > Hangouts . The Hangouts app will open. 2. Tap Add to start a new Hangout. 3. Type a name, email, number, or circle, or select a contact from the list. 4. Type a message or tap to start a video chat. A chat window or a video chat window opens.
The Search window opens. If confirmation appears, follow the onscreen instructions. If a description for Google Now appears, tap GET STARTED and follow the onscreen instructions if you want to use Google Now. 2. Type your search keywords and tap on the onscreen keyboard. Search results appear. To search by voice, tap in the search bar and speak your search terms. Google Search Operations ● Managing Account and Privacy: In the search window, tap privacy and change the settings.
● Changing the Search Language: In the search window, tap and select the spoken language. ● Configuring Voice Search: In the search window, tap settings. ● Changing Search Information: In the search window, tap select where to search. ● Manage Now Cards: In the search window, tap settings. ● View Google Search Version: In the search window, tap version and legal information.
2. Tap onscreen keys for calculations. Calculation results appear. Calendar Use Calendar to create and manage events, meetings, and appointments. Your Calendar helps organize your time and reminds you of important events. In order to sync with your Google calendar, you must sign in to a Google Account on your tablet. See Google Account. Change Calendar View To change the calendar view, do the following. ● Change Calendar View: From the Calendar, tap change the current view.
● View Next/Previous Month/Week/Day: From the Calendar, flick the screen left or right. Add an Event to the Calendar Add events to your calendar directly from the Calendar application. 1. From the home screen, tap Calendar or tap Apps > Calendar . The Calendar app opens. 2. Click an empty day or time on your calendar. The add event window opens. Tip: You can also create an event by tapping 3. . Enter an event title, start date/time, end date/time, etc., and then tap SAVE.
The event is added to your calendar. View Calendar Events You can view more information about an event or edit the event. 1. From the home screen, tap Calendar or tap Apps > Calendar . The Calendar app opens. 2. Tap a date and then tap an event. The event details appear. To edit the event, tap changes. To delete the event, tap and modify the necessary settings. Then tap SAVE to save the > DELETE. Then tap OK to confirm the deletion.
3. Tap the menu option you want to configure. 4. Change the necessary settings. Clock Your tablet has a clock app that lets you set alarms, view time in time zones around the world, use a stopwatch, set a timer, and use your tablet as a desk clock. Check the Time You can check the tablet any time on your tablet. The current time displays in the upper right corner of the status bar. Many widgets and lock screens also display the time and provide options for how time is displayed.
2. Tap on the top of the screen. 3. Tap to add a new alarm. 4. Slide the clock pointer to set the time and then tap OK. 5. Check the Repeat checkbox to set the repeat mode. Then select the desired week days. 6. Tap to set the ringtone. Then select the desired alarm sound and tap OK to confirm. 7. Tap Label to enter the alarm label. Enter the name and tap OK. The alarm is set.
The Clock appears. World Clock The world clock lets you keep track of the current time in multiple cities around the globe. 1. From the clock app, tap 2. Tap on the top of the screen. and select a city. 3. Repeat to add multiple cities. Timer The timer provides a countdown timer. 1. From the clock app, tap on the top of the screen. 2. Use the keypad to set the length of the timer.
3. Tap to begin the timer. Stopwatch The stopwatch lets you time events down to the hundredth of a second. 1. From the clock app, tap on the top of the screen. 2. Tap to start the stopwatch. While the watch is running, tap lap. 3. Tap to pause the stopwatch. To reset the stopwatch, tap To share your results, tap to record a lap. Repeat this step to record another new . .
1. From the home screen, tap Apps > Facebook . 2. Enter your Facebook username and password and tap LOG IN. Your Facebook account is added to your tablet. Tip: If you do not have a Facebook account, tap Sign Up for Facebook to create a new account. Use Facebook Once you’ve downloaded the app and signed in, you can post and read updates, upload pictures, tag locations, and more, all from your tablet. 1. From the home screen, tap Apps > Facebook . The Facebook app launches.
YouTube View videos uploaded to YouTube and upload your own videos to your YouTube account. View YouTube Videos You can use the YouTube app to view videos on YouTube even if you aren’t signed in to a YouTube account. 1. From the home screen, tap Apps > YouTube . The YouTube app launches. If you’re prompted to provide confirmation to use the site, follow the onscreen instructions to continue. 2. Search through the YouTube channels and tap a video you want to see.
The video plays on your tablet screen. Tap the screen to pause or resume play while watching. Post a Video to YouTube You can post videos to your YouTube account from your tablet. Before posting, you must set up a YouTube account and sign in to it on your tablet. 1. From the home screen, tap YouTube 2. Tap 3. Tap or tap Apps > YouTube . tab. and select a video to upload. Enter a title, description, and tags, and select a privacy setting. 4. Tap UPLOAD.
The video is uploaded to your YouTube channel. Google Play Music App The Google Play Music app lets you browse, shop, and play back songs purchased from Google Play as well as songs you have loaded from your own music library. The music you choose is automatically stored in your Google Play Music library and instantly ready to play via streaming or download. For more information about Google Play Music, visit play.google.com/about/music.
3. Tap an item from the category window and then tap a song. The song begins playing. Google Play Music Screen Layout The following diagram outlines the main features of the Play Music app player screen. Feature Description Return to music list Tap to return to the previous screen. Show music image Display music image. Music title/artist Display a music title and artist name.
Feature Description Progress bar Drag the bar forward/back to move to any point in a song. Repeat Repeat a song. Shuffle Play songs in random order. Previous song Tap to restart the current song. Tap twice to go back to the previous song. Play/pause Tap to switch play and pause. Next song Go to the next song. Rate (thumbs up/thumbs down) Tap to rate the current song. Options menu Set the following options: Add to playlist, Go to artist, Go to album, Clear queue, Save queue.
3. Tap next to the song you want to add to a playlist. Then tap Add to playlist. 4. Tap New playlist. 5. Enter a name and tap CREATE PLAYLIST. The playlist is created. Playing a Playlist 1. Tap > My Library and select PLAYLISTS tab. 2. Tap the playlist you want to play. Then tap the song you want to play. Deleting a Song from a Playlist 1. Tap > My Library and select PLAYLISTS tab. 2. Tap the playlist you want to access. Then tap next to the song you want to delete.
3. Tap Remove from playlist. Sprint Music Plus With Sprint Music Plus and the Music Store, Ringtone Store, and Ringback Tone Store, you can purchase, download, and play music, ringtones, and ringback tones for your tablet. Update the Sprint Music Plus App on Your Tablet Before you use Sprint Music Plus on your tablet, you must update the app from the Google Play store app. 1. From the home screen, tap Apps 2. Tap Menu > Play Store . > My apps. 3. Tap Sprint Music Plus.
4. Tap UPDATE > ACCEPT. 5. When the update has completed, tap OPEN. To open the app from the home screen, tap Apps > Sprint Music Plus . Access Sprint Music Plus 1. From the home screen, tap Apps > Sprint Music Plus . The app opens. The first time you use the app, tap Accept to agree to the Premium Services Terms of Use. 2. Tap a store option from the main page (Ringbacks Store, Music Store, or Ringtones Store), or tap > Music (under Library) to access your music.
Tap the onscreen navigation tools to skip ahead or rewind. Tap additional options. For more information, tap at any time to see > Settings > About or Help. Note: If you have loaded music on to your tablet from your computer (see Transfer Files between Your Tablet and a Computer), you will need to sync your music to listen to it through Sprint Music Plus. From the Sprint Music Plus app, tap see your music in the library. > Settings > Synchronize your music library.
The app will open and display the Music Store. 2. Enter a song or artist in the search field or browse through options in the tabs in the center of the screen. 3. Tap a song to select it. The song information screen is displayed. 4. Follow the onscreen instructions to preview or purchase the song. Tap the Sprint Music Plus menu. at any time to display Tip: For ringtones or ringback tones, tap Ringtone Store or Ringback Tone Store from the Sprint Music Plus main menu.
Connectivity The following topics address your tablet’s connectivity options, including USB file transfer, Wi-Fi, Bluetooth, and more. Transfer Files between Your Tablet and a Computer You can use the supplied USB cable to connect your tablet directly to your computer and transfer music, pictures, and other content files.
2. Pull down the status bar to display the notification panel. The USB connection options appears. The files on your tablet can now be accessed via your computer. For most transfers, you'll want to use Connected as a media device. To change the option, tap it in the notification panel to open the USB computer connection window, and then tap the desired option. 3. On your computer, navigate to the detected device (such as through the My Computer menu) and open it. 4.
The transferred files are now saved to your tablet or microSD card. Wi-Fi Wi-Fi provides wireless Internet access over distances of up to 300 feet. To use your tablet’s Wi-Fi, you need access to a wireless access point or “hotspot.” The availability and range of the Wi-Fi signal depends on a number of factors, including infrastructure and other objects through which the signal passes.
3. Tap the switch to On to turn Wi-Fi on. Wi-Fi is enabled. You will see the names and security settings of in-range Wi-Fi networks. To disable Wi-Fi, tap the switch to Off . 4. Tap a Wi-Fi network to connect, enter the password (if it’s not an open network), and then tap CONNECT. Your tablet is connected to the Wi-Fi network. You will see ( ) in the status bar. The password, for a household wireless LAN router, is sometimes found on a sticker on the router (WEP, WPA, KEY, etc.).
Note: The next time your tablet connects to a previously accessed secured wireless network, you will not be prompted to enter the password again, unless you reset your tablet to its factory default settings or you instruct the tablet to forget the network. Note: Wi-Fi networks are self-discoverable, which means no additional steps are required for your tablet to connect to a Wi-Fi network. It may be necessary to provide a user name and password for certain closed wireless networks.
3. Tap the name of the connected access point and then tap FORGET. Wi-Fi is disconnected. After disconnecting from an access point, you may need to re-enter the password to reconnect. Wi-Fi Direct Use Wi-Fi Direct to connect directly to other Wi-Fi Direct devices simply via Wi-Fi, without an access point or via the Internet. 1. From the home screen, tap Apps 2. Tap Wi-Fi > Settings . . The Wi-Fi settings menu appears. 3. Tap the switch to On to turn Wi-Fi on. Wi-Fi is enabled.
If a connection is not accepted after a certain period, the connection request is canceled. To stop a connection, tap End connection > OK. Hotspot Hotspot allows you to turn your tablet into a Wi-Fi hotspot. When this feature is turned on, you can share your tablet's mobile data services via Wi-Fi with other Wi-Fi enabled devices. The feature works best when used in conjunction with 4G data services. Important: Use of the Hotspot feature requires an additional subscription.
Hotspot is enabled. To disable Hotspot, tap the switch to Off . Note: The best way to keep using the tablet as a hotspot is to have it connected to a power supply. Important: Write down the passkey (password) for this communication (shown onscreen). Connect to Hotspot 1. Enable Wi-Fi (wireless) functionality on your target device (laptop, media device, etc.). 2. Scan for Wi-Fi networks from the device and select your tablet hotspot from the network list. 3.
For USB tethering, connect your tablet to the target device with the supplied USB cable. For Bluetooth tethering, pair your tablet with the other device via Bluetooth. Bluetooth Bluetooth is a short-range communications technology that allows you to connect wirelessly to a number of Bluetooth devices, such as headsets and hands-free car kits, and Bluetooth-enabled handhelds, computers, printers, and wireless tablets. The Bluetooth communication range is usually approximately 30 feet.
Bluetooth is enabled. To disable Bluetooth, tap the switch to Off . Tip: You can also turn Bluetooth on or off with the toggle menu in the notification panel. Pull down the status bar to display the notification panel and then tap Bluetooth to turn Bluetooth on or off. Note: Turn off Bluetooth when not in use to conserve battery power, or in places where using a wireless tablet is prohibited, such as aboard an aircraft and in hospitals.
The Bluetooth device is paired to your tablet. Methods to accept a Bluetooth connection differ depending on the devices used. Unpairing from a Paired Device 1. From the Bluetooth settings menu, tap next to the paired device you wish to unpair. 2. Tap FORGET. The device is unpaired from your tablet. To make another connection with the device, you will need to pair again. Connect to a Paired Bluetooth Device You can listen to music over a Bluetooth stereo headset.
1. From the home screen, tap Apps 2. Tap Bluetooth > Settings . . The Bluetooth settings open. Paired Bluetooth devices appear in the “Paired devices” list. 3. Tap a device from the “Paired devices” list. Your tablet connects to the paired device. The pairing and connection status is displayed below the device’s name in the Bluetooth devices section. When the device is connected to your tablet, the Bluetooth paired icon is displayed in the status bar.
4. Tap a paired device to receive the data. The contact information is sent. If you see a message to confirm, follow the onscreen instructions. Receive Data via Bluetooth Your tablet is capable of receiving a wide variety of file types with Bluetooth, including pictures, music tracks, and documents such as PDFs. 1. When another device attempts to send a file to your tablet via Bluetooth, you will see a request to accept the file. 2. Tap ACCEPT. The file is sent to your tablet.
When you open a received file, what happens next depends on the file type: • Media files and documents are usually opened directly in a compatible application. For example, if you open a music track, it starts playing in the Music application. • For a vCard contact file, if there are multiple vCard files on your storage card, you can choose to import one, several, or all of those contacts to your contacts list.
Settings The following topics provide an overview of items you can change using your tablet’s Settings menus. Basic Settings From the home screen, tap Apps > Settings to access your tablet’s settings menu. The table below outlines the top-level settings categories. Category Description Wi-Fi Enable and set Wi-Fi options. Bluetooth Enable and configure Bluetooth connections. Data usage Check your tablet’s data usage. More Provides additional wireless and network options.
Category Description Backup & reset Configure the data backup settings and format your tablet to its factory defaults. Date & time Configure the date and time settings. Accessibility Set accessibility options such as screen magnification, hearing aid compatibility, and other related options. Printing Configure the printing settings. Activate this Device Activate a new tablet or use additional self-service options. About tablet View your tablet information.
Tip: You can also access settings from the notification panel. Pull down the status bar and tap the notification panel to open the Quick Settings menu. Then tap to access the Settings . Wi-Fi Settings Menu The Wi-Fi settings menu lets you turn Wi-Fi on or off, set up and connect to available Wi-Fi networks, and configure advanced Wi-Fi options. For more information about Wi-Fi settings, see Wi-Fi. 1. From the home screen, tap Apps 2. Tap Wi-Fi > Settings . . The Wi-Fi settings menu appears. 3.
● Enable Wi-Fi Only for Stable Connection: From Wi-Fi settings, tap > Advanced > Avoid poor connections. The setting is available when Wi-Fi is turned on. Check the Avoid poor connections check box to turn the option on. ● Install Certificates for Wi-Fi Authentication: From Wi-Fi settings, tap > Advanced > Install certificates and then select a certificate stored in Google Drive, Downloads, the internal storage, or the memory card.
The Bluetooth settings open. Bluetooth Settings Operations ● ● ● ● Enable Bluetooth: In Bluetooth settings, tap the switch to On When enabled, confirmation appears for your tablet to be discoverable by other devices. Follow the onscreen instructions. Set the switch to On ● to enable or Off to disable. Pairing Bluetooth Devices: Make sure the other devices are set to be discovered. From Bluetooth settings, tap the device name in “Available devices” and follow the onscreen instructions.
Data Usage Settings The data usage menu lets you view your tablet’s mobile and Wi-Fi data usage, set data limits, restrict hotspot usage, and more. 1. From the home screen tap Apps 2. Tap Data usage > Settings . . The data usage window opens. Data Usage Settings Operations ● Enable Mobile Data: In Data usage window, tap the Cellular data switch to On the service.
● This setting stops some apps and services from working unless your tablet is connected to a Wi-Fi network. If a confirmation appears, tap OK. View Both Mobile Data and Wi-Fi Usage: From the Data usage window, tap > Show Wi-Fi. When Show Wi-Fi is enabled, you will see a Wi-Fi tab at the top of the Data usage window. Tap to view your tablet’s Wi-Fi data usage. More Settings The More settings menu provides access to additional wireless and network options.
2. Tap More . 3. Set items. Your settings are saved and implemented. Virtual Private Networks (VPN) From your tablet, you can add, set up, and manage virtual private networks (VPNs) that allow you to connect and access resources inside a secured local network, such as your corporate network.
2. Tap Security , and then tap Screen lock > Password. 3. Enter a new password (at least four characters without any spaces) and tap CONTINUE. 4. Reenter the password and tap OK to confirm your password. The password is set, allowing secure credential storage. 5. Tap Trusted credentials and then tap your preferred system and user credentials. Your secure credentials storage is set. You can then download and install the certificates needed to access your local network.
1. From the home screen, tap Apps 2. Tap More > Settings . > VPN. The VPN settings window appears. 3. Tap , and then enter the information for the VPN you want to add. Information may include Name, Type, Server address, PPP encryption (MPPE), and advanced options. Set up all options according to the security details you have obtained from your network administrator. 4. Tap SAVE. Your VPN is added to the VPNs section of the VPN settings window.
2. When prompted, enter your login credentials, and then tap CONNECT. You will connect to the selected VPN. When you are connected, a VPN connected icon status bar. appears in the notification area of the 3. Open the Web browser to access resources such as intranet sites on your corporate network. Disconnect from a VPN 1. Pull down the status bar and tap the notification panel to access the Quick Settings menu. 2. Tap the VPN connection to disconnect.
Display Settings Use the tablet's display settings menu to adjust items such as wallpaper, brightness, screen timeout, and more. Display Settings Overview The display settings menu allows you to configure the following options: Display Setting Description Brightness level Set the display brightness. Adaptive brightness Optimize the brightness level depending on the surrounding light conditions. Wallpaper Set a wallpaper for the home screen. Set a screen timeout duration.
2. Tap Display . 3. Set your display options. Your display settings are saved and applied. Sound and Notification Settings The Sound and notification settings menu lets you control your tablet’s audio, from ringtones and alerts to tap tones and notifications. Sound and Notification Settings Overview The Sound and notification settings menu allows you to configure the following options: Sound and Notification Setting Description Media volume Set volume for media playback.
Sound and Notification Setting Description App notifications Manage notifications settings individually for each application. Notification access View which application can access your notifications. Access Sound and Notification Settings 1. From the home screen, tap Apps 2. Tap Sound & notification > Settings . . 3. Set your sound and notification options. Your sound and notification settings are saved and applied.
Storage Setting Description Unmount SD card If an optional memory card is installed, tap to unmount the memory card to allow for safe removal. Mount SD card If an optional memory card is installed, tap to mount the memory card and make it available for use. Erase SD card If an optional memory card is installed, tap to erase all data stored on the card and prepare it for use by your tablet. Access Storage Settings 1. From the home screen, tap Apps 2. Tap Storage > Settings . . 3.
2. Tap Battery . 3. Tap items to view details. Check your battery condition and access additional options. Tip: To enable the battery saver function, tap > Battery saver > On . Note: The battery saver function will automatically disable when your tablet is charging. Applications Settings Check installed applications and running applications.
2. Tap Apps . 3. Tap items to view details. Check your application settings condition and access additional options. Depending on the app and its location, you may be able to force the app closed, uninstall or disable the app, clear cache and data, and more. Location Access Settings Your Location Services settings menu lets you select how your tablet determines its location (using the wireless networks, GPS satellites, both, or neither).
Your tablet’s location services are enabled. If you see a confirmation, follow the onscreen instructions to connect. Configure Location Mode 1. From the home screen, tap Apps 2. Tap Location > Settings . > Mode. 3. Select the desired settings. Your location settings are applied and saved. Security Settings The Security settings menus let you set encryption options, password visibility, administrator settings, and credential storage options.
Security Settings Overview Many security settings are dependent on Screen lock settings, SIM lock settings, etc. The following table outlines the settings available through the Security settings menu: Security Setting Description Screen lock Manage the screen lock options. Owner info Enter information that is displayed on the lock screen. Lockscreen shortcuts Assign a lock screen shortcut. Encrypt tablet Encrypt all data on your tablet.
2. Tap Security . The Security settings menu opens. 3. Set your security options. Your security settings are applied and saved. Lock Screen Settings The lock screen settings let you set your method for unlocking your tablet, customize lock screen options, determine whether to show pop-up tips for unlocking the tablet, and enter your owner information to be displayed on the lock screen. Screen Lock You can increase the security of your tablet by creating a screen lock.
Access Screen Lock Settings 1. From the home screen, tap Apps 2. Tap Security > Settings . > Screen lock. The Screen lock settings menu opens. Use a Screen Unlock Pattern 1. From the Screen lock settings menu, tap Pattern. 2. Draw the screen unlock pattern by connecting at least four dots in a vertical, horizontal, or diagonal direction. Lift your finger from the screen when finished. The tablet records the pattern. 3. Tap Continue.
4. When prompted, draw the screen unlock pattern again, and then tap CONFIRM. The screen unlock pattern is saved. If you fail to draw the correct unlock pattern on the screen after five attempts, you will be prompted to wait for 30 seconds before you can try again. Note: Disable the Make pattern visible option if you do not want the unlock pattern to display on the screen when you unlock it. Note: To change your unlock screen pattern, from home, tap Apps Screen lock.
3. Enter your PIN again and tap OK to save the setting. The screen lock is set. If you fail to enter the correct PIN after five attempts, you will be prompted to wait for 30 seconds before you can try again. Use a Screen Unlock Password 1. From the Screen lock settings menu, tap Password. 2. Enter a password and tap CONTINUE. 3. Enter your password again and tap OK to save the setting. The screen lock is set.
Security Setting Description Make pattern visible You can select whether the pattern will be visible on the screen when you unlock your tablet using a pattern. Automatically lock Choose the amount of time before the screen automatically locks after the screen has timed-out. Power button instantly locks You can instantly lock the screen when you press the Power/lock button.
Set Up a New Account 1. From the home screen, tap Apps 2. Tap Accounts > Settings . > Add account. An Add account window appears. 3. Tap an account type and then follow the onscreen instructions to add the required account information. The account is added to the accounts list. Manage Existing Accounts 1. From the home screen, tap Apps Settings > Settings .
2. Tap Accounts and select an account. The account settings menu appears. 3. Select the option to configure and modify the necessary settings. The account options are updated. Note: The available settings options vary depending on the account type. Language and Input Settings Your tablet’s language and input settings let you select a language for the tablet’s menus and keyboards, select and configure keyboard settings, configure speech input settings, and set your tablet’s mouse/trackpad options.
Language and Input Setting Description Google voice typing Configure Google voice typing settings. Voice input Configure your voice search settings. Text-to-speech output Configure text-to-speech output settings. Pointer speed Set the speed of the pointer for a mouse/trackpad. Access Language and Input Setting Options 1. From the home screen, tap Apps 2. Tap Language & input > Settings . . The Language and input settings menu opens. 3.
● Enable Spell Checker: From the Language and input settings menu, tap Spell checker and then tap the switch to On language or tap to enable the spell check function. Tap Language to specify the next to Google Spell Checker option to configure the settings. ● Add Words to Dictionary: From the Language and input setting menu, tap Personal dictionary and then tap ADD to add a word to the dictionary.
Backup and Reset Option Description Backup account Select the account used to back up data. Automatic restore When reinstalling an application, backed up settings and data will be restored. Factory data reset Reset all settings and delete all data on your tablet. ● Performing a factory data reset erases all data on the tablet. It is recommended that you back up important data before performing a factory data reset. ● Erased information cannot be restored.
Factory Data Reset Tip: Before performing a factory data reset on your tablet, you may want to unmount an installed microSD memory card to avoid losing any data you may have stored on it. From home, tap Apps > Storage > Settings > Unmount SD card to unmount the microSD card. 1. From the Backup and reset menu, tap Factory data reset. 2. Read the factory data reset information page and tap RESET TABLET. 3. Tap ERASE EVERYTHING.
Date and Time Settings Use the date and time settings menu either to automatically use the network-provided date and time or manually set these values, as well as select time and date format options. Date and Time Overview The following date and time options may be configured: Date and Time Option Description Automatic date & time Enable or disable the system to set the date and time automatically via the connected wireless network.
2. Tap Date & time . 3. Set available date and time options. Your date and time settings are applied and saved. Accessibility Settings The accessibility menu lets you enable and manage accessibility-related applications. Accessibility Settings Overview The following accessibility options may be configured: Accessibility Option Description TalkBack Enable this option to let your tablet provides spoken feedback to help visually impaired users.
Accessibility Option Description Persistent Alerts Enable this option to set the repeat interval of notifications for the selected applications. Large text Enable this option to make text appear bigger on the screen. High contrast text Enable this option to let the system automatically fix the text color to make the text easier to see on the screen. Auto rotate screen Enable this option to set the screen to rotate automatically when your tablet is rotated.
2. Tap Accessibility . 3. Set available accessibility options. Your accessibility settings are applied and saved. Printing Settings The printing menu lets you print any file wirelessly from your tablet to an optional compatible printer. Make sure your tablet is connected to the same network as the printer. 1. From the home screen, tap Apps 2. Tap Printing > Settings . . The Printing menu appears.
3. Select a print service from the list. Tap the switch to On Tap > Add printer to add a new printer. Tap > Settings to configure the printer settings. to enable the service. Activate This Device Use this menu to activate a new tablet or use additional self-service options such as checking the status of an in-service tablet. 1. From the home screen, tap Apps 2. Tap Activate this Device > Settings . . The Device Self Service menu appears. 3.
About Tablet Item Description Status View your tablet’s status. Status information includes helpful information about battery status and level, SIM status, IMEI information, addresses for IP, MAC, and Bluetooth, and more. 4G settings View the network provider information and IP address. Legal information View the open source licenses and Google legal, Wallpaper, and Carrier legal information. Model number View your tablet’s model number. Brand View your tablet’s brand name.
3. Select or view available options. Your tablet information is displayed. System Update The system update menu lets you update your tablet's software and other related settings. System Update Overview The following system update options may be configured: System Update Option Description Update Profile Update your user profile information. Update PRL Update the latest PRL (Preferred Roaming List) used by your tablet to access the network.
For Assistance The following topics address areas of support for your tablet, including troubleshooting, specifications, account information, and customer service contact information. Troubleshooting Check the questions and answers below for troubleshooting solutions for common tablet issues. Check Here First Question: Tablet freezes/operation is unstable. Answer: Turn the tablet on again.
From the home screen, tap Apps data switch to On > Settings > Data usage and set the Cellular . Answer 5: Is a disabled access point set? To configure the access point: From the home screen, tap Apps > Settings > More > Tethering & portable hotspot > Set up Wi-Fi hotspot and modify the Network Name, Security, and Password. Then tap SAVE to save the settings. Question: Battery level goes down quickly.
Item Description BT 4.1 + LE WiFi 802.11b/g/n Connectivity GPS LTE B2/B4/B5/B12/B25/B26/B41 3.5mm audio jack Micro USB I/O Micro SD Nano SIM Accelerometer Sensor E-compass Dimensions 162.3 x 260 x 8.95mm 5200 mAh Battery Li-polymer / Embedded Sprint Account Information and Help Find out about account passwords and information about managing your account and finding help.
For more information, or to change your passwords, sign on to sprint.com/mysprint. Manage Your Account Manage your Sprint account from your computer, your Sprint tablet, or any other tablet. Online: sprint.com/mysprint ● Access your account information. ● Check your data used (depending on your Sprint service plan). ● View and pay your bill. ● Enroll in Sprint online billing and automatic payment. ● Purchase accessories. ● Shop for the latest Sprint tablets.
Index 4G, 78 About Tablet 4G settings, 167 Android version, 167 Baseband version, 167 Brand, 167 Build number, 167 Kernel version, 167 Legal information, 167 Model number, 167 Processor information, 167 Status, 167 Accessibility Settings Accessibility shortcut, 164 Auto rotate screen, 164 Captions, 163 Color correction, 164 Color inversion, 164 High contrast text, 164 Large text, 164 Magnification gestures, 163 Persistent Alerts, 164 Speak password, 164 Switch Access, 163 TalkBack, 163 Text-to-speech output
Status indicators, 79 Data Usage Settings, 137 Date and Time Settings Automatic date and time, 162 Automatic time zone, 162 Select time zone, 162 Set date, 162 Set time, 162 Use 24-hour format, 162 Display Settings Adaptive brightness, 143 Ambient display, 143 Brightness level, 143 Daydream, 143 Font size, 143 Sleep, 143 Wallpaper, 143 When device is rotated, 143 Drag, 11 Editing Text, 30 Email Add account, 71 Add Exchange ActiveSync account, 72 Compose and send, 73 Configure settings, 77 Manage inbox, 75 S
Location Services, 148 Lock Button, 3 Maps, 95 Memory, 145 Messaging, 61 microSD Card Erase, 146 Mount, 146 Unmount, 146 Mobile Hotspot, 124 Music Google Play Music, 110 Sprint Music Plus, 114 NASCAR MOBILE, 94 Navigation, 95 Google Maps, 95 Scout, 96 Notification Icons, 48 Notification Panel, 49 Notifications, 48 Photos, 88 View pictures and videos, 89 Pictures Delete, 91 Edit, 90 Share, 90 Take with camera, 85 View, 89 Pinch, 13 Play Music, 110 Play Store, 34 Find and install apps, 34 Power Button, 3 Powe
PRL, 43 Profile, 42, 44 Software, 41 Tap, 10 Tethering, 125 Text Editing, 30 Text Entry, 27 Timer, 105 Touch, 10 Touch and Hold, 11 Touchscreen Keyboard, 27 Turn off, 40 Turn on, 40 Turn Your Tablet Off, 9 Turn Your Tablet On, 9 Typing, 27 Video Camera Record video, 87 Videos Index Record, 87 View, 89 Voice Search, 99 Voice Typing, 29 Volume Button, 3 VPN, 139 Add connection, 140 Connect or disconnect, 141 Prepare for connection, 139 Secure credential storage, 139 Wallpaper, 50 Widgets, 52 Wi-Fi, 120 Sett