Federal Communications Commission (FCC) Statement This device complies with Part 15 of the FCC Rules. Operation is subject to the following two conditions: • This device may not cause harmful interference, and • This device must accept any interference received; including interference that may cause undesired operation. This Equipment has been tested and found to comply with the limits for a Class B digital device, pursuant to Part 15 of the FCC rules.
CONTENTS TAKING CARE OF YOUR NOTEBOOK PC ................................................... 5 1 BEFORE YOU START ............................................................................... 9 1-1 Making sure you have everything ................................................... 9 1-2 Finding where everything is located ............................................ 10 2 GETTING STARTED ............................................................................... 19 2-1 Power Sources ...................
This page is intentionally left blank.
TAKING CARE OF YOUR NOTEBOOK PC To prevent possible overheating of the computer’s processor, make sure you don’t block the openings provided for ventilation. DO NOT press or touch the display panel. DO NOT place on uneven or unstable work surfaces. DO NOT use your notebook computer under harsh conditions. DO NOT place or drop objects on the computer and DO NOT apply heavy pressure on it. DO NOT subject the computer to magnetic fields.
DO NOT expose to direct sunlight. DO NOT use or store in extreme temperatures. Avoid sudden changes in temperature or humidity by keeping it away fromA/C and heating vents. DO NOT expose the computer to rain or moisture. DO NOT place near fire or other sources of heat. DO NOT tamper with the batteries. Keep them away from children.
DO NOT expose to dust and/or corrosive chemicals. DO NOT slam your notebook shut and never pick up or hold your notebook by the display. DO NOT spray water or any other cleaning fluids directly on the display. If you are traveling with your computer, remember to carry it as hand luggage. Do not check it in as baggage.
This page is intentionally left blank.
1 BEFORE YOU START 1-1 Making sure you have everything When you receive your notebook PC, unpack it carefully, and check to make sure you have all the items listed below.
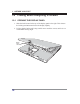
1. BEFORE YOU START 1-2 Finding where everything is located 1-2-1 OPENING THE DISPLAY PANEL 1. Slide the latch located at the top of the display panel to the right. This releases the locking mechanism and raises the display slightly. 2. Lift the display backwards, being careful not to touch the screen, until it is at a comfortable viewing angle.
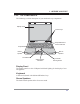
1. BEFORE YOU START 1-2-2 TOP COMPONENTS The following is a brief description of your notebook’s top components. Display Panel Instant Keys Suspend/Resume/ Power On Button Keyboard Built-in Speaker Built-in Speaker Scroll Button Status Display Indicators TouchPad Pointing Device Display Panel The display panel is a color LCD panel with back lighting for the display of text and graphics. Keyboard A full-size keyboard with dedicated Windows keys.
1. BEFORE YOU START Status Display Indicators The Status display indicator lights correspond to specific components of your notebook. (See suspend notebook activity without powering off, resume your notebook from suspend mode, and power on your notebook when it has been shut down from Windows. (See Suspend/Resume/Power On Button in 2-3-1 Power On for more information.
1. BEFORE YOU START 1-2-3 FRONT PANEL COMPONENTS The following is a brief description of your notebook’s front panel components. Display Panel Latch Built-in Speaker Memory Card Reader Infrared Port Built-in Speaker Built-in Stereo Speakers The built-in dual speakers allow for stereo sound.
1. BEFORE YOU START 1-2-4 LEFT-SIDE PANEL COMPONENTS The following is a brief description of your notebook’s left-side components. PC Card Eject Button USB Ports IEEE 1394 Port PC Card Slot Headphone Jack Audio-in Jack Microphone Jack USB Ports (V2.0) The four USB ports allow you to connect Universal Serial Bus devices. The leftmost USB port is disabled when your notebook PC is POINT connected to an optional Port Replicator.
1. BEFORE YOU START 1-2-5 RIGHT-SIDE PANEL COMPONENTS The following is a brief description of your notebook’s right-side components. Power Adapter Port Lithium ion Battery Bay Optical Drive Emergency Optical Drive Tray Release Optical Drive Eject Button Lithium ion Battery Bay The internal battery pack can be removed for installation of a fully charged battery pack. (See 2-1-3 Replacing the Battery for more information.) Optical Drive The Optical Drive allows you to play back a media disc.
1. BEFORE YOU START 1-2-6 BACK PANEL COMPONENTS The following is a brief description of your notebook’s back panel components. Port Replicator Interface Modem Port (RJ-11) TV-out Port Parallel Port Ethernet Port (RJ-45) External Monitor Port Kensington Lock Slot Modem (RJ-11) Port The modem (RJ-11) port is used to attach a telephone line to the internal 56K modem. LAN Port (RJ-45) The LAN port is designed to support a 10/100/1000 Base-T standard RJ-45 plug.
1. BEFORE YOU START Kensington Lock Port The Kensington lock slot allows you to secure your notebook to an immovable object through an optional security cable. 1-2-7 BOTTOM COMPONENTS The following is a brief description of your notebook’s bottom panel components.
1. BEFORE YOU START Optical Drive Bay The internal optical drive is accessible through the optical drive bay. Main Unit and Configuration Label The configuration label shows the model number and other information about your notebook. In addition, the configuration portion of the label has the serial number and manufacturer information that you will need to give your support representative. It identifies the exact version of various components of your notebook.
2 GETTING STARTED 2-1 Power Sources Your notebook PC has two possible power sources: a primary Lithium ion battery or an AC adapter. 2-1-1 CONNECTING THE POWER ADAPTERS The AC adapter provides power for operating your notebook PC and charging the batteries. Connecting the AC Adapter 1. Plug the DC output cable into the adapter power port of your notebook PC. 2. Plug the AC adapter into an AC electrical outlet. POINT The Lithium ion battery is not charged upon purchase.
2. GETTING STARTED 2-1-2 RECHARGING THE BATTERY The Lithium ion battery is recharged internally using the AC adapter. To recharge the battery make sure the battery that needs to be charged is installed in your notebook PC and connect the AC adapter. There is no memory effect on the Lithium ion battery, therefore you do not need to discharge the battery completely before recharging. The charge times will be significantly longer if your notebook PC is in use while the battery is charging.
2. GETTING STARTED 2-1-3 REPLACING THE BATTERY This notebook PC features a rechargeable bridge battery that allows for fast warm swapping of batteries. All you need is an additional battery and you can have a fully charged spare to swap with one that is not charged without having to close all your applications and powering down your computer. 1. Have a charged battery ready to install. 2. Press [F1] while holding down [FN] to place your notebook PC in suspend mode and disconnect the AC adapter.
2. GETTING STARTED 2-2 Display Panel Your notebook PC contains a display panel that is backlit for easier viewing in bright environments and maintains top resolution through the use of active-matrix technology. 2-2-1 OPENING THE DISPLAY PANEL 1. Slide the latch located at the top of the display panel to the right. This releases the locking mechanism and raises the display slightly. 2. Lift the display backwards, being careful not to touch the screen, until it is at a comfortable viewing angle.
2. GETTING STARTED 2-2-2 ADJUSTING DISPLAY PANEL BRIGHTNESS Once you have turned on your notebook PC, you may want to adjust the brightness level of the screen to a more comfortable viewing level. There are two ways to adjust the brightness, keyboard and power management utility. The higher the brightness level, the more power the notebook PC POINT will consume and the faster your batteries will discharge. For maximum battery life, set the brightness to as low a level as possible.
2. GETTING STARTED 2-3 Starting Your Notebook PC 2-3-1 POWER ON Suspend/Resume/Power On Button The suspend/resume/power on switch is used to turn on your notebook from its off state. Once you have connected your AC adapter or charged the internal Lithium ion battery, you can power on your notebook. When you turn on your notebook be sure you have a power POINT source. This means that either the battery is installed and charged, or that the AC adapter is connected with AC power.
2. GETTING STARTED 2-3-2 BOOT SEQUENCE The procedure for starting-up your notebook is termed the Bootup sequence and involves your notebook’s BIOS. When your notebook is turned on the for the first time, the main system memory is empty, and it needs to find instructions to start up your notebook. This information is stored in the BIOS program. Each time you power on or restart your notebook, it goes through a boot sequence which displays a flash screen until your operating system is loaded.
2. GETTING STARTED 2-4 Status Display Indicators The Status Display Indicator LEDs correspond to specific components of your notebook. These lights (when visible) tell you that those components are operating. There are two additional lights on the front edge of the system to indicate battery and power states. CapLk Power Indicator 2-4-1 Battery Indicator NumLk ScrLk Hard Drive Access Wireless LAN POWER INDICATOR The Power indicator symbol states whether your system is powered on.
2. GETTING STARTED 2-4-2 BATTERY INDICATOR The Battery indicator tells you whether the primary Lithium ion battery is charging or fully charged. POINT CAUTION 2-4-3 If there is no battery activity, the power adapters are not connected, or the power switch is Off, the Battery indicator will also be off. Batteries subjected to shocks, vibration or extreme temperatures can be permanently damaged.
2. GETTING STARTED 2-4-6 SCRLK INDICATOR The ScrLk indicator states that your scroll lock is active. 2-4-7 HARD DRIVE ACCESS INDICATOR The Hard Drive Access indicator states whether your internal hard drive is being accessed.
2. GETTING STARTED 2-5 Using the Keyboard Your notebook has an integral 87-key keyboard. The keys perform all the standard functions of a 101-key keyboard, including the Windows keys and other special function keys. This section describes the following keys. • Numeric keypad • Cursor keys • Function keys • Windows keys Function Keys / Q .
2. GETTING STARTED 2-5-2 WINDOWS KEYS Your notebook has three Windows keys, consisting of two Start keys and an Application key. The two Start keys display the Start menu. This button functions the same as your on-screen Start menu button. The Application key functions the same as your right mouse button and displays shortcut menus for the selected item. (Please refer to your Windows documentation for additional information regarding the Windows keys.
2. GETTING STARTED • • • • • 2-6 [FN+F8]: Pressing [F8] repeatedly while holding [FN] will increase the volume of your notebook PC. [FN+F9]: Pressing [F9] while holding down [FN] allows you to toggle between playing and pausing your optical drive. [FN+F10]: Pressing [F10] while holding [FN] stops your optical drive. [FN+F11]: Pressing [F11] while holding [FN] to go back to the previous file. [FN+F12]: Pressing [F12] while holding [FN] to go to the next file.
2. GETTING STARTED 2-7 Power Management Your notebook has many options and features for conserving battery power. Some of these features are automatic and need no user intervention. However, others depend on the parameters you set to best suit your operating conditions. 2-7-1 SUSPEND/RESUME/POWER ON BUTTON When your notebook is active, the Suspend/ Resume/Power On button can be used to manually put your notebook into Suspend mode.
2. GETTING STARTED Your notebook’s system memory typically stores the files on which you are working, opens applications information, and any other data required to support the operations in progress. When you resume operation from Suspend mode, your notebook will return to the point where it left off. You must use the Suspend/Resume/Power On button to resume operation, and there must be an adequate power source available, or your notebook will not resume.
2. GETTING STARTED 2-7-4 STANDBY MODE Standby mode is one of the power management parameters. When Standby mode is activated, your notebook shuts off the display and turns off the hard drive when there is no activity (keystroke, pointer action, sound generation, video display change, modem transmission or reception, etc.) on your notebook for the user-selected Standby timeout period. Any activity will cause your notebook to return to normal operation automatically.
3 USING YOUR NOTEBOOK PC 3-1 Touchpad Pointing Device The Touchpad pointing device comes built into your notebook PC. It is used to control the movement of the pointer to select items on your display panel. The Touchpad is composed of a cursor control, a left and right button, and a scrolling button. The cursor control works the same way a mouse does, and moves the cursor around the display. It only requires light pressure with the tip of your finger.
3. Using Your Notebook PC 3-1-1 CLICKING Clicking means pushing and releasing a button. To left-click, move the cursor to the item you wish to select, press the left button once, and then immediately release it. To rightclick, move the mouse cursor to the item you wish to select, press the right button once, and then immediately release it. You also have the option to perform the clicking operation by tapping lightly on the Touchpad once.
3. Using Your Notebook PC 3-1-3 DRAGGING Dragging means pressing and holding the left button, while moving the cursor. To drag, move the cursor to the item you wish to move. Press and hold the left button while moving the item to its new location and then release it. Dragging can also be done using the Touchpad. First, tap the Touchpad twice over the item you wish to move making sure to leave your finger on the pad after the final tap.
3. Using Your Notebook PC 3-2-2 REMOVING A MEMORY CARD To remove the memory card from the reader, follow these simple steps: 1. Locate the drive icon for your memory card reader. 2. Right-click the icon and select Eject. 3. Remove memory card from the reader. Physically removing the memory card before it is ejected may CAUTION result in data loss.
3. Using Your Notebook PC 3-3-1 OPTICAL DRIVE SOFTWARE DVD Model only: With the optical drive and Optical Drive software you can play DVD movies on your notebook PC. The optical drive includes controls which allow you to take full advantage of the features of a DVD movie, as well as standard features such as fast forward, fast reverse, pause, etc. DVD / CD-RW Model only: With this optical drive, you can read audio CDs, play DVD movies, and write data onto a recordable CD-R or CD-RW disc.
3. Using Your Notebook PC 3-3-2 LOADING A CD, DVD, CD-R, OR CD-RW To load a disc into your optical drive drive, follow these steps: 1. Push and release the eject button on the front of the optical drive drive to open the holder tray. The tray will come out of the notebook PC a short distance. 2. Gently pull the tray out until a media disc can easily be placed in the tray. 3. Place the media into the tray, label side up, with the hole in the center of the disc.
3. Using Your Notebook PC 3-3-3 REMOVING MEDIA 1. Push and release the eject button on the front of the optical drive drive. This will stop the drive and the holder tray will come out of the notebook PC a short distance. 2. Gently pull the tray out until the disc can easily be removed from the tray. 3. Carefully remove the media disc from the holder tray. 4. Gently push the holder tray back in until you hear a click.
3. Using Your Notebook PC 3-3-6 USING DOLBY™ HEADPHONE The Dolby Headphone utility lets you enjoy multi-channel sound sources, such as DVD movies, with realistic surround sound using your conventional stereo headphones. The Dolby Headphone is a utility that is available in the DVD player software. Media discs which do not have the Dolby Surround 5:1 symbol POINT will not support Dolby Headphone.
3. Using Your Notebook PC POINT Many movie run-times are longer than your system can support on a single battery. If you are watching a DVD movie on battery power you may need to swap in an additional, charged battery or attach AC power during the movie to view it in its entirety. An additional fully-charged battery is highly recommended if you will be watching DVD movies on battery power. To Watch a Movie on Battery Power: 1. Have an additional fully-charged battery or your AC adapter ready for use. 2.
3. Using Your Notebook PC 3-3-8 AUTO INSERT NOTIFICATION FUNCTION The Auto Insert Notification function allows your notebook PC to automatically start a DVD/CD as soon as it is inserted in the optical drive drive and the tray is closed. Your notebook PC will begin playing an audio DVD/CD or will start an application if the DVD/ CD includes an auto run file. Disabling Auto Insert Notification Function To disable the Auto Insert Notification function, follow these easy steps: 1.
3. Using Your Notebook PC 3-4 PC Cards Your notebook PC supports Type II PC Cards, which can perform a variety of functions depending on which type of PC Card you install. You can install one PC Card at a time in your notebook PC. Make sure that the PC Card conforms to PCMCIA 2.1 or CardBus standards. For further information, refer to the instructions supplied with your PC Card. 3-4-1 INSTALLING PC CARDS PC Cards are installed in the PC Card slot.
3. Using Your Notebook PC 1. See your PC Card manual for specific instructions on the installation of your card. Some PC Cards may require your notebook PC to be OFF while installing them. 2. Make sure there is no PC Card currently in the slot. If there is, see 3-4-2 Removing PC Cards. 3. If the eject button is extended, press it in until it clicks. 4. Insert your PC Card into the slot with the product label facing up. 5. Push the card firmly into the slot until it is seated in the connector.
3. Using Your Notebook PC 3-5 Memory Upgrade Module Your notebook PC comes with either 128MB or 256MB of high speed Synchronous Dynamic RAM (SDRAM) factory installed. To increase your notebook’s memory capacity, you may install an additional memory upgrade module. The memory upgrade must be a dual-in-line (DIMM) SDRAM module.
3. Using Your Notebook PC 5. Align the connector edge of the memory upgrade module, chip side up, with the connector slot in the compartment. 6. Insert the memory upgrade module at a 45 o angle and press it firmly onto the connector. 7. Press the memory upgrade module down into the compartment until it locks underneath the retaining clip. You will hear a click when it is properly in place. 8. Replace the cover and screw that were removed previously. Installation of the new memory module is now complete.
3. Using Your Notebook PC 3-5-2 REMOVING A MEMORY UPGRADE MODULE 1. Perform steps 1 through 4 of 3-5-1 Installing a Memory Upgrade Module. 2. Pull the clips sideways away from each side of the memory upgrade module at the same time. 3. While holding the clips out, remove the module from the slot by lifting it up and pulling towards the back of your notebook PC. 4. Store the memory upgrade module in a static guarded sleeve. 5.
3. Using Your Notebook PC 3-5-3 CHECKING NEW MEMORY CAPACITY Once you have changed the system memory capacity by either adding or removing a memory upgrade module, be sure to check that your notebook PC has recognized the change. You can check the memory capacity by looking at the main menu of the BIOS setup: 1. Turn on the power to your notebook PC using the power switch. 2. Allow the system to start booting and press the [F2] key once the flash screen appears on the screen.
3. Using Your Notebook PC 3-6 Device Ports on Optional Port Replicator Your notebook PC and the optional Port Replicator come equipped with multiple ports to which you can connect external devices including: disk drives, keyboards, USB devices, printers, etc. 3-6-1 PS/2 PORT The PS/2 port allows you to connect an external keyboard, and/or numeric keypad and mouse. In order to connect a PS/2 interface device follow these easy steps: 1. Align the connector with the port opening. 2.
3. Using Your Notebook PC 3-6-3 SERIAL PORT The serial port, or COM port, allows you to connect serial devices, such as printers or scanners. In order to connect a serial interface device follow these easy steps: 1. Align the connector with the port opening. 2. Push the connector into the port until it is seated. 3. Tighten the two hold-down screws, located on each end of the connector.
3. Using Your Notebook PC 3-6-6 INTERNAL LAN (RJ-45) PORT The RJ-45 port is used to connect the internal Fast Ethernet (10/100 Base-T/Tx) to a Local Area Network (LAN) in your office or home, or broadband devices such as a cable modem, DSL, or satellite internet. If your notebook has been configured with internal LAN capability you will need to configure your notebook to work with your particular network. (To properly set up your LAN environment, consult with a networking professional.
3. Using Your Notebook PC This page is intentionally left blank.
4 TROUBLESHOOTING Your notebook PC is sturdy and subject to few problems in the field. However, you may encounter simple setup or operating problems that you can solve on the spot, or problems with peripheral devices, that you can solve by replacing the device. The information in this section helps you isolate and resolve some of these straightforward problems and identify failures that require service.
4. Troubleshooting • Any error messages that have occurred • Hardware configuration • Type of device connected, if any See the Configuration Label on the bottom of your notebook for configuration and serial numbers.
APPENDIX Notebook Specifications Processor BIOS Chipset Main memory LCD Graphic Hard Disk Optical Disk Drive Modem PC card slot LAN Interface I/O ports Audio Memory card reader Mini-PCI Keyboard Battery AC adapter Pointing device OS Dimensions Weight Intel® CentrinoTM Mobile Technology Phoenix 512K BB Flash ROM Intel 855PM (Odem) + ICH4-M Zero on board and two SO-DIMM memory sockets 14”XGA/15”XGA and SXGA+ TFT-LCD ATI M9-CSP64 support AGP4X One 2.5” 9.
Appendix WLAN Specifications IEEE 802.11b standard technology 124-pin SO-DIMM edge connector 2.4GHz support Data rate up to 11Mbps, 5.5Mbps, 2Mbps, 1Mbps Transmit output power: 16.7dBm Voltage: 3.