Important Information Safety and Performances Before You Start Getting Started Basic Calls and Phone Use Call Options Personalizing Settings Text Entry Message Java™ T-Zone Get more IM Tools Camera Index
The design of this phone complies with the FCC guidelines and these international standards. Use only the supplied or an approved antenna. Read this information before you start Unauthorized antennas, modifications, or attachments could impair call quality, damage the using your phone phone, or result in violation of FCC regulations. Conditions of Use Operation of this NEC mobile phone is subject to the Do not use the phone with a damaged antenna.
Safety and Performances Emergency services To make an emergency call in any country Press 112 Ask the operator for the service which you require: Police, Ambulance, Fire Brigade, Coastguard or Mountain Rescue Services. Give your location and, if possible, remain stationary to maintain phone contact. The 112 emergency number service is available on every digital network service. The number 999 is an alternative emergency number for UK only, and can only be used with a valid SIM card.
• The operation of some medical electronic devices, such as hearing aids and pacemakers, may be affected if a cell phone is used next to them. Observe any warning signs and manufacturer's recommendations. If you have a weak heart, you should take extra precautions when setting functions such as the Vibrator and Ring tone volume functions for incoming calls. If you set the Vibrator setting to anything other than OFF, be careful that the phone is not near a source of heat (e.g.
• ANSI/IEEE C95.1-1992. *Safety levels with respect to human exposure to radio frequency electromagnetic fields, 3kHz to 300 GHz.* The Institute of Electrical and Electronics Engineers Inc., New York, 1991. FCC Report and Order, ET Docket 93-62, FCC 96-326, Federal Communications Commission (FCC), August 1996. Radio communications (Electromagnetic Radiation Human Exposure) Standard 1999, Australian Communications Authority (ACA), May 1999.
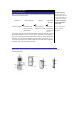
Before you Start Phone system structure User Guide Legends When you are using your phone, several elements are involved to provide you This type of paragraph contains details of where to successful telecommunication: find related information to the topic being explained. NEC Phone Service Provider Network WAP service This type of paragraph provider contains information worth noting. The people This type of paragraph that provide contains important your Internet information.
Display information Main LCD graphic display area This area contains the greetings graphic on power up, status graphics, as well as information when searching for networks and making calls. The standby screen shows the current network, vibrator status, current active mode, current time and date and whatever you have keyed using the phone’s keypad.
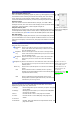
7. IM 8. Tools 9. Camera Under construct! Include functions such as My document, Camera, Organization, Clock, Calculation, Composer, Voice memo and PC sync. See page XX for details. Allows you to take a picture. See page XX for details. Option menu operation example Changing of the phone modes using the option menu is carried out as follows: Changing of the phone modes using the Option menu is carried out as follows: From the standby screen, press key. Press LSK to access the Option menu for Phone modes.
Getting Started Your phone is equipped with a battery and a charger. Other optional accessories can customize your phone for maximum performance and mobility. All the features described in this user guide are supported by your phone. For all the features to work, you must have a valid SIM card (included in the package supplied by your service provider) that also supports these features. Even if you have a fully featured SIM card, any feature not supported by the network transmitting your call will not work.
Before using your phone, you must sign-up/register with a wireless network service provider to receive a personal SIM (Subscriber Identity Module). The SIM card contains a computer chip that keeps track of your phone number, the services included in your subscription, and your SIM phonebook information. It is stored in a recess in the battery compartment. The phone is unusable (except for emergency calls) until a valid SIM card is inserted.
Charging the battery for the first time Your phone is powered by a rechargeable battery. A new phone battery must be fully charged before using your phone for the first time. Before attempting to use your phone, insert the phone's battery. Place the battery terminal end towards the hinge of the phone. Lower the battery towards the phone to lock into place and slide back the rear cover until you hear a click (see right).
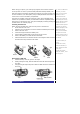
Changing the battery Make sure the phone is switched off. Some settings, stored numbers, and messages may be lost if the battery is removed while the power is on. 1. Press down the rear cover. 2. Slide the rear cover about 8 mm in the direction indicated by the arrows. 3. Remove the rear cover. 4. Put the new battery into place in the direction indicated by the arrow, making sure that the tabs of the battery fit properly into the notches in the phone. 5.
Basic calls and Phone use You can make a call in the same way as a normal push-button phone. Press after entering the area code and phone number. key Dialing calls •Enter the phone number in the standby screen and check the number on the display. Press call key to dial the call. To end the call at any time, press power key to return to the standby screen.
Using handsfree Insert the handsfree to the earphone jack at the side of the phone. When there is an incoming call: Under auto answering mode, the call will be connected automatically. Under manual answering mode, press send key to connect the call. • • Placing a call on hold You can place a received or dialed call on hold by pressing RKS. Press RSK again to return to the call. If a call is received but not answered, the caller’s information is stored in Missed calls.
Fast dial Fast dials can be activated in the Abbreviated Dialing Numbers by entering a number between 1 to 255 (depending on your SIM card) and pressing #. The phone details that correspond to the record number will be displayed. Press key to dial. Each phonebook entry will be saved either in the SIM card or Phone. Voice mail Most mobile service providers offer this external voice mail service to their subscribers.
Call options From the main menu select Phonebook>Options to access this function. A quick way to view received and dialed calls list from the standby screen is to press call key and scroll to the respective lists by R and L navigation key. Call lists There is a total of 3 call lists in your phone's memory: 1. Dialed calls 2. Missed calls 3. Received calls From the main menu, select Phonebook > Call options. Press 1 for Dialed calls, 2 for Missed calls and 3 for Received calls.
Personalizing settings You may customize your phone from the following settings. From the main menu, select Settings. And you may see Phone, Phone modes, Display, Calls, Security, Network, T9® input, and Reset settings. Under Phone option, there are: Voice volume To adjust the volume during a call, use the up navigation key to increase volume and the down navigation key to decrease volume.
the following procedure to set the time and date: Network time From the main menu, select Settings > Phone > Time/Date. Highlight Network time and press LSK to toggle Network time On/Off. A tick will appear in the check box beside the option. Press RSK to accept changes and return to the Phone menu. Set time format From the main menu, select Settings > Phone > Time/date > Set time format. Use the up and down navigation keys to highlight 12 Hour/24 Hour format. Press LSK to confirm the selection.
When a phone mode is selected, some of your phones settings will be altered according to the selected phone mode.
call/Phonebook call/Alarm/Message/Group 1-10. The volume screen showing the level of ring volume is displayed. Use the up/right navigation key to increase or down/left navigation key to decrease the volume setting to the level required (the level bar moves in the direction corresponding to the key pressed). Press LSK to save the current ring volume setting or RSK to reject any ring volume changes. The phone returns to the Ringer volume screen.
You can select one of the two available animations available in your phone: From the main menu, select Settings > Display > Animation. Use the up or down navigation keys to highlight either Animation 1 or Animation 2. Press LSK to confirm the selection. Brightness To alter the brightness of your phone's display screen, use the following procedure: From the main menu, select Settings > Display > Brightness.
•Status check •Cancel all •All un-answer current status screen. Setting up call divert and editing the number • From the main menu, select Settings > Calls > Call forwarding. • Use the up and down navigation keys to highlight the desired condition to forward your incoming calls. Press LSK to display the Option menu. Highlight Set and press LSK to display the Divert to: screen.
You may be required to enter one of the following security codes as shown below. When the phone prompts you for one of these codes, use the keypad to enter the appropriate number and press LSK to confirm.
• When roaming (You will not be able to receive calls when you are outside your home network. This means that no charges will be incurred for incoming calls) To place restrictions on certain type of calls: From the main menu, select Settings > Security > Bar calls. Use the up and down navigation keys to highlight the type of calls you want to restrict and press LSK to display the Option menu. Select Set to activate. You will be prompted to enter the bar password.
Network info From the main menu, select Settings > Network > Network info. Use the up and down navigation keys to highlight the network you want to connect to and press LSK to select. The screen will return to standby mode after a confirmation message is displayed. Choose network From the main menu, select Settings > Network > Choose network. Press LSK to confirm. This will restart the network search that will be very useful if you are not on your home network or you need to register on a different network.
settings.
Text Entry This section describes how you can enter text (letters, numbers and symbols). The same method of text entry can be used in all of the phone’s editing display. T9® Input In the text entry screen, pressing the * key can change the text entry mode in the normal text input or when T9® is activated. Pressing and holding the # key will toggle T9® input On/Off.
T9® preferred Alternatively, you can To select whether to activate T9® input, use the following procedure: From the main menu, select Settings> T9® input. Highlight T9® preferred press and press LSK to toggle T9® preferred On/Off. A tick in the check box and hold the # key in the indicates that T9® input has been activated. text • T9® Chinese entry screen to toggle To activate/deactivate the input methods for T9® Chinese, use the following T9® procedure: From the main menu, select Settings > T9® input.
Numeric input (123). T9® chinese stroke With the text entry screen displayed, press * key until the T9® Chinese stroke input is activated. Press key 1 to 6 to add a stroke as shown on the keypad to be displayed in the editing screen stroke bar. To select a word from the list of possible words, use the left and Right navigation keys to scroll through the same list, or use up and down navigation keys to get to the next page of the same list. Press the LSK to confirm selection for the word.
Message From the main menu, select Message. Using this function, you can send and receive text messages with attached sound, image files, etc. The following folders in the Message menu have the following functions: Inbox: The received messages are saved. (To enter, select Inbox from Message menu screen.) Outbox: The sent messages are saved and specified. (To enter, select Outbox from Message menu screen.) Draft: The edited messages are saved.
message (available for Inbox only). Detail - Display the date, time and sender’s information. Extract number - Extract the number to save in the phonebook if it is not already saved (available for Inbox only). Extract URL - Access the hyperlink attached to the message (available for Inbox only) Call Sender – Directly call the number who sent you the message. To select an option, highlight the option and press LSK.
from the standby screen. Press LSK to display the message list of the highlighted mailbox (Inbox/Outbox/Draft). Highlight the message to be read and press LSK. Select View from the Option menu. The message contents will be displayed. Creating and sending a message The following describes the operations related to creating and sending a message. To create and send a new SMS message Select Message from the main menu or press left navigation key directly from the standby screen.
• The Edit screen will be displayed with the sender’ s address and Re: original subject of the MMS message. Input the message and press LSK when the MMS reply is done. If necessary, edit the Subject title. Press LSK again for the Option menu. Highlight Send and press LSK to send the MMS reply. To forward a received message Select Message from the main menu or press # navigation key directly from the standby screen. Select Inbox from the Message menu screen.
Status report Select this option to request for a receipt when the SMS message is sent successfully. Use the up and down navigation keys to highlight Status report and press LSK. The tick in the check box indicates that Status report is activated. Direct reply Use the up and down navigation keys to highlight Direct reply and press LSK to toggle it On/Off. The tick in the check box indicates that direct reply is activated.
• To add a new topic, select Topic list > User defined > to display the Enter msg ID: screen. Enter the ID and press LSK. Enter the name and press LSK. To add to a current topic, select Topic list > Current > to display a list of topics to choose from. To delete a topic, highlight the topic, press LSK and select Delete. Auto display Turns the automatic display function On/Off for cell broadcast messages to be displayed in standby mode.
Java™ You can download Java™ from WAP sites and etc. and run these in your phone. The downloaded Java applications are saved under this function. Java From the main menu, select Java™. Alternatively, you can press and hold " navigation key directly from the standby screen. The downloaded Java™ applications and folders will be displayed.
T Zones
Get more You may customize your phone from the following settings. From the main menu, select Settings. And you may see Phone, Phone modes, Display, Calls, Security, Network, T9® input, and Reset settings.
Phonebook Lists Your phone can store up to 8 different contacts phonebooks: Personal directories (ADN) in SIM Personal directories (ADR) in your phone memory (Phone) Own number Fixed dialing numbers (FDN) Service dialing numbers (SDN) Voice mailbox Complete (a list of all the numbers stored in the other phonebooks (Phone, IM, FDN) except SDN numbers) Groups From the main menu, select Phonebook > Lists to display the phonebook entries.
IM
Tools From the main menu, select Accessory to access the various functions provided by your phone as listed below: My document (voice memo, Photos, picture, sounds, memory status) Camera Organization (Scheduler, ToDo list, Notepad) Clock (Alarm clock, Auto off, Auto on, Countdown, Stopwatch) Calculation (Calculator, Currency conv.) Composer Voice memo PC sync Voice memo The voice memo files are saved here. You may send the file as an MMS attachment.
Auto off When this function is activated, the phone will be automatically switched off at the pre-set time everyday. . Auto on When this function is activated, the phone will be automatically switched on at the pre-set time everyday. Countdown After a preset time elapsed, the function will indicate last 3 seconds of the countdown timer by a beep tone. At the end of the countdown time, a special beep can be heard. . Stop watch From the main menu, select Accessory > Clock > Stopwatch.
Camera The integrated digital camera in the phone allows you to take photos and send them out via the Multimedia Messaging Service (MMS) or as an e-mail attachment. The photos will be stored in JPG format in the phone, and can be viewed by most picture viewing programs. Taking a picture To take and save a picture inside your phone, use the following procedure: . From the main menu, select Accessory > Camera or press Sidekey directly.
. Highlight Photo size and press the LSK to display the Option menu. Use the # and $ navigation keys to highlight the image size that best suits your needs and press LSK to confirm the selection. . The available sizes are: VGA (640 x 480); QVGA (320 x 240); QQVGA (160 x120). . A larger image size will take up more memory space. Brightness . Highlight Brightness and LSK to adjust the brightness for the photo shoot with the use of # and $ navigation keys. Press LSK to confirm the setting. Image quality .
Go to my photos . By selecting this menu, you can access the Photos folder in My document.