
User's Manual


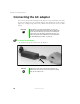


Table Of Contents
- Contents
- Checking Out Your Gateway Notebook
- Getting Started
- Getting Help
- Windows Basics
- Using the Internet
- Using Multimedia
- Sending and Receiving Faxes
- Managing Power
- Travel Tips
- Customizing Your Notebook
- Upgrading Your Notebook
- Networking Your Notebook
- Moving from Your Old Computer
- Maintaining Your Notebook
- Restoring Software
- Troubleshooting
- Safety, Regulatory, and Legal Information
- Index

13
Connecting the AC adapter
www.gateway.com
2 Connect the AC adapter to your notebook’s power connector.
3 Plug the power cord into a wall outlet.
The battery charge indicator turns on (see “Front” on page 2 for the
location of the indicator). If the battery charge indicator does not turn
on, disconnect the adapter from your notebook and repeat Step 2.
4 When you finish using your notebook for the first time, turn the
notebook off and leave the notebook connected to AC power for at least
24 hours.
5 If the battery meters do not show a full charge after 24 hours, contact
Gateway Technical Support at www.gateway.com/support/contact.
Warning Do not attempt to disassemble the AC adapter. The
AC adapter has no user-replaceable or user-serviceable
parts inside. The AC adapter has dangerous voltages that
can cause serious injury or death. Contact Gateway about
returning defective AC adapters.