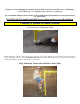
Instructions for the Assembly and Safe Use of FramePro Products Multi-Functional Scaffold Prefabricated Mobile Interior Scaffolds FramePro Product LLC. 900 Business Park Dr., Suite D Dixon, Calif.
Worksite Inspection Users of FramePro Scaffolding must walk the area in which they will work, to remove any materials that may be a in the way of the scaffold setup. Particular care must be taken to note floor hazards such as construction debris, holes in the floor, etc. FramePro Scaffolds must be used on solid flat surfaces. Equipment Inspection Prior to use FramePro Scaffold users must thoroughly inspect the scaffold prior to use.
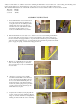
ACCESSORIES The FramePro Products Multi-Functional Scaffold is available in Steel and Aluminum GUARDRAIL SET MFS TRUSS MFS LADDERS MFS PLATFORM MFS CASTERS/ PINS
MFS GUARDRAIL SAFETY PIN MFS OUTRIGGERS DANGER This metal equipment is conductive. Do not use near electrical circuits. Serious injury or death could result. WARNING Do not use this equipment if you are in poor health, taking medications, drugs, or drinking alcoholic beverages, all of which may impair your ability to work safely on this product. Do not mix platforms, casters, trusses, end frame access ladders or other components from other manufacturers with FramePro scaffolding.
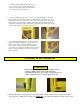
-Always lock the brakes on scaffold casters before climbing the End Frame Access Ladders. For easier locking and unlocking of the casters, turn the brake lever outward. The lever on the casters is to be pressed down until it locks the wheel -The maximum Distributed Load of a FramePro Scaffold Tower decreases with the number of sections that are stacked. Base Only 1,000 lbs. 2 Sections 850 lbs. 3 sections 700 lbs. ASSEMBLY INSTRUCTIONS 1. ` Invert an End Frame Access Ladder.
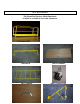
of the truss channel. Make sure the platform ledges on the truss channel are thoroughly cleaned and free of debris that would prevent the platform form seating properly into the trusses. 6. To adjust the platform height move to one end of the scaffold and grasp both Positive Engagement Locks on the trusses. Depress both thumb plates, pushing the pins out of the holes in the ladder legs. The trusses are now free to move either up or down on the ladder frame to the desired platform height.
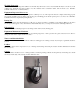
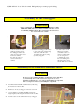
2.)Rail will feel “loose” this is normal. Pull gently up to ensure proper locking. Assembly of the Outriggers WARNING Before scaffold units are to be stacked, a set of (4) Outriggers (MFSNOR, MFS-WOR) with casters shall be installed on the base section of scaffolding. (OSHA 1910.29) The casters must be the same size as the casters in the base scaffold . 1. Insert a caster into each Outrigger. Casters used in the Outriggers must be the same size as the casters used in the base scaffold.
before proceeding. For easier locking and unlocking of the casters, turn the brake levers outward. 5. One person climbs onto the platform of the Base scaffold. From the ground, the second person hands up components of the first stacked section . 6. Install the two (2) End Frame Access Ladder. First, then install the two (2) side Trusses at the desired platform height. Lock all four (4) Positive Engagement Locks on the Trusses 7.
Complete sections with platforms should be stacked. Each stacked section includes two ( 2 ) End Frame Access Ladders two ( 2 ) adjustable trusses, and one ( 1 ) platform. To get maximum height from a FramePro Products Multi-Functional Scaffold set trusses just below the top of the ladders.
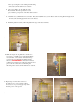
Mount and dismount the platform from the top center of the End Frame Access Ladder. Do not swing around the scaffold. Do not try to pull or “scoot” yourself from one location to another while standing on the platform. Climb down from platform to the floor. Unlock the casters and move the scaffold in a safe manner. Relock the casters before climbing up to the working platform. For easier locking and unlocking of the casters, turn the brake lever outward.