
User's Manual

80-J7615-1 Rev. A MAY CONTAIN U.S. AND INTERNATIONAL EXPORT CONTROLLED INFORMATION 11-3
Installing the Cargo Sensor Installing the Cargo Sensor Using 3" or 1" Pan Mount
There are three different options for mounting the cargo sensor: two using external pans and
one using a flat internal mount. Both external pan mounts have the same basic installation
steps.
• If you have a plate nose trailer or container or a dry van with less than 2", you will need to
use a 3" pan mount. See Installing the Cargo Sensor Using 3" or 1" Pan Mount on
page 11-3.
• If you have a dry van, or at least 2" but less than 3" from the skin to the outside liner, use a
1" pan. See Installing the Cargo Sensor Using 3" or 1" Pan Mount on page 11-3.
• If you have 3" from the inside skin to the outside liner, use a flat internal mount. See
Installing the Cargo Sensor Using a Flat Internal Mount on page 11-9.
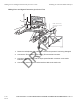
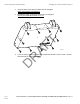
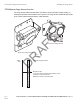
Installing the Cargo Sensor Using 3" or 1" Pan Mount
The 3" or 1" external pan mount installs outside on the trailer nose just below (approximately
1/2") the top rail horizontal rivet line where the trailer skin attaches to the top rail, in the
adjacent bay to the terminal.
Use a 3" pan mount on: container, plate nose trailer, or dry van trailer with less than 2" space
between the trailer skin and the plywood liner.
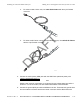
Container: There is no 7-way power. The container installation uses the cargo sensor only
cable.
Plate Nose Trailer: There is 7-way power and all cables are routed externally. Uses the
standard dry van “Y” cable.
Dry Van: There is 7-way power and all cables are routed internally. Uses the standard dry
van “Y” cable.
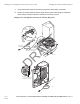
The 1" pan is used when there is at least 2" but less than 3" space between the trailer skin
and the outside surface (cargo side) of the plywood liner. The 1" pan uses the standard dry
van “Y” cable and all cables are routed internally (except possibly at 7-way).
DRAFT