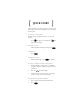
[ QUICK START ] Follow the directions on these two pages to start using your phone right away. For more information, refer to the rest of this user guide. ... To turn on your phone You must turn on your phone in order to use any of its features. ➤ ... ... ... ... ... Press pwr for about a second, until the appears on the display. To make a call ➤ Dial the number on the keypad, then press To hang up ➤ Press END icon SEND . . To answer a call ➤ When the phone rings, press SEND to answer it.
[ii] ➤ Press the structure. ➤ Press or through the menus. ➤ Enter the menu and menu item number (such as 6 3 for Display > Banner) to open a menu item. ➤ Press C to back up one level without saving changes, or END to cancel all the way out of the menus.
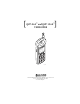
[ ] QCP-860™ and QCP-1960™ USER GUIDE D [ R -M OM LC u UA 0 Th Q -- pr 2 am ] A 3 K OO 8:4 [B ] NU ME D EN 3 ND SE 2 6 1 5 9 4 8 7 0 r pw C ι S029_56A1 QUALCOMM Incorporated 6455 Lusk Boulevard, San Diego, California 92121-2779 U.S.A. http://www.qualcomm.
[iv] This manual is based on the production version of the QCP-860 and QCP-1960 telephones. Software changes may have occurred after this printing. QUALCOMM reserves the right to make changes in technical and product specifications without prior notice. The products and equipment described in this documentation are manufactured under one or more of the following U.S.
[v] [ Customer Support ] Your service provider’s customer support department should be able to answer all your questions. You may also call U.S. 619-651-4028 or 800-349-4478 (toll-free, U.S. only) for QUALCOMM Customer Service. Consult QUALCOMM’s web site at www.qualcomm.com for more information about all our phones. Visit the Cellular Telecommunications Industry Association (CTIA) website at www.wow-com.com (wow-comTM) or call 888-901-SAFE (toll-free, U.S.
[ TABLE OF CONTENTS ] Quick start . . . . . . . . . . . . . . . . . . . . . . . . . . . . . . . i Getting to know your phone . . . . . . . . . . . . . . . . . . . 1 Turning the phone on and off . . . . . . . . . . . . . . . . . . 1 Safe operating instructions . . . . . . . . . . . . . . . . . . . . 2 Understanding the display . . . . . . . . . . . . . . . . . . . . 3 Smart Keys.......................................................... 5 Standby mode .....................................................
[vii] Searching the phone book. . . . . . . . . . . . . . . . . . . . 28 Example............................................................ 29 Voice mail, pages, and text messages . . . . . . . . . . . 30 Types of messages . . . . . . . . . . . . . . . . . . . . . . . . . 30 Alerts. . . . . . . . . . . . . . . . . . . . . . . . . . . . . . . . . . 31 Memory ............................................................ 31 Voice mail . . . . . . . . . . . . . . . . . . . . . . . . . . . . . .
[viii]
[ GETTING TO KNOW YOUR PHONE ] Turning the phone on and off ... To turn the phone on 1. Fully extend the antenna for optimal reception. 2. Hold down pwr for about a second. “Searching...” means the phone is searching for a signal. means the phone has found a signal. You can make and receive calls. “Roaming” means you are outside your home system. means the phone cannot find a signal. Wait a little longer or move into an open area.
[2] Getting to know your phone Safe operating instructions Using your phone properly increases the number of years of service it will give you. Read the following cautions before you use the phone. • If you have a pacemaker, keep the phone at least six inches (15 centimeters) away from your chest. If your phone is too close to a pacemaker, its radio frequency (RF) energy may interfere with the pacemaker. If you have any reason to suspect a problem, turn off your phone immediately.
Understanding the display [3] Understanding the display Your phone has a five-line display. The top line contains the display icons defined in the following list. The two words on the bottom line define the current function of the Smart KeysTM (described on page 5). Digital Mode icon. The phone is operating in CDMA digital mode. Digital CDMA calls have advantages such as privacy, voice clarity, and longer battery life. If you have service but the digital mode icon is not visible, you are in analog mode.
[4] Getting to know your phone receiving any signal. Wait a few minutes to see if you get a signal, or try moving into an open area. On Call icon. Indicates you are on a call. Roaming icon. You are outside of your regular service area. If the icon is flashing, it means that you are completely outside your home system. Different rates may apply. Envelope icon. You have a voice mail, page, or text message. Press to see message information. See “Voice mail, pages, and text messages” on page 30.
Understanding the display [5] Smart Keys Smart Keys are the two unlabeled keys immediately beneath the display. You can see them on the phone picture, next page (# 2). They change function depending on the situation. The word immediately above each Smart Key on the display identifies its current function. In standby mode, the Smart Keys are [MENU] and [BOOK]. When the directions in this manual tell you to press a Smart Key, they always start with either the [MENU] or [BOOK] Smart Key.
[6] Getting to know your phone Using the keys R D -- QUALCOMM -Apr 20 Thu 8:43 am 1 [ MENU ] [ BOOK ] 2 3 SEND END 1 2 3 4 5 6 7 8 9 6 0 7 i 8 4 5 9 C pwr 10 11 1. Press the volume keys on the side of the phone to adjust the volume, move the cursor when editing numbers, and scroll through menus.
Using the keys [7] 2. The two Smart Keys change function depending on what screen you are in. Look at the word on the display above the key for the current function. 3. SEND 4. Press the Send key to make or answer a call. When the Envelope icon appears on the display, press the Message key to open the message screen. 5. END Press the End key to end a call or to silence the ringer when it rings. Press the End key at any time to cancel out of the current screen and return to standby mode. 6.
[8] Getting to know your phone 10. pwr Press and hold the Power key down for about a second to turn the phone on or off. 11. C Press the Clear key once to erase the last character. Press and hold C to erase the whole line. C Press once to back up to the previous C to return to menu level. Press and hold standby mode. Using the keyguard The keyguard protects your phone against accidental key presses when the phone is turned on. Press SEND to answer calls while the keyguard is on. ...
Charging the batteries [9] Charging the batteries Your phone comes with a rechargeable internal lithium ion (LiIon) battery. You do not need to remove this battery for charging. The battery is partially charged when you receive the phone. If the battery level falls too low, the phone turns off without saving any functions in progress. Your phone comes with either an AC Adaptor or a Global Travel Charger (Model # TXTVL031).
[ MAKING AND RECEIVING CALLS ] This section explains how to make and receive calls. In addition to basic dialing and answering operations, you’ll learn how to use advanced features like muting calls, redialing any of the last ten numbers, and setting up a three-way conversation. Your phone must be turned on in order to use any of its features. When the phone is off, incoming calls go to voice mail if available (see “Voice mail, pages, and text messages” on page 30). Making and receiving calls ...
Redialing calls [11] Redialing calls Your phone keeps a “recent history” list of the last ten incoming and outgoing calls. You can easily redial or save any number on the list. ... To redial the last number you dialed ➤ When you are in standby mode, press SEND until you see “CALLING...” on the display. Tip. If you are not sure what mode you are in, press END ... to return to standby mode. To redial from the recent history list 1. Press the key under [BOOK].
[12] Making and receiving calls Recent history list The recent history list contains some or all of the following types of calls. Called By Incoming calls, if caller ID is available. Call To Any numbers you dialed. Missed Unanswered incoming calls, if caller ID is available. This type does not include call attempts made when the phone was off. Call Waiting Incoming calls that occurred while you were on another call. This type of call only occurs if your system supports call waiting.
Service provider calling features [13] Service provider calling features Your service provider may offer extra features like caller ID, three-way calling, call forwarding, and call waiting. If you wish to use these features, contact your service provider for details. Your QUALCOMM phone supports all of these options if they are activated on your phone. Caller ID Caller ID is a service provider feature that displays the number of the person that is calling you.
[14] Making and receiving calls Call forwarding Some service plans allow you to forward your calls to another number. Typically, you press plus a numerical code, then enter the forwarding number and press SEND . The phone beeps and shows a message confirming that you have forwarded your calls. Consult your service provider for details. Call waiting ... To use call waiting 1. When you are on a call and another call comes in, you hear two beeps.
Adjusting the volume [15] Adjusting the volume This section explains some easy ways to adjust the volume. You can also use the menu options on the Volume menu (see “Volume” on page 36). ... To silence the ringer ➤ END When the phone rings, press to turn off the ringer. The display momentarily reads “RINGER SILENCED,” then returns to “INCOMING CALL.” You may press SEND to answer the call even after turning off the ringer. ...
[ PHONE BOOK ] You can save phone numbers and associated information in your phone for quick dialing. There are 99 “memory locations” in the phone book. Each memory location holds up to 32 digits. You can also enter a name to go with the phone number. The name can be up to 12 characters. ... To speed dial a phone number ➤ Enter the memory location number and press SEND . See “Searching the phone book” on page 28 to learn different ways of finding numbers in the phone book.
Saving a number [17] Saving a number Tip: When you save a number in the phone book, include long distance information. That way, you can dial the number from anywhere. If it’s a local number, you only pay local rates. ... To save a number from standby mode 1. Enter the phone number you want to save. The [MENU] Smart Key changes to [SAVE]. 2. Press the key under [SAVE]. The name screen appears. 3. Enter a name to go with the number. To enter a letter, press the corresponding number key.
[18] Phone book enter a two-digit number between 01 and 99. If the number is already assigned, the phone asks if you wish to overwrite the previous entry. Press the key under [OK] to save the memory location number. The Make Secret? screen appears. 6. Press the key under [NEXT] to cycle through the options. Press the key under [OK] when you see the option you want. • No allows the phone number to appear normally in the phone book, recent history list, and so on.
Saving a name with the number [19] Saving a name with the number To enter letters, press the key labeled with the letter you 2 want. For instance, if you press appears on the display. Press , the letter A 2 again to cycle through the remaining letters. Two seconds after you choose a character, or when you enter another letter, the cursor moves to the right one space. You can also press or to move the cursor backward or forward. Example. To enter the name “Ann,” press enter the capital letter “A.
[20] Phone book ... To enter punctuation characters 1. While entering a name, press ι to open a list of 27 punctuation characters (shown below). Each character is associated with a number key. 2. Use or to move up or down between the three screens of characters. 3. To enter a punctuation mark, press the number associated with it. To cancel out of the screen without entering a punctuation mark, press C .
Saving a name with the number [21] Special characters Your phone supports English, French, Spanish, and Portuguese displays. If you select the English display, the number keys enter the letters printed on the keys. If you select another language, you can also enter letters with accents, cedillas, circumflexes, and other marks. To select a language, press the key under [MENU], then press 6 7 to open the Display > Language menu. Press the keys as indicated below to enter special characters.
[22] Phone book Entering pauses and hyphens You can save pauses and manual hyphens along with numbers. Pauses are useful for dialing numbers like voice mail access lines or any numbers that require a security code or credit card number. There are two kinds of pauses. Timed pauses are two seconds long. Hard pauses cause the phone to stop dialing until you press the key under [RESUME]. Hyphens are only for show.
Entering pauses and hyphens [23] Example Suppose you want to save the phone number and code for your voice mail at work. To access your voice mail, you must dial a number, then enter a password, then press Pound ( ). Here is what you should do. 1. Enter the voice mail phone number. 2. Press 3. Press 2 to select TimePause. The screen returns to the ι . The Pause/Hyphen screen appears. entry screen. A “T” appears after the phone number. 4. Enter the password, then the key. 5. Press the 6.
[24] Phone book Dialing from the phone book If you forget the memory location number... Press the key under [BOOK]. Press or to scroll up or down through the phone book until you see the memory location number and its associated entry. You can also search for the entry by name (see “Searching the phone book” on page 28). ... To speed dial a number ➤ From standby mode, enter the memory location SEND number and press ... . To dial from a memory location 1. Press the key under [BOOK]. 2.
Dialing from the phone book [25] ... To use touch dialing ➤ From standby mode, enter the memory location number on the keypad. Hold down the last digit until you see the message “Calling...” along with the phone book data. ... To edit a number “on the fly” You can change a number from the phone book or recent history list right before dialing. For instance, you may want to add long distance codes when dialing outside your home system. 1. Recall the number from the phone book or recent history list.
[26] Phone book Changing the phone book ... To edit a phone book entry You can change the phone number, name, and memory location of any non-secret phone number. You can also make non-secret numbers secret. Press the key under [SAVE] to skip over a screen without changing anything, or to accept the changes you have made and move to the next step. 1. Press the key under [BOOK]. The [BOOK] Smart Key changes to [VIEW]. 2. 3. Go to the phone book entry.
Changing the phone book [27] ... To erase a phone book entry 1. Press the key under [BOOK]. The [BOOK] Smart Key changes to [VIEW]. 2. Go to the phone book entry. 3. Press the key under [VIEW] if necessary to see details of the entry. The [EDIT] and [ERASE] Smart Keys appear. 4. Press the key under [ERASE], then press the key under [OK] to confirm that you want to erase the memory location. “-erased-” appears on the display to indicate that you successfully deleted the entry.
[28] Phone book Searching the phone book The phone automatically sorts the phone book by memory location number. To sort the entries alphabetically, change the setting in the Display > Sort Book menu option (6 2). ... To scroll through the phone book 1. Press the 2. Use key under [BOOK]. or to scroll up or down through the list. ... To search by name 1. Press the key under [BOOK]. The [MENU] Smart Key changes to [NAME] and the [BOOK] Smart Key changes to [CALLS]. 2.
Searching the phone book [29] Example To search for “Peter”, enter the letter “P.” If there is no entry for Peter, the phone shows the next entry after the “P”s. If the next entry was in the “R”s, you might see the entry for “Rabbits by Ralph.” If you enter three or more consecutive letters in the name, the display shows the first name that contains those letters. For example, if you enter the letters “C-A-K-E,” the phone might show the entry for “Heidi’s Hotcakes.” ...
[ VOICE MAIL, PAGES, AND TEXT MESSAGES ] Many portable phones come with voice mail service. When your phone is turned off, calls automatically go to your voice mail. Some service providers allow people to send short messages such as pages or email to your phone. Types of messages Voice mail. When you receive a voice message, the voice mail system sends a notification to your phone. You must call your voice mail service to hear the message, since it is stored on their system and not on your phone.
Alerts [31] Alerts When you receive voice mail or short messages, your phone alerts you in three ways: • A message on the display says “Page/Msg” or “Voice Mail.” Asterisks indicate that the message is urgent. • An envelope icon, which blinks if the message is urgent. • Four beeps. To turn off the beep, go to the Volume > Message Volume menu item ( 2 4 ). Press to open the message screen. Use the volume keys to scroll to “Voice” or “Page/Msg.” Press the key under [OK] to view the messages.
[32] Voice mail, pages, and text messages Voice mail Each voice mail notification automatically erases the previous notification. It does not erase the actual message in your voice mail. ... To listen to your voice mail 1. When and “Voice Mail” appear, press . The [MENU] and [BOOK] Smart Keys change to [OK] and [NET]. 2. Scroll to the “Voice” line on the display, then press the 3. key under [OK] to view the notification.
Pages and text messages [33] Pages and text messages ... To view a page or text message 1. When and “Page/Msg” appear, press 2. Scroll to the “Page/Msg” line, then press the . key under [OK]. The first new message opens. If there are no new messages, a list of old messages appears. 3. Press the key under [VIEW] to look at a message. ... To dial a callback number After viewing the message, press 2. If the message includes a callback number, press SEND ... SEND 1. . again to dial it.
[ MENUS ] Menus allow you to check or change phone settings. This section illustrates the menu structure, explains how to use menus, and defines each menu item. Diagram Notice that each menu except the Keyguard menu contains a secondary list of menu items. As usual, the Smart Keys will change depending on what screen you are in.
Pages and text messages [35] ... To enter the menu structure 1. Press the key under [MENU]. A list of the menus appears. 2. Press the number that corresponds to the menu you want to open. You must provide your lock code to open the Security menu. 3. Press the number of the item you want. Note: Since the Keyguard menu does not contain any menu items, selecting the menu number is enough to toggle the setting. In other cases, selecting the menu opens a list of menu items. ... To set a menu item 1.
[36] Menus Menu item descriptions 1. Keyguard This feature disables the keypad to protect your phone against accidental key presses. See “Using the keyguard” on page 8 for more details. 2. Volume The items in this menu enable you to adjust the volume of the ringer, keys, earpiece, and incoming message alert. Different menu items appear if your phone is attached to the Hands-free Car Kit or the Hands-free Headset: for example, Car Spkr Volume and Headset Volume. 2-1. Ringer Adjusts the ringer volume.
Menu item descriptions [37] 2-4. Message Adjusts the incoming message alert beep. Possible settings: off, low, M-, M+, high. 3. Call info The items in this menu allow you to see the number and duration of various kinds of calls. Duration is always measured in minutes and seconds. 3-1. Home calls Displays the duration of all calls you made in your home system (that is, not roaming) since the last reset. Press the key under [RESET] to reset. 3-2.
[38] Menus 4. Security You must enter your four-digit lock code to open the Security menu. The default lock code is usually either 0000 or the last four digits of your phone number. If you forget your lock code, call your service provider. 4-1. Lock Mode Activates a security lock using your four-digit lock code. You can only call emergency numbers or receive incoming calls. To unlock the phone, press the key under [UNLOCK] and enter your lock code.
Menu item descriptions [39] 5. Features 5-1. Auto Answer Sets the phone to automatically pick up after two rings. This feature is useful in combination with the Hands-free Car Kit. Possible settings: on, off. 5-2. Auto Retry Redials failed calls five times or until the call goes through. Auto Retry works when the system is busy or unavailable, not when the phone line is busy. Possible settings: every 60 seconds, every 30 seconds, every 10 seconds, off. 5-3.
[40] Menus long as you hold down a key. Possible settings: normal, long. 5-6. One Touch Enables touch dialing. See “Touch dialing” on page 24 to learn how to use this feature. Possible settings: enable, disable. 5-7. Ringer Type Sets the sound of the incoming call alert. Press the key under [NEXT] to cycle through the settings. Each ring plays automatically. Possible settings: standard, options 1 - 9. 6. Display 6-1. Backlight The backlight illuminates the phone display and keypad.
Menu item descriptions [41] Press the key under [EDIT] to create or change your banner. Enter characters the same way you do for the phone book (see “Saving a name with the number” on page 19). 6-4. Show Time Displays the date and time during standby mode. Possible settings: yes, no. 6-5. Auto Hyphen Hyphenates phone numbers according to the North American numbering plan. Automatic hyphenation does not affect dialing in any way, nor does it count towards the 32-digit limit in the phone book.
[42] Menus 7. Alerts 7-1. Call Drop The phone beeps and shows a message when you drop a call. Possible settings: on, off. 7-2. Minute The Minute Minder alert beeps ten seconds before each minute during a call. This helps you track your phone use. Possible settings: on, off. 7-3. Service The Service alert beeps when a network service parameter changes.
Menu item descriptions [43] 8. System The items on this menu enable you to set network options. 8-1. Set Service Determines which signals your phone will accept. Automatic, the default and recommended setting, accepts whatever system the phone service provides. No Roaming prevents you from making or receiving any calls outside the home system. The QCP-860 phone has two other options, A Side and B Side. They refer to the two cellular blocks.
[44] Menus City A, then all your phone calls would be “roaming” calls and would incur higher charges. 8-3. Auto NAM Allows the phone to automatically switch to one of the programmed NAMs when it detects the appropriate network signal. Leave the setting at “off” unless you have accounts with multiple service providers. Possible settings: on, off. 8-4. Data/Fax Determines whether the phone can receive both voice and data calls, or just data calls.
[ CARING FOR YOUR PHONE ] Use the following guidelines to optimize the performance and life of your phone, antenna, and battery. Phone • Do not let unauthorized personnel install or service your phone or accessories. Faulty installation or service may be dangerous, and will invalidate your warranty. • Only use QUALCOMM-approved accessories with QUALCOMM phones.
[46] Caring for your phone Antenna Follow these guidelines to get the best reception possible. • Fully extend the antenna when you place or receive a call. • Do not touch the antenna while you are on a call. • Do not bend or twist the antenna.
Battery [47] Battery Your phone comes with an internal LiIon battery (illustrated below) that provides excellent talk and standby time. Leave this battery in the phone at all times. You can purchase external batteries that snap onto the back of the phone for extended talk and standby time. LiIon batteries do not have any “memory effect,” so you can safely recharge the battery whenever you want. You can recharge the battery for years before it shows any sign of age.
[48] Caring for your phone 1. Latch Holds the top of the external battery in place. 2. Screw Holds the internal battery in place. Do not remove the internal battery at any time. If you ever need to replace the internal battery, have your QUALCOMM service center install a replacement. 3. Internal battery The internal battery is flush with the back surface of the phone. 4. Contacts The external battery rests against these contacts, which allow it to transmit energy to the phone. 5.
Battery [49] External batteries You can snap an optional external battery onto the back of your phone. The external battery does not replace the internal battery, but provides extra-long talking and standby time. The convenient Hot Swapping feature prevents you from dropping calls when one battery is low (see “Hot swapping” on page 51).
[50] Caring for your phone ... To attach an external battery 1. Insert the two teeth on the battery into the corresponding holes on the back of the phone. S029_50A 2. Rotate the top of the battery towards the phone until it latches into place. S029_51A ... To remove an external battery 1. Push the button on the top of the battery cartridge to disengage the battery. 2. Pull the battery away from the phone.
Battery [51] Battery power levels The phone uses all the power in the external battery before it starts to use the internal battery. The battery icon only tracks one battery at a time. It reflects the charge level of the external battery (if attached) as long as it has a charge. Otherwise, it tracks the internal battery level. The more black bars there are, the fuller the battery is.
[52] Caring for your phone If your internal battery falls low during a call, just snap on an external battery. The phone automatically starts drawing from the external battery without dropping the call. The battery icon starts displaying the charge level of the external battery. Follow these guidelines to improve battery performance. • Do not disassemble or short-circuit the battery. • Keep the metal contacts at the base of the battery clean.
Battery [53] Charging accessories There are several charging accessories available for your phone. You can use the accessories with or without an external battery attached to your phone. Consult the documentation that came with the charging accessory to find out standard charging times and operating details. All charging times are estimates and may vary. If an external battery is attached to your phone, the charging accessories charge the internal battery first, then the external battery.
[54] Caring for your phone Hands-free Car Kit (Model # TXCKT031). Like the Cigarette Lighter Adaptor, this accessory charges the internal phone battery off your car battery in about two hours, then starts charging the external battery. The microphone and speaker attachments let you use your phone in hands-free mode. This may increase your safety while driving.
Battery [55] R D M OM LC U A re -- Q W h e l it a ! D ig ro m F s me Co 0 -- P-86 QC D EN 3 ND SE 2 1 6 5 4 9 8 7 S039-01 Global Travel Charger (Model # TXTVL031). Plug the AC adaptor into a standard wall outlet and plug the other end into your phone. Use commercially available plug adaptors for international use. The charger recharges the internal battery in two or three hours, then starts charging r pw the external battery.
[56] Caring for your phone Power save mode Your phone automatically switches to a power-save mode if it has not found a signal after about 15 minutes of searching. Power-save mode decreases the drain on the battery. When the phone is in power-save mode, you cannot make or receive calls. “Power Save Mode” and the No Signal icon ( ) appear on the display. The phone periodically rechecks for a signal. Press any key to manually check for service.
[ SAFETY INFORMATION ] Radio Frequency (RF) energy Your telephone is a radio transmitter and receiver. When it is on, it receives and also sends out RF energy. Your service provider’s phone network controls the power level of the RF signal. This power level can range from 0.006 watts to 0.6 watts. Exposure to RF energy In August 1996, the U.S. Federal Communications Commission (FCC) adopted RF exposure guidelines with safety levels for hand-held wireless phones.
[58] Safety information Medical devices Pacemakers. If your portable wireless phone is too close to a pacemaker, the phone’s RF energy may interfere with the pacemaker’s operation. The Health Industry Manufacturers Association and the wireless technology research community recommend that you follow these guidelines to minimize the potential for interference. • Always keep the phone at least six inches (15 centimeters) away from your pacemaker when the phone is turned on.
Radio Frequency (RF) energy [59] In health care facilities. Turn your phone off in health care facilities when instructed. Hospitals and health care facilities may be using equipment that is sensitive to external RF energy. Potentially unsafe areas Posted facilities. Turn your phone off in any facility when posted notices require you to do so. Aircraft. FCC regulations prohibit using your phone on a plane that is in the air. Turn your phone off before boarding aircraft. Vehicles.
[60] Safety information Areas with a potentially explosive atmosphere are often, but not always, clearly marked.
Driving safely [61] Driving safely Before you use your phone while driving, check the local laws and regulations on the use of portable wireless phones in vehicles. Always obey them, and exercise caution while driving. The following ten guidelines for using your phone while driving are based on a list provided by the Cellular Telecommunications Industry Association (CTIA). 1. Get to know your wireless phone and its features, such as speed dial (page 16) and redial (page 11).
[62] Safety information 3. Position your wireless phone within easy reach. Be able to access your wireless phone without removing your eyes from the road. If you get an incoming call at an inconvenient time, let your voice mail answer it for you. 4. Let the person with whom you are speaking know you are driving. If necessary, suspend the call in heavy traffic or hazardous weather conditions. 5. Do not take notes or look up phone numbers while driving.
Driving safely [63] 9. Use your wireless phone to help others in emergencies. If you see an auto accident, crime in progress, or other serious emergency where lives are in danger, call 9-1-1 or other local emergency number, as you would want others to do for you. 10. Call roadside assistance or a special nonemergency wireless assistance number when necessary.
[ INDEX ] A AC Adaptor 9 accessories Cigarette Lighter Adaptor 53 Desktop Charger 54 Global Travel Charger 55 Hands-free Car Kit 54 Hands-free Headset 61 Leather Case 45 use QUALCOMM only 2, 45 adjusting volume 6, 36 air bags, safety considerations 63 aircraft safety 59 alerts change in service 42 dropped calls 42 low power 51 menu 42 message 31 minute 42 setting volume 36 analog mode 3 alert 42 forcing 44 answering calls automatic pickup 39 with number keypad 7 with Pound key 7 with Send key 7 with Star ke
Index [65] cancel out of screen 7, 8 care and maintenance 45–56 CDMA advantages 3 enhanced 4 characters case 19 entering letters 19 international 21 punctuation 20 charging batteries 47 AC Adaptor 9 accessories 53 Cigarette Lighter Adaptor 53 Desktop Charger 54 Global Travel Charger 9, 55 Hands-free Car Kit 54 level too low 9 Cigarette Lighter Adaptor 53 backlight 40 Clear key 8 backing up 8, 35 erasing 8 standby mode 5 credit card dialing 22 D data, forcing 44 date, showing on display 41 Desktop Charger 5
[66] Index charging 53 removing 50 Pound (down) 7 Power 8 Send 7 Smart keys 7 Star (up) 7 volume 6, 36 F Features menu 39 forcing analog mode 44 forwarding calls 14 French characters 21 language option 41 G Global Travel Charger 9, 55 H Hands-free Car Kit 54 auto answer 39 backlight 40 driving safety 61 volume menu options 36 Hands-free Headset driving safety 61 volume menu options 36 hanging up 7, 10 hearing aids 58 hot swapping 49, 51 hyphens automatic 41 manual 22 I Information key 7 punctuation 20
Index [67] Alerts 42 backing up 8, 35 Call Info 37 diagram 35 Display 40 exiting 35 Features 39 Keyguard 36 opening 35 scrolling 6 Security 38 selecting options 7, 35 System 43 Volume 36 Message key 7 messages alerts 31 envelope icon 4 Message key 7, 31 phone memory 31 types of 30 minute alert 42 moving the cursor Pound key 7 Star key 7 volume keys 6 multiple phone accounts 43 muting calls 15, 39 N NAM setting automatically 44 setting manually 43 names banner 40 length 16 saving with phone number 19 search
[68] Index phone numbers searching by 29 viewing your own 1 Portuguese characters 21 language option 41 Pound key 7 Power key 8 power save mode 56 privacy enhanced CDMA voice privacy 4 locking phone 38 secret phone book numbers 18 punctuation characters 20 R radio frequency energy See RF energy receiving calls answering 10 hanging up 10 messages 4 no signal 3 signal strength 3 when phone is off 10 recent history list adding numbers with scratchpad 39 duplicate calls 12 editing 12 erasing 38 redialing last
Index [69] Send key 7 service alert 42 service area, roaming 4 service provider features call forwarding 14 call waiting 14 caller ID 13 restricting calls 38 three-way calling 13 short message services 30–33 signal strength icon 3 silencing mouthpiece 39 ringer 6, 15 Smart Keys 5, 7 software version 41 sorting the phone book 28, 40 Spanish characters 21 language option 41 speed dialing 16, 24 standby mode Clear key 5 definition of 5 End key 5 returning to 7, 8 viewing own phone number 7 standby time battery