
User's Manual

Basic Setup
11-DRAFT May contain U.S. and international export controlled information
Basic Setup
Now that you’ve had a quick overview of the key features of Tagg – The Pet Tracker, you can start the
setup process. There are five easy steps to complete:
Step 1: Charge the Tagg tracker
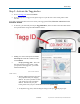
Step 2: Activate the Tagg tracker
Step 3: Personalize your pet’s profile
Step 4: Set up your notifications
Step 5: Attach the Tagg tracker to your dog’s collar
Step 1: Charge the Tagg tracker
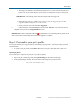
Attach the AC adapter to the USB cable and plug the USB cable into the docking station power
port.
Plug the AC adapter into an electrical outlet.
Note: The docking station cannot be powered through your computer’s USB port.
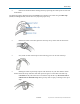
Place the tracker on the docking station. To properly secure the tracker on the docking station,
make sure its charging contact aligns with the docking station’s charging pins. (When the tracker
is in the correct position, the status indicator will be illuminated and facing the front of the
docking station.)
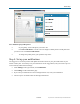
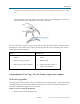
Your tracker is charging when the status indicator flashes blue. It will turn solid blue when the
tracker is fully charged. Charging may take up to 2 hours.
When fully charged your tracker’s battery can last up to 30 days
*.
Note: When your tracker is near the docking station, it automatically enters power saving mode,
providing you the maximum amount of time between charges.
*
Actual battery life may vary depending upon usage patterns.
While your Tagg tracker is charging, you can continue to the four remaining steps to complete the setup.