
User Manual


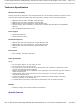


b. Connect the other end of the USB cable to any USB connector of your desktop computer as
shown in Figure 2.
Figure 2
c.
The Found New Hardware screen will appear.
d. The driver for your device will be automatically detected and installed.
e. Check for the Green Light on the device to make sure the USB cable is connected correctly
between the device and the system and the Windows driver is loaded.
f.
The New network device installed screen will appear on the bottom right corner. Click X to
close the message. (XP only)
Back to Top
3. Connecting to Your Wireless Network
To connect to the wireless network, the wireless network name (SSID) of the wireless USB adapter
must match the wireless network name specified by your Wireless Broadband Router. To set the network
name, follow the instructions below for Windows XP. For Windows 2000, follow the instructions under
section 3.2.
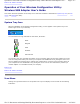
3.1 Connecting using Windows® XP
a. Configure your wireless router. See the documentation that came with your router
for instructions.
b. Right-click on the wireless network connection item on the system tray (located in
the lower-right corner of the Microsoft® Windows® operating system desktop).
Pa
g
e 2 of 4Gettin
g
Started with
y
our Dell™ Wireless USB Ada
p
ter: Dell™ Wireless USB Ada
p
ter User's G...
4/27/2005file://C:\Documents and Settin
g
s\Mark\M
y
Documents\Re
p
orts to review\J59313\submittal items
\
...