
User Manual


Available Networks: The first section of this menu displays a list of the available wireless networks. If
you are associated with a network, a blue bubble appears over the icon for the network in both this list
and in the Preferred networks list.
The Configure button to the right of this list allows you to configure your connection to the highlighted
network; refer to Network Configuration
for an explanation of this process. The Refresh button forces
the Configuration Utility to update the list by scanning for available networks.
Preferred Networks: The second section of this menu displays a list of preferred networks. This list
shows the order, from top to bottom, of the networks to which your computer will attempt to connect. If
your computer is connected to any of these networks, a blue bubble appears over the icon for that
network. If your computer cannot find any of these networks when it performs a scan, a crossed-out red
bubble appears over the icon for that network
When your computer starts searching for a wireless network, it begins by attempting to connect to the
first network in this list. If it cannot connect to this network, it then attempts to connect to the second
network in the list. This process continues until the computer establishes a connection with one of these
networks. After a connection is established, if a higher priority network becomes available, then the
current connection is dropped and the computer connects with the higher priority network.
You can change the order of preferred networks by highlighting a network in this list and clicking the
Move Up or Move Down buttons.
The Add button allows you to add a network to the list of preferred networks. The Properties button
allows you to configure the selected network. Refer to Network Configuration
for an explanation of the
operation of these buttons. The Remove button removes the selected network from the list of preferred
networks.
Two items appear beneath the Preferred networks section. The Show wireless configuration icon
in systray field determines whether the icon for the WLAN configuration utility appears in the system
tray at the bottom right side of your desktop. If this field is not checked, you can start the Configuration
Utility from the Start Menu by selecting Programs
→
Wireless
→
USB Wireless Card Utility.
At the bottom of the Wireless networks menu are three buttons. Clicking the OK button applies any
changes you made in this or any of the other menus of the Configuration Utility and closes the utility.
Clicking the Cancel button cancels any changes you made since you last clicked the Apply but does not
close the utility. Clicking the Apply button saves any changes you made in this or any of the other
menus of the utility and leaves the utility open.
Back to Top
Back to the Table of Contents
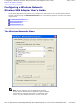
Network Configuration
There are three ways to configure a network through the WLAN Configuration Utility:
z
by choosing a network in the list of available networks and clicking the Configure button.
z
by choosing a network in the list of preferred networks and clicking the Properties button.
z
by clicking the Add button beneath the list of preferred networks.
When you click any of these buttons, a window similar to the following appears on your screen:
WLAN Configuration Utility to configure wireless
communications.
Pa
g
e 2 of 13Confi
g
urin
g
a Wireless Network: Dell™ Wireless USB Ada
p
ter User's Guide
4/27/2005file://C:\Documents and Settin
g
s\Mark\M
y
Documents\Re
p
orts to review\J59313\submittal items
\
...