
User's Manual

PRELIMINARY
Atheros Communications, Inc. Page 11
COMPANY CONFIDENTIAL March 2004
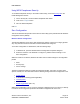
4. Click Advanced and:
o Leave the server name field blank for the client to accept a certificate
from any server with a certificate signed by the authority listed in the
Network Certificate Authority drop-down list. (recommended)
o Enter the domain name of the server from which the client will accept a
certificate.
o Change the login name if needed.
5.
Click OK.
6.
Enable the profile.
Using PEAP-GTC Security
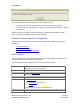
To use PEAP-GTC security In the Atheros Client Utility, access the Security tab in the Profile
Management window.
1.
On the Security tab, choose the WPA radio button.
OR: On the Security tab, choose the 802.1x radio button.
2.
Choose PEAP (EAP-GTC) from the drop-down menu.
To use PEAP (EAP-GTC) security, the server must have WPA-PEAP certificates, and the
server properties must already be set. Check with the IT manager.
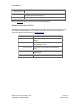
1.
Click the Configure button.
2.
Select the appropriate network certificate authority from the drop-down list.
3.
Specify a user name for inner PEAP tunnel authentication:
o Check Use Windows User Name to use the Windows user name as the
PEAP user name.
o OR: Enter a PEAP user name in the User Name field to use a separate
user name and start the PEAP authentication process.
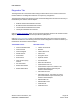
4.
Choose Token or Static Password, depending on the user database.
Note that Token uses a hardware token device or the Secure Computing SofToken
program (version 1.3 or later) to obtain and enter a one-time password during
authentication.
5.
Click Advanced and:
o Leave the server name field blank for the client to accept a certificate
from any server with a certificate signed by the authority listed in the
Network Certificate Authority drop-down list. (recommended)
o Enter the domain name of the server from which the client will accept a
certificate.
The login name used for PEAP tunnel authentication, fills in automatically as PEAP-
xxxxxxxxxxxx, where xxxxxxxxxxxx is the computer's MAC address. Change the login
name if needed.
6.
Click OK.