Atheros Client Utility Help Model AR5BMB5 PRELIMINARY June 2004
PRELIMINARY Introduction • System Requirements Profile Management • Create or Modify a Profile • Remove a Profile • Profile Auto Selection • Switch Profiles • Configure TCP/IP • Configuring Win XP Security • EAP-TLS • EAP-TTLS • PEAP (EAP-GTC) • PEAP (EAP-MSCHAP V2) • LEAP • WPA Passphrase Check Status or Diagnostics • Check Current Status • Check Driver Information • Check Statistics Connect to Another Network Settings • Signal Strength Display • Data Display • Display Refresh Interval Tools • Tray Icon •
PRELIMINARY Microsoft Windows 2000, Windows Millennium Edition, Windows 98 Second Edition, Windows XP, or Windows NT 4.0 (with Service Pack 6) Profile Management Configure the wireless network adapter (wireless card) from the Profile Management tab of the Atheros Client Utility.
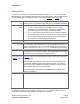
PRELIMINARY Auto Profile Selection Management Including a profile in the auto selection feature allows the wireless adapter to automatically select that profile from the list of profiles and use it to connect to the network. Including a profile in auto profile selection: 1. On the Profile Management tab, click the Order Profiles button. 2. The Auto Profile Selection Management window appears, with a list of all created profiles in the Available Profiles box. 3.
PRELIMINARY Import and Export Profiles Importing a Profile 1. From the Profile Management tab, click the Import button. The Import Profile window appears. 2. Browse to the directory where the profile is located. 3. Highlight the profile name. 4. Click Open. The imported profile appears in the profiles list. Exporting a Profile 1. 2. 3. 4. From the Profile Management tab, highlight the profile to export. Click the Export button. The Export Profile window appears.
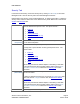
PRELIMINARY General Tab In the Atheros Client Utility, access the General tab by clicking New or Modify on the Profile Management tab. Edit the fields in the General tab to configure the configuration profile. Make sure to also edit the Security and Advanced tabs. Profile Name Identifies the configuration profile. This name must be unique. Profile names are not case sensitive. Client Name Identifies the client machine. Network Names (SSIDs) The IEEE 802.11 wireless network name.
PRELIMINARY Advanced Tab In the Atheros Client Utility, access the Advanced tab by clicking New or Modify on the Profile Management tab, then clicking the Advanced tab in Profile Management. Edit the Advanced tab of Profile Management to configure the profile. Also edit the General and Security tabs. Transmit Power Selects the transmit power level for 80211b/g or 802.11a in mW. Actual Level transmit power may be limited by regulatory domain or hardware limitations.
PRELIMINARY Security Tab In the Atheros Client Utility, access the Security tab by clicking New or Modify on the Profile Management tab. Click the Security tab in the Profile Management window. Edit the fields in the Security tab of Profile Management to configure the profile. To define the security mode, select the radio button of the desired security mode. Make sure to also edit the General and Advanced tabs. WPA Enables the use of Wi-Fi Protected Access (WPA).
PRELIMINARY Using EAP-TLS Security To use EAP-TLS security In the Atheros Client Utility, access the Security tab in the Profile Management window. 1. On the Security tab, choose the WPA radio button. OR: On the Security tab, choose the 802.1x radio button. 2. Choose EAP-TLS from the drop-down menu. Enabling EAP-TLS security: To use EAP-TLS security, the machine must already have the EAP-TLS certificates downloaded onto it. Check with the IT manager. 1.
PRELIMINARY 4. Click Advanced and: o Leave the server name field blank for the client to accept a certificate from any server with a certificate signed by the authority listed in the Network Certificate Authority drop-down list. (recommended) o Enter the domain name of the server from which the client will accept a certificate. o Change the login name if needed. 5. Click OK. 6. Enable the profile.
PRELIMINARY 7. Enable the profile. Using PEAP-MSCHAP V2 Security To use PEAP-MSCHAP V2 security In the Atheros Client Utility, access the Security tab in the Profile Management window. 1. On the Security tab, choose the WPA radio button. OR: On the Security tab, choose the 802.1x radio button. 2. Choose PEAP (EAP-MSCHAP V2) from the drop-down menu. To use PEAP (EAP-MSCHAP V2) security, the server must have WPA-PEAP certificates, and the server properties must already be set. Check with the IT manager.
PRELIMINARY Using LEAP Security To use security In the Atheros Client Utility, access the Security tab in the Profile Management window. LEAP security requires that all infrastructure devices (e.g. access points and servers) are configured for LEAP authentication. Check with the IT manager. • Configuring LEAP • Enabling LEAP Configuring LEAP: • On the Security tab, choose the WPA radio button. Choose WPA-LEAP from the dropdown menu. • OR: On the Security tab, choose the 802.1x radio button.
PRELIMINARY Pre-Shared Encryption Keys Defining pre-shared encryption keys: 1. Click the Define Pre-Shared Keys radio button on the Security tab. 2. Click on Configure. 3. Fill in the fields in the Define Pre-Shared Keys dialog box: Key Entry Determines the entry method for an encryption key: hexadecimal (0-9, AF), or ASCII text (all keyboard characters except spaces). Encryption Selects the default encryption keys used.
PRELIMINARY Using WPA Passphrase Security To use WPA Passphrase security In the Atheros Client Utility, access the Security tab in the Profile Management window. 1. On the Security tab, choose the WPA Passphrase radio button. 2. Click on the Configure button. 3. Fill in the WPA Passphrase. Click OK. Zero Configuration This section describes the operation of the Atheros Client Utility (ACU) and Windows XP Wireless Configuration Service (WZCS).
PRELIMINARY To turn Zero Configuration off on Windows XP, take the following steps: 1. In Windows XP, open the Wireless Network Configuration Properties dialog box. 2. Clear the check box “Use Windows to configure my wireless network settings” to set Zero Configuration. When this check box is cleared, all profile settings are controlled by the configuration profile, which is set up from the Station Configuration tab of the ACU.
PRELIMINARY Server Based Shows whether server based authentication is used. Authentication Data Encryption Displays the encryption type the driver is using. Configure the encryption type on the Security tab. Signal Strength Shows the strength of the signal. Click the Advanced button to see the advanced status diagnostics.
PRELIMINARY Diagnostics Tab The Diagnostics tab of the Atheros Client Utility provides buttons used to retrieve receive and transmit statistics. The Diagnostics tab does not require any configuration.
PRELIMINARY Scan Available Networks Click the Scan button on the Profile Management tab to scan for available infrastructure and ad hoc networks. On this list, click Refresh to refresh the list at any time. Connecting to a different network • Highlight a network name and click the Activate button to connect an available network. If no configuration profile exists for that network, the Profile Management window opens to the General tab.
PRELIMINARY Display Settings To change the display settings, choose Options > Display Settings from the menu. The display settings dialog box contains tools to set the: Signal Strength Display Sets the units used when displaying signal strength: Units percentage (%) or dBm. Refresh Interval Use the up/down arrows to set the display refresh interval in seconds. Data Display Sets the display to cumulative or relative: • Relative displays the change in statistical data since the last update.
PRELIMINARY Tray Icon The tray icon appears at the bottom of the screen, and shows the signal strength using colors and the received signal strength indication (RSSI). Hold the mouse cursor over the tray icon to display the current configuration profile name and association, as well as transmit and receive speed and the wireless adapter name. Right-click on the tray icon to: Help Open the online help. Open Atheros Client Utility Launch the Atheros Client Utility (ACU).
PRELIMINARY SSID Displays the SSID of the associated network. Access Point Name Shows the name of the access point the wireless adapter is connected to. Access Point IP Address Shows the IP address of the access point the wireless adapter is connected to. Link Speed Lists the speed of the link connection. Client Adapter IP Address Displays the IP address of the wireless adapter. Exit Exit the Atheros Client Utility application.
PRELIMINARY Troubleshooting Utility The Troubleshooting Utility is an optional utility that identifies and resolves wireless adapter configuration and association problems when the adapter is in access point (infrastructure) mode. This utility is available only in Mini PCI solutions. To run the Troubleshooting Utility: • • From the Diagnostics tab, click the Troubleshooting button to run the Troubleshooting Utility. OR: Select Action > Troubleshooting from the action menu.
PRELIMINARY Ad Hoc Mode In ad hoc mode, a wireless network adapter works within an independent basic service set (IBSS), as illustrated here. All stations communicate directly with other stations without using an access point (AP). To connect to an ad hoc network, configure the profile for ad hoc mode. Ad Hoc Mode Profile Configuration To configure a profile in ad hoc mode, change the Network Type in the Profile Management's Advanced tab.
PRELIMINARY Infrastructure (Access Point) Mode In infrastructure (access point (AP)) mode, the wireless network adapter participates in a basic service set (BSS) as a station, and communicates with the other stations through an AP, as illustrated here. To connect to an access point network, configure the profile for access point mode. Infrastructure (Access Point) Mode Profile Configuration To configure a profile in infrastructure (access point) mode, change the Network Type in the Advanced tab.
PRELIMINARY Uninstall an Old Driver Uninstall an old driver before upgrading to a new NDIS driver release. To remove the newly installed driver from the system if the system does not have previously installed versions of the NDIS driver, proceed to Step 4. 1. To remove the NDIS driver from the OS, go to Device Manager, right-click Atheros Wireless Network Adapter, and choose Uninstall. 2. Click OK to uninstall the device. 3.
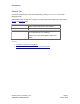
PRELIMINARY Advanced Status Information Click the Advanced button on the Current Status tab of the Atheros Client Utility to see advanced information about the program and its operations. The Current Status tab does not require any configuration. The following table describes the items found on the Advanced Status screen. Network Name (SSID) Displays the wireless network name. Configure the network name on the General tab. Server Based Shows whether server based authentication is used.
PRELIMINARY Current Transmit Displays the current transmit rate in Mbps. Rate Channel Shows the currently connected channel. Frequency Displays frequency the station is using. Channel Set Shows the current channel set. Compliance FCC Radio-Frequency Exposure Notice: FCC ID#: PPD-AR5BMB5 This device generates and radiates radio-frequency energy.
PRELIMINARY FCC OEM Labeling instructions: OEM should add following label: Contain FCC ID: PPD-AR5BMB5 Above should be clearly visible on products where AR5BMB5 is installed. Industry Canada Notice (Applicable to Use Within Canada): This device complies with Canadian RSS-210. To prevent radio interference to the licensed service, this device is intended to be operated indoors and away from windows to provide maximum shielding.
PRELIMINARY European Community—CE Notice (802.11b Radio) Marking by the symbol: CE Mark with exclamation mark indicates compliance with the essential requirements of Directive 73/23/EC and the essential requirements of articles 3.1(b), 3.2 and 3.3 of Directive 1999/5/EC.