Manual Count!Guard Let’s make things safer!
Count!Guard Manual 2 Contents CONTENTS ...................................................................................................................................................................... 2 PREFACE ......................................................................................................................................................................... 3 1 INTRODUCTION ...........................................................................................................
Count!Guard Manual 3 Preface This document This manual is intended for administrators and operators of Count!Guard and is applicable for version 2.1.0.0 or higher in combination with WebCCTV 4.2.0.0 or higher. WebCCTV can be replaced by GuardNVR or IQR in this manual. Safety Notices Please observe all safety notes and instructions carefully when using this product. Liability The information in this publication is believed to be accurate in all respects.
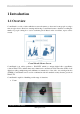
Count!Guard Manual 4 1 Introduction 1.1 Overview Count!Guard is a video solution which uses network cameras to detect and count people crossing a narrow region in two directions: entering and leaving. Count!Guard creates a database recording the number of people coming in or out for each time period. Based on the stored data, reports can be created. Count!Guard Scheme Screen Count!Guard is an add-on product to WebCCTV which is a unique digital video surveillance solution.
Count!Guard Manual 5 Persons passing by each other Multiple persons passing together Person(s) lingering in the counting zone Person(s) lingering + passing persons Version 2.1.0.
Count!Guard Manual 6 1.2 Equipment checklist The following items are located on the Count!Guard installation CD: Count!Guard software suite installation Adobe Acrobat Reader installation Microsoft Visual C++ 8.0 Run-time library .Net 2.0 (SP1) Framework installation Java Version 6 Update 11 Framework installation Microsoft ASP .NET 2.0 AJAX Extensions 1.0 Video Client Component installation Count!Guard manual in PDF format Count!Guard quick start guide in PDF format 1.
Count!Guard Manual 7 The image resolution has to be at least QVGA (320x240). Lighting conditions: daylight or similar lighting. The camera streams in JPEG The working of Count!Guard cannot be supported if all conditions are not completely fulfilled. Not meeting these requirements may lead to inaccurate counts and abnormal behavior of the Count!Guard application. 2 Installation This chapter provides information how to install the Count!Guard software.
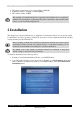
Count!Guard Manual 8 3. If not all required software is installed, you will get the next screen (or a comparable one). Click Yes. If all required software is installed, this step will be skipped. 4. The first installation screen appears. Click Next. 4. Carefully read the License Agreement, accept it and click Next. Version 2.1.0.
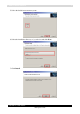
Count!Guard Manual 9 5. Select the default measurement system 6. Select the installation directory of your choice and click Next. 7. Click Install. Version 2.1.0.
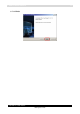
Count!Guard Manual 10 8. Click Finish. Version 2.1.0.
Count!Guard Manual 11 3 Web Application There are two applications that can be used to configure and use Count!Guard: Web Application: The web application is the default application that should be used. It is reachable at all times; meaning from every computer in the network and from Internet if the network was configured properly. Both local and remote usages are possible with the web application.
Count!Guard Manual 12 3.1 Getting started To open the web application, click the Count!Guard Web Application icon on your desktop: The login page will be opened. To log in, please enter the following parameters: Login: User name Password: Password of the user Domain: This field is not required when the computer is not part of a domain. You can login with the same credentials as for WebCCTV. Count!Guard uses the WebCCTV user management for its authentication. Login Screen Click the Log in button.
Count!Guard Manual 13 3.2 Configuration To configure Count!Guard, click the Configuration button in the left panel of the web application. The following topics are configured in the Configuration menu: Servers Cameras Recordings (General Settings) Configuration Screen 3.2.1 Servers There must be a connection to a WebCCTV server to be able to receive streaming video and be able to get counts.
Count!Guard Manual 14 3.2.1.1 Add server To add a server, click the Add Server button in the Servers & Cameras screen and enter the following fields: Server – If you are going to add a local WebCCTV server, this becomes local host (=127.0.0.1). Otherwise this is the IP-address of the WebCCTV server. Port – By default 1518. This is the communication port with the WebCCTV server. Username – User who has access rights for the WebCCTV server. Password – Password of user above.
Count!Guard Manual 15 3.2.2 Cameras In order to have streaming video and get counts, a camera from an added WebCCTV server has to be selected and configured. Selecting and configuring a camera is done in the Servers & Cameras page of the Configuration tab and allows to: Add camera Delete camera Edit & Configure camera (Counting Algorithm) The camera configuration (algorithm) is the core of the Count!Guard application.
Count!Guard Manual 16 Add Camera Screen To go back to the Servers and Cameras page without making changes, click Cancel button. 3.2.2.2 Delete camera To delete a camera , execute the following step: Click the Delete link on the Servers & Cameras page. Your camera has been deleted. 3.2.2.3 Edit & Configure camera (Counting Algorithm) 3.2.2.3.1 Camera and Positioning requirements Before we can start the camera configuration, check first if the following requirements are met.
Count!Guard Manual 17 Lighting conditions: daylight or similar lighting. The camera streams in JPEG. 3.2.2.3.2 Camera Configuration In normal circumstances, a basic camera configuration is enough to get accurate counts. Execute the following steps for a basic configuration: Click the Edit link on Servers & Cameras page. The Camera Configuration Wizard is opened in the Configuration File tab.
Count!Guard Manual 18 Draw the Detection Lines and Flow Direction. Detection Lines - set of lines along which detection of moving objects is performed. At least 2 lines must be defined, 3 is the recommended value. Drawing the detection lines can be performed by using left mouse button. (One click to start a line, one click to finish a line) Flow Direction - the direction corresponding to the positive counter.
Count!Guard Manual 19 When the Metric system is selected, the values for People width and Camera height parameters will be entered in meters. When the US Units system is selected, the values will be entered in feet. Specify the following Standard Parameters: o People width (m) – This parameter is used to calculate how many persons are crossing a line at the same time. Normally this is +/-50 cm (1.6 feet). This parameter is measured in meters.
Count!Guard Manual 20 Standard Parameters Screen Click Next. The Advanced Parameters tab is opened. Specify the following Advanced Parameters if needed. This is only necessary in non-standard environments: o Use shadow removal – Visible shadows may deteriorate counting results. This parameter reduces the shadow effect. It is enabled by default. o Sensibility – Value between 0 and 1, default value 0,5. This parameter can be increased for low contrast images or decreased for high contrast images.
Count!Guard Manual 21 Advanced Parameters Screen Click Finish. The configuration is saved. You can leave the configuration wizard at any time by clicking the Cancel button. Navigating to previous tabs is performed by clicking the Previous button. Version 2.1.0.
Count!Guard Manual 22 3.2.3 Recordings When your server and cameras are configured, the Count!Guard application will start counting and all data will be recorded. The Records path is configured in the General Settings screen. General Settings Screen All counting data for all servers and cameras is stored in the records folder. By default, this folder is C:\Program Files\Quadrox\Count!Guard\Records. To change this folder, browse your computer, select the folder, click Select.
Count!Guard Manual 23 3.3 Using Count!Guard 3.3.1 Live To open the web application, click the Count!Guard Web Application icon on your desktop. Enter your login credentials and click Login. The Count!Guard Web Application opens in the Live menu. The Live screen consists of the following parameters/fields: Selection Cameras – Choose which of the connected cameras to be visualized in the viewing window. View window – Visualizes the real time image/stream of the selected camera.
Count!Guard Manual 24 3.3.2 Analysis The analysis menu allows the user to retrieve present or historical information about counts. There are two sections: Overall information from all cameras. Export statistical data. Analysis Screen 3.3.2.1 Overall information This section gives an overview the cameras that are configured in the Count!Guard application and gives the IN/OUT DIFFERENCE total for each camera for the present day. 3.3.2.
Count!Guard Manual 25 3.3.2.2.1 Creating In order to create an export, execute the following steps in the Analysis menu: Click Export. Select the camera(s) of which you want to export data. Export Select Cameras Screen Select the period for which you want to create an export. Export Select Time Period Screen Version 2.1.0.
Count!Guard Manual 26 Click Export. Export Confirmation Screen A File Download window will appear. Click Save. File Download Screen Version 2.1.0.
Count!Guard Manual 27 Select the path where you want to save the export file. Click Save. Your data is exported. Export Path Selection Screen If you want to cancel the export process, click Cancel at any time. 3.3.2.2.2 Export Example An exported file can be opened in Microsoft Office Excel (2003 SP3 / 2007) or another program that is able to open .xls files (e.g. Open Office) and consists of: Raw data Customizable graphs (based on Pivot Tables). Version 2.1.0.
Count!Guard Manual 28 By default the following sheets will be present in an exported file: Timeline Chart: Counts per hour Chart: Version 2.1.0.
Count!Guard Manual 29 People in shop Chart: Raw Data: You can use the raw data to create graphs, pivot tables or other actions yourself. Version 2.1.0.
Count!Guard Manual 30 3.3.3 Info The Info menu gives detailed information about Count!Guard installation. System Info Screen The System Information section consists of the following parameters: Logged User – user that is logged in. OS Version – version of operating system installed. Setup Version – Count!Guard software version installed. Setup Path – directory where the Count!Guard software is installed. Version 2.1.0.
Count!Guard Manual 31 4 Local Application There are two applications that can be used to configure and use Count!Guard: Local Application: This application is for local use only whereas the web application also can be used for remote connection. The local application should be used only in exceptional cases as difficult parameterization or problems with the web application. Web Application: The web application is the default application that should be used.
Count!Guard Manual 32 4.1 Configuration To configure Count!Guard, click the Configuration tab of the local application. The following topics are configured in the Configuration menu: Servers Cameras Recordings (General Settings) Configuration Screen 4.1.1 Servers Their must be a connection to a WebCCTV server to be able to receive streaming video and be able to get counts.
Count!Guard Manual 33 4.1.2.1 Add server To add a server, enter the following fields: Server – If you are going to add a local WebCCTV server, this becomes local host (=127.0.0.1). Otherwise this is the IP-address of the WebCCTV server. Port – By default 1518. This is the communication port with the WebCCTV server. Username – User who has access rights in the WebCCTV application. Password – Password of the user in step 3. Domain – Not required if the WebCCTV is not part of a domain.
Count!Guard Manual 34 4.1.2 Cameras In order to have streaming video and get counts, a camera from an added WebCCTV server has to be selected and configured. Selecting and configuring a camera is done in the Cameras manager section of the Configuration tab and allows to: Add camera Delete camera Edit & Configure camera (Counting Algorithm) Camera Manager Screen The camera configuration (algorithm) is the core of the Count!Guard application.
Count!Guard Manual 35 4.1.2.2 Delete camera To delete a camera, execute the following steps: Select a camera in the Added cameras panel. Click <
Count!Guard Manual 36 Buttons MvApplications Configuration Tools Window Select parameter area’s (Example: Detection lines together) Select single object (Example: One detection line) Allows seeing which parameter areas are present in the image by selecting an area. Fit image to your screen Save your setting/context Delete all drawn objects on the image Move image when it is bigger as screen.
Count!Guard Manual 37 Drawing lines or arrows is done by clicking one time to select the begin point and clicking again where you want the line or arrow to end. Double click at the last end point of your lines or end point of your arrow to confirm the drawing. A red rectangle will appear around the lines or arrow. Select Detection Lines in the Parameters pallet. Draw 3 equal spread lines on the image that are positioned (more or less) perpendicular on the flow direction. An example is shown below.
Count!Guard Manual 38 The rest of the parameters below don’t have to be configured for normal conditions and only in non-standard environments: People lifespan: This parameter is used to configure how fast people are entering after each other. By default this is 0.5 seconds. In crowded environments this can be lowered (minimum = 0.3 seconds) Use shadow removal: Visible shadows may deteriorate counting results. This parameter reduces the shadow effect. It is enabled by default.
Count!Guard Manual 39 Enter a name (or keep the proposed camera identifier) for your context (setting), select your desired save location and click Save context. Save Configuration Context Screen By default, the folder for the configuration files is: Windows XP Pro: C:\Documents and Settings\All Users\Application Data\Quadrox\Count!Guard\Cameras\{GUID}.prm Windwos Vista: C:\ProgramData\Quadrox\Count!Guard\Cameras\{GUID}.prm Close all opened windows except the Count!Guard application.
Count!Guard Manual 40 4.1.3 Recordings When your server and cameras are configured, the Count!Guard application will start counting and all date will be recorded. The Records path is configured in the General Settings section of the Configuration tab. General Settings Screen Following parameters are available for recordings: Storage folder: In this folder all counting data is stored for all servers and cameras. By default, this folder is C:\Program Files\Quadrox\Count!Guard\Records.
Count!Guard Manual 41 4.2 Using Count!Guard 4.2.1 Live To open the local application, click the Count!Guard Local Application icon on your desktop and click Live tab. The Live screen consists of the following parameters/fields: Selection Cameras – Choice which of connected cameras to be visualized in the view window. View window – Visualizes the real time image/stream of the selected camera.
Count!Guard Manual 42 4.2.2 Analysis The analysis tab allows the user to retrieve present or historical information about counts. There are three sections: Overall information from all cameras. Delete statistical information. Export statistical data. Analysis Screen 4.2.2.1 Overall information This section gives an overview the cameras that are configured in the Count!Guard application and gives the IN/OUT DIFFERENCE total for each camera for the present day. 4.2.2.
Count!Guard Manual 43 Selection Delete Data Screen Click Delete. 4.2.2.3 Export The Count!Guard application allows the user to export data to files with .xls extension. Exported data will be saved on your computer and represented by graphs, pivot tables and raw data when opened in Microsoft Office Excel (2003 SP3 / 2007) or another program that is able to open .xls files (e.g. Open Office). 4.2.2.3.
Count!Guard Manual 44 Select the period for which you want to create an export. Export Select Time Period Screen Select the location and file (or enter new file name). Export File Name Screen Click Export. Export Finish Screen Your data will now be exported to the Excel sheet in the directory you selected. If you want to exit the Exporting screen, click Close. Version 2.1.0.
Count!Guard Manual 45 4.2.2.3.2 Export Example An exported file can be opened in Microsoft Office Excel (2003 SP3 / 2007) or another program that is able to open .xls files (e.g. Open Office) and consists of: Raw data Customizable graphs (based on Pivot Tables). By default the following sheets will be present in an exported file: Timeline Chart: Counts per hour Chart: Version 2.1.0.
Count!Guard Manual 46 People in shop Chart: Raw Data: You can use the raw data to create graphs, pivot tables or other actions yourself. For more information or questions, contact support@quadrox.com Version 2.1.0.
Count!Guard Manual 47 License Agreement Use of the Software is subject to acceptance of the License Agreement below. Please read terms and conditions of this License Agreement carefully. The material is copyrighted and licensed (not sold). This License Agreement represents the entire agreement concerning the Licensed Material between Licenser and Licensee and it supersedes any prior proposal, representation or understanding between the parties.
Count!Guard Manual 48 Terms This License Agreement is effective upon the first use of the Software on a computer, and shall continue until terminated. Licensee may terminate this License Agreement at any time by destroying any Licensed Material in his possession or by returning the Licensed Material and any copies or extracts to the Licenser. No refund of any amount paid will be made, except as granted in accordance with paragraph 5. “Warranty” hereunder.