AcousticDesign Multi-Use Loudspeaker AD-S82 AD-S82H 203 mm (8”) two-way *TD-000115-00* TD-000115-00 rev.
IMPORTANT SAFETY PRECAUTIONS & EXPLANATION OF SYMBOLS 1- Read these instructions. 2- Keep these instructions. 3- Heed all warnings. 4- Follow all instructions. 5- Clean only with a dry cloth. 6- Install in accordance with QSC Audio Product’s instructions and a licensed, professional engineer. 7- Do not install near any heat sources such as radiators, heat registers, stoves, or other apparatus (including amplifiers) that produce heat. 8- Only use attachments/accessories from QSC Audio Products, Inc.
Introduction Thank you and congratulations on your purchase of the Acoustic Design AD-S82 Multi-Use, All-Weather Loudspeakers. These products represent the state-of-the-art in all-weather, lightweight SR (sound reinforcement) loudspeaker systems. To get the most from your investment, we encourage you to review this manual carefully. The AD-S82 loudspeaker systems are full range, high output, two-way designs delivering superior sound quality and high SPL in a lightweight, all-weather enclosure.
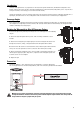
Mounting If using the loudspeaker only (no optional mount), the loudspeaker can be set on any appropriate surface. The cabinet will lean back at a slight angle when set on a flat surface. When operated at high output levels, the cabinet can generate sufficient vibration, causing the cabinet to move or creep if set on a hard surface. Use anti-slip matting under the cabinet or self-adhesive rubber feet to keep the cabinet from creeping.
Optional ID-8 and ID-8T Mounting Procedure (continued) EN 3- Choose the appropriate rubber sealing gasket and thread the speaker wire through it. Make sure the tapered side of the gasket is toward the cover. Push the gasket into its seat, and thread the nut over the speaker wire and tighten. 4- Trim the wires to the appropriate length. Strip the wires and secure them to the terminals. 5- With the latch open, align the loudspeaker with the IntelliDock and slide the loudspeaker into place.
Optional YM-8 and YM-8T Yoke Mounts The YM-8 and YM-8T yoke mounts provide for mounting on most any surface and are adjustable on one axis. A cover plate is provided for the loudspeaker’s rear recess and is secured with a retaining screw. The cover plate has a wiring feed-through hole, complete with rubber grommet and compression nut to prevent water from wicking down the cable and into the electrical connections.
Optional YM-8 and YM-8T Mounting Procedure (continued) EN 5- Strip the speaker wiring ends and connect the wires. If using the YM-8, connect the wires directly to the binding posts. If using the YM-8T, connect the 70V/100V terminals in the cover assembly. 5a- The YM-8T cover assembly is equipped with the 70V/ 100V matching transformer, a 4-position power selection switch, and all required connections pre-wired.
AD-S82 and AD-S82H Loudspeaker Dimensions EN 8
Specifications Frequency Response : AD-S82 85- 22k Hz (-6 dB) 55- 23k Hz (-10 dB) AD-S82H 80- 21k Hz (-6 dB) 60- 22k Hz (-10 dB) Maximum Output : (calculated) 110 dB SPL continuous rms output 116 dB SPL peak output 113 dB SPL continuous rms output 119 dB SPL peak output Impedance: 8 ohms nominal 6.4 ohms minimum, 240 Hz 25 ohms maximum, 2.5k Hz 8 ohms nominal 7.
AD-S82 Response, Beamwidth, and Impedance Curves AD-S82 Horizontal and Vertical Beamwidth Vs. Frequency Beamwidth (degrees) EN Horizontal Vertical Frequency (Hertz) AD-S82 Response On-Axis, 20° Off-Axis, 40° Off-Axis, and Impedance Vs. Frequency On Axis 40° Off Axis Impedance Frequency (Hertz) Specifications are subject to change without notice.
AD-S82H Response, Beamwidth, and Impedance Curves AD-S82H Horizontal and Vertical Beamwidth Vs. Frequency Beamwidth (degrees) EN Horizontal Vertical Frequency (Hertz) AD-S82H Response On-Axis, 20° Off-Axis, 40° Off-Axis, and Impedance Vs. Frequency 20° Off Axis SPL (dB) 40° Off Axis Impedance Impedance (ohms) On Axis Frequency (Hertz) Specifications are subject to change without notice.
Painting the AD-S82(H) Loudspeaker The loudspeaker enclosure and grill can be painted to match any decor, provided the following precautions are observed. The optional ID-8 IntelliDock and YM-8 yoke mount can also be painted. The cabinet is made of high impact polystyrene which requires controlled painting procedures in order to obtain good results when painting. Use a paint “system” designed for polypropylene from any reputable paint supplier. 1- Remove the grill.
IMPORTANTES PRECAUCIONES DE SEGURIDAD Y EXPLICACIÓN DE LOS SÍMBOLOS 1- Lea estas instrucciones. 2- Conserve estas instrucciones. 3- Observe todas las advertencias. 4- Siga todas las instrucciones. 5- Limpie solamente con un paño seco. 6- Instale de acuerdo con las instrucciones de QSC Audio Product y de un ingeniero profesional licenciado. 7- No instale cerca de ninguna fuente de calor tal como radiadores, registros de calor, estufas u otros aparatos (inclusive amplificadores) que produzcan calor.
Introducción Le agradecemos y felicitamos por su compra de los altavoces Acoustic Design AD-S82 de múltiples usos y para todo clima. Estos productos representan lo más avanzado en sistemas de altavoces SR (refuerzo sonoro) ligeros, para todo clima. Para aprovechar al máximo su inversión, le recomendamos que revise detenidamente este manual.
Montaje Si va a usar sólo el altavoz (sin montaje opcional), lo puede colocar en cualquier superficie apropiada. Cuando se coloque sobre una superficie plana el gabinete quedará inclinado a un ligero ángulo. Cuando se hace funcionar a niveles de alta salida, el gabinete puede generar mucha vibración y moverse o desplazarse si se encuentra sobre una superficie rígida. Use un tapete antideslizante debajo del gabinete o unas patas de caucho autoadhesivas para evitar el desplazamiento del gabinete.
Procedimiento opcional de montaje de ID-8 y ID-8T (continuación) ES 3- Seleccione la junta de sellado de caucho apropiada y pase el cable del altavoz a través de ella. Asegúrese de que el lado ahusado de la junta quede orientado hacia la cubierta. Presione la junta en su asiento, y pase la tuerca sobre el cable del altavoz y apriétela. 5- Con el sujetador abierto, alinee el altavoz con el IntelliDock y deslice el altavoz a su lugar.
Montajes de horquilla YM-8 y YM-8T opcionales Los montajes de horquilla YM-8 y YM-8T permiten el montaje casi en cualquier superficie y son ajustables en uno de los ejes. Se proporciona una placa de cubierta para la cavidad posterior del altavoz y se fija con un tornillo de fijación. La placa de cubierta tiene un orificio para el paso de los cables, completo con una arandela aislante de caucho y una tuerca de compresión para evitar la entrada del agua por el cable y hasta las conexiones eléctricas.
Procedimiento opcional de montaje de YM-8 y YM-8T (continuación) ES 5- Quite el aislamiento de los extremos de los cables del altavoz y conecte los cables. Si va a usar el montaje YM-8, conecte los cables directamente a los terminales de sujeción. Si va a usar el montaje YM-8T, conecte los terminales de 70 V/100 V en el conjunto de la cubierta. 6- Alinee la cubierta en la parte posterior del altavoz y deslícela a su lugar. La cubierta está diseñada para caber de una sola manera.
Pintura del altavoz AD-S82(H) La caja y la parrilla del altavoz se pueden pintar para coincidir con cualquier estilo de decoración, siempre y cuando se observen las siguientes precauciones. Los montajes IntelliDock ID-8 y de horquilla YM-8 opcionales también se pueden pintar. El gabinete está hecho de poliestireno de alto impacto, que requiere procedimientos controlados de pintura para obtener buenos resultados.
PRÉCAUTIONS IMPORTANTES ET EXPLICATION DES SYMBOLES 1- Lire ces instructions. 2- Conserver ces instructions. 3- Respecter tous les avertissements. 4- Suivre toutes les instructions. 5- Nettoyer uniquement avec un chiffon sec. 6- Installer conformément aux instructions de QSC Audio Product et d’un technicien professionnel diplômé.
Introduction Merci et félicitations pour votre achat des haut-parleurs tout temps multi-usage Acoustic Design AD-S82. Ces produits représentent le meilleur de la technique en matière de systèmes de haut-parleurs SR (sonorisation sélective) légers et tout temps. Pour tirer le meilleur parti de votre investissement, nous vous recommandons de lire attentivement ce manuel.
Montage Si le haut-parleur seul est utilisé (sans le support en option), il peut être placé sur n’importe quelle surface appropriée. Posée sur une surface plane, l’enceinte reposera en position légèrement inclinée vers l’arrière. Utilisée à une puissance élevée, l’enceinte peut produire des vibrations suffisantes et entraîner le léger déplacement de l’enceinte sur une surface dure. Placer un tapis anti-glisse sous l’enceinte ou des pieds en caoutchouc auto-adhésif pour l’empêcher de bouger.
Procédure de montage des modèles ID-8 et ID-8T proposés en option (suite) 3- Choisir le joint en caoutchouc approprié et enfiler le câble du haut-parleur à travers celui-ci. S’assurer que le côté effilé du joint est tourné vers le couvercle. Enfoncer le joint dans l’emplacement qui lui est réservé et visser l’écrou sur le câble du haut-parleur, puis serrer. 5- Avec le loquet ouvert, aligner le haut-parleur avec l’IntelliDock et glisser le haut-parleur pour le mettre en place.
Supports à berceau YM-8 et YM-8T proposés en option Les supports à berceau YM-8 et YM-8T permettent un montage sur la plupart des surfaces et sont réglables sur un axe. Une plaque-couvercle est fournie pour le renfoncement arrière du haut-parleur et se fixe par une vis de retenue. La plaque-couvercle a un trou qui permet d’enfiler le câble, avec un passe-câble en caoutchouc et l’écrou de compression pour empêcher de l’eau de couler le long du câble et dans les connecteurs électriques.
Procédure de montage des modèles YM-8 et YM-8T proposés en option (suite) 5- Dénuder les extrémités des câbles du haut-parleur et connecter les câbles. Avec le modèle YM-8, connecter les câbles directement aux bornes de raccordement. Avec le modèle YM8T, connecter aux bornes 70 V/100 V du couvercle. 5a- Le couvercle du modèle YM-8T est équipé d’un transformateur d’adaptation 70 V/100 V, d’un sélecteur d’alimentation à 4 positions, avec tous les branchements requis précâblés.
Application de peinture sur le haut-parleur AD-S82(H) Le boîtier et la grille du haut-parleur peuvent être peints suivant le décor, à conditions d’observer les précautions suivantes. Le modèle ID-8 IntelliDock et le support à berceau YM-8 peuvent également être peints. L’enceinte est faite de polystyrène anti-choc qui demande des procédures précises d’application de peinture pour obtenir de bons résultats.
WICHTIGE SICHERHEITSVORKEHRUNGEN UND SYMBOLERKLÄRUNG 1. Diese Anleitung sorgfältig durchlesen. 2. Diese Anleitung gut aufbewahren. 3. Alle Warnhinweise beachten. 4. Alle Anleitungen befolgen. 5. Nur mit einem trockenen Tuch reinigen. 6. Die Installation gemäß der Anleitung von QSC Audio Products und eines lizenzierten Fachtechnikers vornehmen. 7. Nicht in der Nähe von Wärmequellen wie Heizkörpern, Öfen oder anderen wärmeabstrahlenden Geräten (einschließlich Verstärkern) aufstellen, die Wärme abstrahlen. 8.
Einführung Wir bedanken uns, dass Sie sich für die Mehrzweck- und Allwetterlautsprecher der Serie Acoustic Design AD-S82 entschieden haben und gratulieren Ihnen zu Ihrem Kauf. Diese Produkte entsprechen dem höchsten Stand der Technik für leichte Allwetter-SR (engl.: Sound Reinforcement/Klangverstärkung)-Lautsprechersysteme. Bitte lesen Sie dieses Handbuch gründlich durch, um Ihre Investition optimal zu nutzen.
Montage Wenn der Lautsprecher ohne das optionale Montagezubehör verwendet wird, kann er auf jeder geeigneten Oberfläche aufgestellt werden. Beim Aufstellen auf einer flachen Oberfläche ist das Gehäuse etwas nach hinten geneigt. Beim Betrieb mit einer hohen Ausgangsleistung kann das Gehäuse so viel Vibrationen erzeugen, dass es sich auf harten Oberflächen bewegt bzw. „wandert”. Mit rutschsicheren Matten unter dem Gehäuse oder selbstklebenden Gummifüßen können Sie verhindern, dass sich das Gehäuse bewegt.
Montageverfahren für die optionale ID-8- und ID-8T-Halterung (Fortsetzung) DE 3. Wählen Sie die geeignete Gummidichtung und fädeln Sie den Lautsprecherdraht durch diese hindurch. Achten Sie darauf, dass die konisch zulaufende Seite der Dichtung zur Abdeckung hin weist. Drücken Sie die Dichtung in ihre Aufnahmefläche hinein; führen Sie die Mutter über den Lautsprecherdraht und ziehen Sie sie an. 4. Schneiden Sie die Drähte auf eine angemessene Länge zu.
Optionale YM-8- und YM-8T-Jochhalterungen Die YM-8- und YM-8T-Jochhalterungen ermöglichen eine Montage an fast allen Oberflächen und sind entlang einer Achse verstellbar. Eine mit einer Halteschraube gesicherte Deckplatte ermöglicht den Zugang zum Lautsprecher von dessen Rückseite aus. Die Deckplatte weist ein Drahtdurchführungsloch mit Gummitülle und Überwurfmutter auf, wodurch verhindert wird, dass Wasser das Kabel hinunterläuft und in die elektrischen Anschlüsse eindringt.
Montageverfahren für die optionale YM-8- und YM-8T-Halterung (Fortsetzung) 5. Isolieren Sie die Enden der Lautsprecherdrähte ab und schließen Sie die Drähte an. Verbinden Sie die Drähte bei Gebrauch der YM-8-Halterung direkt mit den Anschlussklemmen. Wenn Sie die YM-8T-Halterung benutzen, schließen Sie die 70V/100-V-Klemmen in der Abdeckeinheit an. 5a.
Lackieren des AD-S82(H)-Lautsprechers Das Lautsprechergehäuse und das Schutzgitter können zur Angleichung an jedes Dekor lackiert werden, wobei jedoch die folgenden Sicherheitsvorkehrungen zu beachten sind. Die optionale ID-8 IntelliDock-Halterung und die YM-8-Jochhalterung können ebenfalls lackiert werden. Das Gehäuse besteht aus hochschlagfestem Polystyrol, das zur Erzielung guter Ergebnisse ein kontrolliertes Anstrichverfahren voraussetzt.
重要安全规范和符号解释 1- 阅读这些规定。 2- 保存这些规定。 3- 注意所有警告。 4- 遵守这些规定。 5- 只能用用干布擦拭。 6- 按照 QSC Audio Product 的说明并在授权的专业工程师的指导下安装。 7- 不要在热源附近安装,热源指可产生热量的设备,如散热器、热中央处理注册器、炉子或 者其他设备 (包括放大器)。 8- 只使用 QSC Audio Products, Inc.
简介 感谢并祝贺您购买 Acoustic Design AD-S82 多用途、全天候扩音器。这些产品是最好的全天 候、轻量 SR (声音增强)扩音器系统。要从您的投资中获得最大收益,我们鼓励您仔细阅 读本手册。 AD-S82 扩音器系统是全范围、高输出、双向式设计,在轻量的全天候外壳中具有出众的声 效和高 SPL。这些扩音器可为众多的 SR 应用提供极好的选择。 覆盖角度 在安装扩音器之前,确定安装方位和您所要的覆盖角度。出厂扩音器的覆盖角度为 90° (水 平) x 60° (垂直)并有垂直定位的机壳。导波管可以旋转改变覆盖角度。 旋转导波管改变 HF 覆盖模式 1- 去掉支架。轻轻地、平稳地将支架从定位槽中取 出,避免弯曲支架。 2- 去掉八颗导波管固定螺丝。推荐使用 2 号 Phillips 改锥。 3- 探入导波管端口,轻轻地拉出导波管。小心,不 要损坏接线、配线或导波管和机壳之间的垫圈。 CH 4- 将喇叭旋转 90°,然后将之放回原来位置。确定 在旋转装配时,配线不会被过度拉伸或者从其连接 处拉松。 5- 在重新安装导波管螺丝前,稍微抬起该设备,确 定垫圈安装适当。如果需要,重新放置。将导波
安装 如果只使用扩音器 (不选择其他托架),扩音器可设置在任何表面上。安置在平面上时,机 壳会向后倾斜一个小角度。 在高输出水平下操作时,如果放置在硬表面上,机壳会产生震动,使机壳移动或蠕动。在机 壳下面使用防滑席或自粘橡胶脚防止机壳蠕动。 在扩音器后面,靠近底部,是安全缆连接点。安装强度足够支持几倍于扩音器设备的重量的 安全索,以防止扩音器跌落。安全索必须具有第二个支撑点,强度足够支撑数倍于扩音器的 重量。 重要事項!确定扩音器正确安装并装备了安全索可拉住扩音器以防止安装失败。 确定安装表面和支持结构强度足够支撑扩音器设备或可能的震动或地震。 连接安全索到扩音器后面底部的接点。确定安全锁、索连接技术、防护硬件 和接点在严重安装失败时具有足够强度以支撑数倍于扩音器的重量。 CH 可选托架 ID-8 和 ID-8T IntelliDock™ 托架 (YM-8 型 号,参见第 6 页) 此种托架有一个快速连接 / 断开销,可提供 电线连接和高度可调的球形托架。此种托架 使得所有托架和配线的安装以及扩音器安置 可在最快的时间内完成。 設備中包括销的安全固定螺丝,所以在没有 使用正确使用 Allen (十六分)螺
可选的 ID-8 和 ID-8T 安装程序 (续) 3- 选择合适的橡胶密封垫圈,将扬声器 的线穿过它。确定垫圈的锥形端朝向封 盖。将垫圈压入座内,将螺母套在扬声器 线上,并拧紧。 4- 将线裁剪到合适的长度。剥开线端, 连接到终端上。 CH 5- 销子打开状态下,用 IntelliDock 调整扩 音器,将扩音器滑动到合适位置。将销子 按下,直到与锁定位置紧密结合。 6- 将扩音器朝向需要的方向,使用提供的工 具拧紧 Allen (十六分)固定螺丝。插入销 钉,拧到旋转一周 (225°) 的 5/8,达到保护 球形托架的目的。如果有转矩扳手和合适的 十六分的螺丝起子,请拧紧螺钉到 16 N-m (12 lbs-ft)。如果有另外的防盗需求,可安装 所提供的安全螺丝。安装安全索到扩音器的 安全索接点。 37
可选的 YM-8 和 YM-8T 套托架 YM-8 和 YM-8T 套托架可在绝大多数表面上安装, 并可在轴上调整。 扩音器的后凹处有一个盖板,并加有固定螺丝。盖 板有一个穿线孔,并有橡胶孔眼和压紧螺母以防进 水损坏线缆和电线接口。 YM-8T 的套托架盖板配备了一个具有 70V 和 100V 的分布式音频输入功能的音频转换器。 参考托架随附的说明书了解详细信息。 可选的 YM-8 和 YM-8T 安装程序 CH 1- 将套支架安全地放到安装表面上。确 定安装表面和支撑结构强度足够支撑扩音 器组件和任何可能的震动或地震。 3- 将扬声器线穿过盖板。 38 2- 安全地将扩音器放到套支架上。 4- 选择合适的橡胶密封垫圈,将扬声器 的线穿过它。确定垫圈的锥形端朝向封 盖。将垫圈压入座内,将螺母套在扬声器 线上,并拧紧。
可选的 YM-8 和 YM-8T 安装程序 (续) 5- 剥开扩音器线端,接线。如果使用 YM-8,将线直接接入连结位置。如果使 用 YM-8T,连接封盖组件上的 70V/100V 终端。 5a- YM-8T 封盖组件配备有 70V/100V 转 换器、 4 位电源选择开关和所有需要的预 连线接口。只需连接扬声器线到盖内相应 的终端,然后将封盖安装到扩音器上即 可。 YM-8T 中封盖到扩音器的连接是采 用香蕉插头。 CH 6- 调整扩音器后盖並将它滑动到固定位 置。该封盖只能在一个位置卡住。安装封 盖固定螺丝,以免封盖因震动松动并保护 连接免受严重的侵蚀。连接安全索到扩音 器后面底部的接点。确定安全锁、索连接 技术、防护硬件和接点在严重安装失败时 具有足够强度以支撑扩音器的重量。 7- 旋转机壳进入需要的位置,并拧紧安 装柄。 重要事項!确定扩音器正确安装并装备了安全索可拉住扩音器以防止安装失败。 确定安装表面和支持结构强度足够支撑扩音器设备或可能的震动或地震。 连接安全索到扩音器后面底部的接点。确定安全锁、索连接技术、防护硬件和接点在严重安装失 败时具有足够强度以支撑数倍于扩音器的重量。 3
给 AD-S82(H) 扩音器上色 扩音器封盖和支架可涂成与装饰风格匹配的颜色,但必须遵循以下注意事项。可选的 ID-8 IntelliDock 和 YM-8 套托架也可以上色。您需要控制上色过程才能在高密度的聚苯乙烯机壳 上获得好的效果。上色 “系统”是使用著名的供应商所提供适用于聚丙烯材料的涂料。 1- 去掉支架。 2- 如果要将托架和扩音器整体上色:连上 ID-8 或 YM-8,以便扩音器和托架可以整体上色。 3- 如果将支架和扩音器分开上色:蒙住扩音器的输入连接器和 ID-8 内部。 4- 蒙住低音用扩音器、高音用扩音器并确定不会将磁带直接插入的驱动器舱门。或者,完 全蒙住支架内部,并将之放在扩音器盖上进行上色。 5- 用中性肥皂和热水冲洗要上色的组件。小心不要将水溅到驱动器或输入连接上。用热水 冲洗。充分晾干。 6- 用红色的 Scotchbrite® 垫或 320 - 400 砂纸打磨要上色的组件。 7- 使用压缩空气,去除要上色的组件上的灰尘。不要直接将压缩空气吹进驱动器内。 8- 清洁要上色的组件。 9- 使用干净的、没有线头的白布,蘸用合适的溶液,擦拭要上色组件。 10- 应用附着力促进剂。
Notes:
Notes:
Notes:
How to Contact QSC Audio Products Cómo comunicarse con QSC Audio Products Comment prendre contact avec QSC Audio Products Kontaktinformationen für QSC Audio Products 联系 QSC Audio Products Mailing address: QSC Audio Products, Inc.