
User guide

© 2011 Cisco Systems, Inc. All rights reserved. This document is Cisco Public Information. Cisco Validated Design Page 45
3.7.1.3 Provisioning Services (PVS) vDisk Creation
Once the Windows 7 image has initially been created with the required software, it must be extracted into a
Provisioning Server vDisk image. To do this, the Citrix XenConvert 2.1 tool is used which, is part of the PVS
Target Device installation.
To create a PVS vDisk:
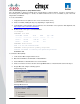
1. Using the PVS Console (Must use the console from the PVS server)
2. Create new vDisk (16GB) (this may vary depending on requirements).
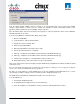
3. Using Diskpart set the partition offset to 1024. For more information on best practice disk alignment, visit
http://support.citrix.com/article/CTX122737.
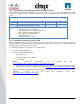
4. From the PVS server open a command window:
C:\>diskpart
DISKPART> list disk
Disk ### Status Size Free Dyn GPT
-------- ---------- ------- ------- --- ---
Disk 0 Online 186 GB 0 B
Disk 1 Online 16 GB 0 B
DISKPART> select disk 1
Disk 1 is now the selected disk.
DISKPART> create partition primary align=1024
DiskPart succeeded in creating the specified partition.
DISKPART> Exit
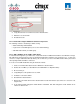
To format the vDisk (NTFS):
1. Un-mount the vDisk using the PVS Console.
2. Attach the New vDisk to the Windows 7 Virtual Machine
3. Set the Windows 7 virtual machine to boot from Network.
4. Create a new device in PVS collection and assign MAC address of virtual machine to this PVS object.
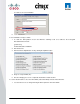
5. Assign vDisk and configure following options:
Private Image mode
Manage AD Password