
User guide

© 2011 Cisco Systems, Inc. All rights reserved. This document is Cisco Public Information. Cisco Validated Design Page 44
3.7.1.1 Create Windows 7 Virtual Machine and Install Standard Software
The following virtual machine configurations and software were used to create the initial Windows 7 virtual
machine on the hypervisor which is then later extracted to create a Citrix Provisioning server vDisk image in .vhd
format.
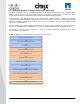
XenDesktop Virtual Desktop Image
OS:
Windows 7 Enterprise 32bit
Service Pack:
-
CPU:
1 x vCPU
RAM:
1536MB
Disk: C:\
E:\
1 x 16GB (PVS vDisk)
1x 3GB Virtual Disk (PVS Write-Cache)
Network:
1 x 1GbE
Software Installed Prior to cloning to vDisk –
o Citrix XenServer Tools on Win7
o Citrix Provisioning Server Target Device 5.6.0
o Microsoft Office Enterprise 2001 SP2
o Internet Explorer 8.0.7600.16385
o Adobe Reader 9.1.0
o Adobe Flash Player 10.0.22
3.7.1.2 Tuning Microsoft Windows 7 Image for VDI
When many Windows desktops run on a hypervisor it is necessary to try to reduce unnecessary CPU cycles and
disk I/O to improve system performance and stability. By turning off unnecessary processes and other unwanted
desktop services for instance helps achieve this.
The following configurations were made to the standard image:
●
Configure fixed 1.5GB page file
●
Configure Networking and Firewall
◦ Turn off firewall
◦ Set DNS IP addresses for domain
◦ Turn off IPV6
●
Windows 7 optimization recommendations from the following Citrix blog -
http://community.citrix.com/pages/viewpage.action?pageId=113247185
◦ Recommended ―Default User Profile‖ settings were also applied and copied to ―Default User‖ using
the latest Forensic User Profile Manager tool, visit http://www.forensit.com/desktop-management.html
●
Citrix PVS TCP Large Send Offload should be disabled on both the PVS server/s and the target device
(Windows 7 image). To do this follow the instructions found here:
http://support.citrix.com/article/CTX117374