
User guide


© 2011 Cisco Systems, Inc. All rights reserved. This document is Cisco Public Information. Cisco Validated Design Page 101
To do this for each server using the XenCenter client ,once each host is added to a resource pool and VLAN
networks created:
1. Server from the list.
2. Select Network Tab.
3. Click the Configure button.
4. Enter Name – Storage.
5. Assign Network (i.e. select VLAN 166 from drop down list).
6. Enter IP and Subnet mask addresses (do not configure gateway as do not want the traffic to route to any other
network).
7. Click OK.
Repeat this process for all servers in each VDA resource pool and authorize these IP address on each volume
using the NetApp configuration manager.
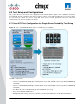
5.9 XenServer Resource Pools
XenServers once built are added to the XenCenter Client so they can be managed and are subsequently added
to appropriate Resource Pools.
Resource Pools have consistent shared Storage and Network configurations which are then in turn assigned to
each host added to the pool. It is best practice to assign and test storage (in this case NFS volumes mounted
from NetApp FAS3170) and Networks to the Pool Master prior to adding pool members
For the test scenarios the following Resource Pools were configured:
●
Infrastructure Pool (for all server virtual machines)
●
Networking: Infrastructure virtual machines also on VLAN 164 so setup as Native VLAN on eth1 as well.