
User guide


Chapter 2 Managing Fabrics 45
Creating an Alias
To create an alias, do the following:
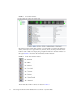
1. Open the Zoning menu, and select Edit Zoning to open the Edit Zoning dialog.
2. Open the Edit menu, and select Create Alias to open the Create Alias dialog.
3. Enter a name for the alias, and click the OK button. The alias name is displayed
in the Zone Sets dialog. An alias name must begin with a letter and be no
longer than 64 characters. Valid characters are 0-9, A-Z, a-z, _, $, ^, and -.
4. Click the Apply button to save the alias name to the zoning database.
Adding a Member to an Alias
You can add a port/device to an alias by domain ID and port number, device port
Fibre Channel address, or the device port WWN. To add ports/devices to an alias,
do the following:
1. Open the Zoning menu, and select Edit Zoning to open the Edit Zoning dialog.
2. Choose one of the following methods to add the port/device:
■ Select a port/device in the Port/Device tree, and drag it into the alias. To select
multiple ports/devices, press the Control key while selecting.
■ Select a port/device in the Port/Device tree. Click an alias to select multiple
ports/devices, press the Control key while selecting. Select an alias. Open the
Edit menu and select Add Members.
■ Select a port/device in the Port/Device tree. To select multiple ports/devices,
press the Control key while selecting. Select an alias. Click the Insert button.
If the port/device you want to add is not in the Port/Device tree, you can add it
by doing the following:
a. Right-click the selected alias.
b. Open the Edit menu and select Create Members.
c. Select the WWN, Domain/Port, or First Port Address option.
d. Enter the hexadecimal value for the port/device according to the option
selected: 16 digits for a WWN member, 4 digits for a Domain/ Port member
(DDPP), or a 6-digit Fibre Channel Address for a First Port Address member
(DDPPAA) where D=domain ID, P=port number, and A=ALPA.
3. Click the OK button to add the member and save the change.