
Installation guide


4 – Installation
Installing a Switch
59055-00 B 4-3
D
Installing a SANbox 5200 switch involves the following steps:
1. Mount the switch.
2. Install SFP transceivers.
3. Connect the switch to the AC power source.
4. Connect the management workstation to the switch.
5. Install the SANbox Manager application.
6. Configure the switch.
7. Cable devices to the switch.
4.2.1
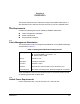
Mount the Switch
The switch can be placed on a flat surface and stacked or mounted in a 19” EIA
rack. Adhesive rubber feet are provided for surface mounts. Without the rubber
feet, the switch occupies 1U of space in an EIA rack. The switch can be rack
mounted without rails, however, rail kits are available from General Devices™
Company, model number C-874:
General Devices Company, LTD.
P.O. Box 39100
Indianapolis, IN 46239-0100
317-897-7000
www.generaldevices.com
WARNING!!
Mount switches in the rack so that the weight is distributed
evenly. An unevenly loaded rack can become unstable possibly
resulting in equipment damage or personal injury.
AVERTISSEMENT!!
Installer les commutateurs dans l’armoire informatique de sorte
que le poids soit réparti uniformément. Une armoire informatique
déséquilibré risque d'entraîner des blessures ou d'endommager
l'équipement.
WARNUNG!!
Switches so in das Rack einbauen, dass das Gewicht
gleichmäßig verteilt ist. Ein Rack mit ungleichmäßiger
Gewichtsverteilung kann schwanken/umfallen und
Gerätbeschädigung oder Verletzung verursachen.