FCC Warning: This device complies wit h part 15 of the FCC Rules. Operation is subject to the following two conditions: (1) This device may not cause harmful interference, and (2) this device must acceptany interference received, including interference that may cause undesired operation. Any Changes or modifications not expressly approved by the party responsible for compliance could void the user’s authority to operate the equipment.
To ensure that your expose to RF electromagnetic energy is within the FCC allowable limits foroccupational use, always adhere to the following guidelines: 1. DO NOT operate the radio without a proper antenna attached, as this may damaged the radio and may also cause you to exceed FCC RF exposure limits. A proper antenna is the antenna supplied with this radio by the manufacturer or antenna specifically authorized by the manufacturer for use with this radio. 2.
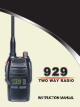
THANK YOU! Thank you very much for choosing our transceiver. The transceiver provides you with reliable, clear and efficient communication service. Our 929 introduces innovative DSP (Digital Signal Processing) baseband technique to achieve high-fidelity voice processing and encryption. 929 is a compact and fashionable transceiver that allows you to enjoy instant communication at ease. The features like novelty, nice timbre, high power (4W), make 929 a high cost-effective professional transceiver.
SAFETY INFORMATION FOR USER Our transceiver is excellently designed with advanced technology. Please observe the following precautions to perform your obligation, prevent personal injury and ensure the safety of transceiver usage. 1. Keep the transceiver and accessories away from children. 2. Please do not try to open or modify the transceiver without permission, non-professionals process may also cause damage. 3. Please use assorted battery and charger to avoid damage. 4.
CONTENTS UNPACKING.......................................................................................01 Supplied Accessories...................................................................................... 01 STANDARD ACCESSORIES/OPTIONAL ACCESSORIES............... 02 Standard Accessories...................................................................................... 02 Optional Accessories.......................................................................................
CONTENTS CTCSS/DCS Encode/Decode ........................................................................ 17 CTCSS/DCS Encode/Decode Setup............................................................... 17 Mode Selection................................................................................................ 18 FM Radio ........................................................................................................ 18 Beep Voice Prompt...........................................................
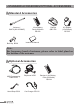
UNPACKING Carefully unpack the transceiver. We recommend you identify the items listed in the table as bellows before discarding the packing material. If any items are missing or have been damaged during shipment, please contact local dealers immediately.
STANDARD ACCESSORIES/OPTIONAL ACCESSORIES Standard Accessories Antenna * QA07V(400-470MHZ) Belt Clip BC06 Li-ion Battery Pack)1300mAh QB-33L Charger QBC-33L AC Adaptor (12V/500mA) QPS-05 Instruction Manual Note: For frequency band of antenna, please refer to label glued on the bottom of the antenna.
BATTERY INFORMATION Charging the Battery Pack The battery pack is not charged at the factory; please charge it before use. Charging the battery pack for the first time after purchase or extended storage (more than 2 moths) may not bring the battery pack to its normal operating capacity. After fully charging/ discharging cycle for two or three times, the operating capacity will reach its best performance.
BATTERY INFORMATION •• Do not charge the battery or transceiver if it is damp. Dry it before charging to avoid danger. WARNING: When keys, ornamental chain or other electric metals contact with the battery terminal, the battery may cause damage or hurt bodies. If the battery terminal short circuit it will generate a lot of heat, please be careful when you carry or use the battery, please put battery or radio into insulated container. Do not put it into metal container.
BATTERY INFORMATION Working Indicator Charging Indicator Transceiver Charge Battery Charge 222Plug the Li-ion battery or the transceiver installed with Li-ion battery into the matched charger. A. Make sure that the battery is well connected with charging connectors. Charging indicator---Red 333Fully charged. Charging indicator--Green. Note: It takes approximately 4 hours to fully charge the battery. But, the actual charging time depends on the dump battery.
PREPARATION Installing / Removing the Battery ■Installing the battery: Match the battery pack with the corresponding guides on the back of the transceiver, and push it upwards till it is fully locked by the battery latch. ■Removing the battery pack: Slide up the battery latch and remove the pack away from the transceiver.
PREPARATION Installing / Removing the Belt Clip ■Installing the Belt Clip: Place the belt clip to the corresponding grooves on the back of the transceiver, and then clockwise screw it. ■Removing the Belt Clip: Anticlockwise turn the screws to remove the belt clip. Installing the Additional Speaker/ Microphone (Optional) Unveil the MIC-SP jack cover and then insert the Speaker/Microphone plug into MIC-SP jack. Note: The transceiver is not completely waterproof while using the Speaker/ Microphone.
GETTING ACQUAINTED LCD Display Screen On the screen, icons for the optional functions are displayed on the screen. It helps a lot when you forget the functions settings.
GETTING ACQUAINTED 1 2 3 4 5 10 6 7 11 12 9 8 09
GETTING ACQUAINTED 111Antenna 222POWER / VOLUME Switch: Turn clockwise to switch on the transceiver, and turn anticlockwise till hearing "Ka" to switch off the transceiver. After switching on the transceiver, turn clockwise to increase the volume and anticlockwise to decrease the volume. 333Jacklight: under standby state, press this key to Emergency Alarm Key to power on the jacklight. Repeat same operation to turn off the light.
GETTING ACQUAINTED Backlight Status and Voice Prompt Warning on low voltage Receive Keypad operation Transceiver emits a low voltage beep at intervals of 60 seconds, and red light twinkles. Backlight lightens all the time Transceiver emits"DU" when entering a function menu, "DU DU" to exit any function.
AUXILIARY FUNCTIONS Users can setup the key [PF1] and PF2] to be one of the optional functions as bellows: •• Squelch off •• Monitor •• Hi/Low Power switch •• Scan •• Frequency Reverse •• Talk around •• Current battery capacity enquiry •• Call •• Temporarily delete interrupting channel For better information on this part, please refer to the "Advanced Operation" instruction.
BASIC OPERATIONS Switch on / off the Transceiver Switch on the Transceiver: Under power-off state, turn POWER/ VOLUME knob clockwise till hearing "Click" to switch on the transceiver. The transceiver will announce "Power on" and current channel. Switch off the Transceiver: When the transceiver is in the open state, turn POWER / VOLUME anticlockwise till hearing "Click" to switch off the transceiver. Switch on/off the Jacklight Under standby state, press the Emergency Alarm Key to switch on the jacklight.
BASIC OPERATIONS dot on the LCD twinkles. Under this state, press / to set to increase the frequency desired current frequency. Press value by step, to decrease the frequency value. Press [PF1] or [PF2] key to confirm the selected frequency and exit the frequency setting mode. After entering the setting mode, if users do not set the frequency or not exit the mode after adjusting the frequency, the transceiver will exit the setting mode automatically after 10seconds.
BASIC OPERATIONS need to press repeatedly till the channel number displayed on the LCD twinkles, secondly, press or to up or down the channel number, and then the transceiver will announce the adjusted channel number. Press to downward the channel to upward the channel number and number. Press any key except , to confirm and exit.
BASIC OPERATIONS into microphone. Please keep around 2.5-5cm distance between microphone and your lip. And please speak in normal tone to make the receiver obtain best tone quality. Note: Pressing and holding [PTT], if the backlight lightens for 10seconds and goes out afterwards and TX icon displayed on the LCD, the transceiver is transmitting. Release the PTT to receive. Emergency Alarm Function Press this key for over 3 second to start the Emergency Alarm Function.
FUNCTIONS SETUP Basic Functions Setup 1. Press repeatedly to select desired sub-menu to setup. 2. Press / to set desired function value. 3. Press [PF1] or [PF2] to save and exit. CTCSS/DCS Encode/Decode When the transceiver is edited with this function, only when CTCSS/DCS signaling is received can the transceiver hear the calling of the other party. Transceivers that have matched CTCSS/ DCS or do not setup with any signaling can hear your call. till "UF" icon is displayed on 111Repeatedly press the LCD.
FUNCTIONS SETUP 222Press / to select desired CTCSS/DCS decode. CTCSS: 67-254.1H, totally 50 groups. Default: 67HZ. DCS: 017N-765I, totally 232 groups. "N" on the LCD means positive code. "I" on the LCD means inverse code. Default: 017N 333Press [PF1] or [PF2] to save and back to standby state. NOTE: The icon "N" or "L" will hide when CTCSS/DCS encode/decode function is closed. Mode Selection There are two modes for option, VFO (frequency mode) and Channel mode.
FUNCTIONS SETUP OFF: turn off FM radio function (reset the transceiver when FM radio is on can also turn this function off) 333Press [PF1] or [PF2] to exit. NOTE: to search FM When FM radio function is on, press / radio station and announce current channel number. When a certain radio station is detected, the radio will rest on the station. The radio can transmit or receive when FM radio is on. Beep Voice Prompt 111Press repeatedly till "BEP" on the LCD twinkles.
FUNCTIONS SETUP On/Off VOX When this function is enabled, you can begin transmitting by fitted high voice, no needing to press the [PTT] key. 111 Press repeatedly till "VOX" on the LCD twinkles. 222Press / to on/off VOX function. ON: turn on VOX function OFF: turn off VOX function 333Press [PF1] or [PF2] to exit. NOTE: To manually set this function, users need to enable this function via programming software firstly, otherwise this option will hide.
FUNCTIONS SETUP channel mode. Under VFO mode, users can upward or downward the frequency by frequency step. 111Under standby state, Press repeatedly till "STP" icon and current value of frequency step are displayed on the LCD. 222Press / to select desired value. There are five options: 5k, 6.25k, 10k, 12.5k. 333Press [PF1] or [PF2] to exit. NOTE: This function is invalid under channel mode.
ADVANCE OPERATIONS [PF1] and [PF2] are programmable, which can realize certain functions as bellows via programming software. NOTE: To start the function programmed on the [PF1]-1s or [PF2]-1s, users need to press and hold [PF1] or [PF2] till the transceiver voice "DU" and then release. Repeat the above operation to turn off the programmed function.
ADVANCE OPERATIONS "H" icon on the LCD means high power. "L" icon on the LCD means low power 2. Scan Scan function can be used to monitor every channel. Under the standby state, pressing the programmed "Scan" key, transceiver emits "Du" beep and comes into scan state. It scans channels in scan list one by one. When one channel receives a matched signal, the transceiver temporarily stays in this channel till the signal disappears.
ADVANCE OPERATIONS Note: Under the talk around state, the transceiver can not communicate with other transceivers via repeaters. Battery Capacity Enquiry Pressing the programmed "Battery Capacity Enquiry", the transceiver will announce current battery capacity. There are 10 grades in total. Grade 10th means full battery capacity. When the battery state is grade 1th(6.1V), the LED lights red. The transceiver will voice prompt users to charge timely and also enter automatically the state of no transmission.
ADVANCE OPERATIONS deletes this channel from scan list. But the priority channels cannot be temporarily deleted. If only one or two channels are in scan list, this operation is not available. Restart the transceiver to add the temporarily deleted channels into scan list again.
BACKGROUND OPERATIONS Wide / Narrow Band Setup On the basis of national conditions, users can set channel spacing as 12.5K (narrow band) to communicate on the transceiver by programming software. This transceiver can realize 12.5K (narrow band) etc as communication way. NOTE: "N" on LCD indicates narrow band. Otherwise it is wide band. Busy Channel Lockout When BCL function is enabled, you can not transmit in busy channel.
BACKGROUND OPERATIONS using a channel for an extended period of time. If you continuously transmit for a period of time that exceeds the programmed time set in advance, the transceiver will stop transmitting with voice prompt. Users can set TOT timer by programming software. Time-Out Timer Pre-Alarm The Time-Out Timer Pre-Alarm is to alarm users that overtime transmission is pending. Users can program desired TOT Pre-Alarm time by programming software.
BACKGROUND OPERATIONS This transceiver is setup with different ways to return to appointed channel. Users can choose the desired way by programming software. NOTE: Users can set the basic and advanced operations via programming software.
Resume Factory Default Once transceiver works abnormally for wrong operations or wrong programming, users can start this function to resume all functions and channels as Factory Default. Press [PTT] and [PF1] key synchronously to switch on transceiver. Holding the two keys for more than 1 second, the transceiver will resume Factory Default after announcing current channel number. Maintaining and Cleaning Cover the jack with its opercula when the transceiver is not at use.
TECHNICAL SPECIFICATIONS General Frequency Range UHF:400-470MHZ Channel Capacity 128 channels Channel Spacing 12.5KHz Phase-locked Step 5KHz, 6.25KHz Operating Voltage 7.4 DC ±20% Battery Life More than 8 Hours (5-5-90 duty cycle with 1200mAh Libattery) Frequency Stability ±2.
TECHNICAL SPECIFICATIONS Power Output Modulation Adjacent Channel Hum & Noise Spurious Emission Audio Response Audio Distortion Transmitting Part 4W/1W 11KΦF3E ≥65dB ≥40dB ≤-36dB 6dB / per interval ≤5% Note: No further advice when any necessary amendments are made for technical need.
TROUBLE SHOOTING GUIDE Problem No power. Battery power dies shortly after correctly charging. Transceiver cannot scan All band noisy after programmed or green light always lightens No sound after using microphone for a while Communication distance becomes short, and it is low sensitivity Cannot talk to or hear other members in your group Corrective Action A.The battery pack may be exhausting. Recharge or replace the battery pack. B. The battery pack may not be installed correctly.
TROUBLE SHOOTING GUIDE Can not power on or frequent power-off The other party gets low or intermittent receiving sound Intermittent receiving with big noise. Loudspeaker become lower or with "ka ka" sound after using a certain time Receive voice from the other party but can not transmit Receiving indicating lam (green light) lightens but no sound Can not adjust channels 34 Check whether the battery touch is out of sharp or broken. Check weather the MIC is stoppage.
ATTACHED CHART CTCSS Frequency Chart 1 2 3 4 5 6 7 8 9 10 11 67.0 69.3 71.9 74.4 77.0 79.7 82.5 85.4 88.5 91.5 94.8 12 13 14 15 16 17 18 19 20 21 22 97.4 100.0 103.5 107.2 110.9 114.8 118.8 123.0 127.3 131.8 136.5 23 24 25 26 27 28 29 30 31 32 33 141.3 146.2 151.4 156.7 159.8 162.2 165.5 167.9 171.3 173.8 177.3 34 35 36 37 38 39 40 41 42 43 44 179.9 183.5 186.2 189.9 192.8 196.6 199.5 203.5 206.5 210.7 218.1 45 46 47 48 49 50 225.7 229.1 233.6 241.8 250.3 254.
ATTACHED CHART DCS Chart 1 2 3 4 5 6 7 8 9 10 11 12 13 14 15 16 17 18 19 20 017 023 025 026 031 032 036 043 047 050 051 053 054 055 065 071 072 073 074 114 21 22 23 24 25 26 27 28 29 30 31 32 33 34 35 36 37 38 39 40 115 116 122 125 131 132 134 135 143 145 152 155 156 162 165 172 174 205 212 217 41 42 43 44 45 46 47 48 49 50 51 52 53 54 55 56 57 58 59 60 223 225 226 243 244 245 246 251 252 254 255 261 263 265 266 271 274 305 306 311 61 62 63 64 65 66 67 68 69 70 71 72 73 74 75 76 77 78 79 80 315 81 32
A1.