LR802UKG 802.
Contents: • Windows Vista Driver Installation Uninstalling the Wireless LAN Card • Windows XP SP2 Driver Installation Uninstalling the Wireless LAN Card Configuring the Wireless LAN Card Connecting to an existing network Configuring the Wireless LAN Card Attachment Note: This product standardized the Radio Frequency Module:「 XXXyyyLPDzzzz-x 」. The system manufacturer is required to attach this Module Approval Label to the system prior to delivery.
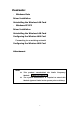
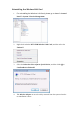
W indows Vista Driver Installation 1. After you have installed the Wireless Adapter your computer will display a Found New Hardware wizard screen, click Cancel to continue. 2. Under your windows environment, go to Start Control Panel System Device Management to check whether 802.11.WLAN is detected. 3. On the other devices Area, right-click the 802.11bg WLAN, and then select the Update Driver Software. 4. Update Driver Software – 802.
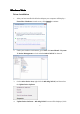
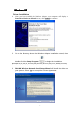
Browse my computer for driver software. 5. Select the correct folder for your driver software, and then click Next to continue. 6. Wireless Adapter Driver is installing.
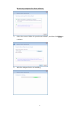
7. Note: Driver software update successfully. Click Close to continue. If you have installed the Windows Vista. You can use the Connect to a Network for Wireless Connection and Configuring. Please refer the Windows Vista User’s Guide.
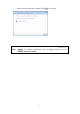
Uninstalling the Wireless LAN Card 1. For uninstalling the Wireless LAN Card, please go to: Start Control Panel System Device Management. 2. Right-check whether RT73 USB Wireless LAN Card, and then select the Uninstal.l 3. Select the Delete the driver software for this device, and then click OK to Confirm Device Uninstall. 4. The Wireless Adapter can now be safely removed from the system when the un-installation is done.
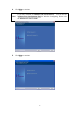
Windows XP Driver Installation 1. After you have installed the Wireless Adapter your computer will display a Found New Hardware Wizard screen, click Cancel to continue. 2. Go to the directory where the Wireless Adapter Installation stored, then double-click the Setup Program to begin the installation. (Exsample: IS_AP_STA_7x_D-1.1.4.0_2500_D-2.1.0.0_RU-1.2.7.0_AU_1.1.4.0_111606_0.0.7.0.exe) 3. RALINK Wireless Network Card Setup Wizard will install the driver on your system.
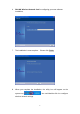
4. Click Next to continue. Note: 5. If you have installed the Windows XP Service Pack 2. You can use the Windows Zero Configuration Tool for Wireless Configuring. Please refer the Windows XP User’s Guide. Click Next to continue.
6. RALINK Wireless Network Card is configuring your new software installation, 7. The installation is now complete. Please click Finish. 8. When you complete the installation, the utility icon will appear on the system tray ( ). You could double-click it to configure wireless network settings.
Uninstalling the Wireless LAN Card 1. For uninstalling the Wireless LAN Card, please go to: Start Programs Ralink Wireless under Windows environment. Then click Uninstall – RT7x. 2. Select Remove all to uninstall the Wireless LAN Card driver and utility.
3. Wait for removing the driver and utility. 4. After completing the uninstallation, click Finish to restart your computer.
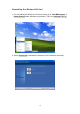
Configuring the Wireless LAN Card Double-click the utility icon in your system tray to begin the utility configuration. Connecting to an existing network Select Site Survey Tab, all available Access Points would be listed. Click on the desired Access Point, and click Connect to connect.
Configuration Profile The Profile Tab allows you to set values for all parameters by selecting a previously defined profile. To create a profile, click Add, type a profile name and set the corresponding parameters. If one of the profiles is no longer used, you may remove it by clicking the Delete button. After changing parameters, click the Activate button to take effect. You can have multiple profiles and modify the profile at any time.
Status The field shows the association status to available Access Point with SSID MAC address of the Access Point. Current Channel Shows the channel on which the connection is made. Current Tx Rate Shows the highest transmit rate of the current association. Throughput (Kbits/sec) This displays the instantaneous wireless Receive and Transmit throughput in Kbits per second. Link Quality / Signal Strength The Link Quality and Signal Strength bar graph is only active when the node is in Infrastructure Mode.
Add to Profile You may select an Access Point, and click Add to Profile to include it to Profile List. Under Add Profile screen / System Configuration Tab, you may set Power Saving Mode, Network Type, RTS Threshold, and Fragment Threshold. Under Add Profile screen / Authentication vs. Security Tab, you may set Authentication Type, Encryption Type, WPA Pre-Shared Key, and Wep Key. Click OK when you have finished the settings. Or click Cancel to abort your new settings for Add to Profile.
After fishing the Add Profile, Check Profile Tab, you may find the new added profile in Profile List. Statistics The Statistics Tab provides information about the Transmit and Receive frames.
Advance The Configuration Utility also offers the advanced configuration for user to set the Wireless Adapter under certain network environment. These advanced options include Wireless mode, B/G Protection, Tx Rate, and Turn On/Off RF. QoS QoS Tab shows to provide Power Save and Direct Link.
About About Tab shows the product version including the detail of Configuration Utility Version, Driver Version, EEPROM Version, and NIC MAC Address.
Attachment Federal Communication Commission Interference Statement This equipment has been tested and found to comply with the limits for a Class B digital device, pursuant to Part 15 of the FCC Rules. These limits are designed to provide reasonable protection against harmful interference in a residential installation.
This device is intended only for OEM integrators under the following conditions: 1) The antenna must be installed such that 20 cm is maintained between the antenna and users, and 2) The transmitter module may not be co-located with any other transmitter or antenna, 3) For all products market in US, OEM has to limit the operation channels in CH1 to CH11 for 2.4G band by supplied firmware programming tool. OEM shall not supply any tool or info to the end-user regarding to Regulatory Domain change.
Canadian Regulatory Wireless Notice This device complies with RSS-210 of the Industry Canada Rules. Operation is subject to the following two conditions: 1) this device may not cause interference and 2) this device must accept any interference, including interference that may cause undesired operation of the device IMPORTANT NOTE: IC Radiation Exposure Statement: This equipment complies with IC radiation exposure limits set forth for an uncontrolled environment.