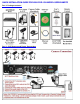
QUICK INSTALLATION GUIDE FOR H264 DVR 4 CH MODEL QSDR4V4MRTC Part 1- Package contents: Part 2 – DVR Camera and Power Connections
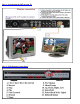
Part 3 – Connecting the DVR to your TV Part 4 – DVR Controls: Front Panel
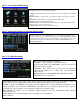
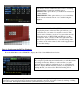
Part 5 – Accessing the DVR menus Push MENU from the DVR front panel, or remote. The Main Menu offers the following Setup Features: CAMERA: Setup name display, position, image view, and record quality of each channel (cameras). RECORD: Enable recording & audio, set resolution & quality, recording mode and file size. NETWORK: Setup Network access (Remote Internet Monitoring). SEARCH: Find files for playback and backup.
Grid Explanation: Red=Alarm (motion detection) recording Green=General (time schedule) recording Transparent=No recording Blue=The channel and date selected. Manual Recording: From the Record Setup screen set the Rec Mode to “ALWAYS”. Your DVR will continuously record and separate files will be created with the Pack Time Intervals you selected. Time Schedule Recording: From the Record Setup screen, set the Rec Mode to “TIME SCHEDULE RECORD” and click “SCHEDULE” in green.
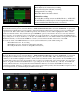
The Motion detection Menu has three sections, including Channel Status, Sensitivity and Motion area. STATUS: This option allows you enable motion detection on any channel. SENSITIVITY: This option allows you to set sensitivity level of motion detection from 1 to 4, with 4 being the highest. Next, click on the MD AREA SETUP button, which will display the picture on the left. This option allows you to select the area you want to be sensitive to motion. The area in red is sensitive to motion.
File list: On the Video search menu mode, click File list to display the submenu shown in the picture on the left. This option will allow you to view all of the available files by channel and type (all, normal, or alarm). You can select a file and push the SEL button to playback the file, or use the FWD button and down button to select the backup option and backup the recorded file you selected.